5.3. Project Trashand the Disk-Space Paradox You can get rid of a clip either by selecting it and then pressing the Delete key or by dragging it directly onto the project Trash icon (shown back in Figure 4-5). This iMovie feature is radically different than in iMovie 4 and earlier, for better and for worse . The iMovie Trash has a lot in common with the iPhoto Trash, the Finder's Trash, or the Windows Recycle Bin: It's a safety net. It's a holding tank for clips, photos, and sounds that you intend to throw out. They're not really gone, though, until you use the File  Empty Trash command. Empty Trash command. Just as in those other Trashes, you can open the iMovie Trash "folder," look over and even play back the clips inside, and rescue or delete individual audio and video clips without emptying the whole Trash. To open the Trash window, click the Trash icon or choose File Show Trash. See Figure 5-4 for details.
Tip: If you just want to empty the whole Trash right now, without having to wait for the Trash contents window to open, press the  and Option keys as you click the Trash icon. and Option keys as you click the Trash icon.
You should also be aware that: -
Whenever you choose File Empty Trash (or -Option-click the Trash can), iMovie first saves your project. (A message even appears to tell you so.) And that means that you lose your ability to undo your recent steps; the Undo command is dimmed. In fact, emptying the Trash also disables the Revert to Saved command and vaporizes whatever's on your Clipboard. (You can still use the Revert Clip to Original command, however.) So when would you ever choose File Empty Trash? The short answer is, only when you need to reclaim the hard-drive space it's taking up, and perhaps once when your project is finished. -
On the other hand, emptying the project Trash doesn't always restore free disk space, for technical reasons described on the next page. -
Emptying the Trash is no longer likely to corrupt your iMovie projecta rare but deeply upsetting occurrence in some earlier versions. Figure 5-4. Top: This message often appears when you open up an iMovie project you made with a previous version. It's calling your attention to the fact that you can now open the Trash and look over its contents individually.
Middle: If you click the Trash icon (or click View Trash in the dialog box above), the Trash window opens. Click a clip to select itand to make it appear, in tiny, QuickTime, playable form, at the right side of the box, so you can see what you're dealing with. If you decide you don't want to lose this clip after all, you can drag it right out of this box and back into the Clips pane or the Movie Track.
Bottom: On the other hand, if you don't want to hang onto the selected clip or clips, click Delete Selected Clip(s). Or click Empty Trash if you want to nuke the whole lot. Either way, a variation of this message appears, filling you in on the import of your decision. 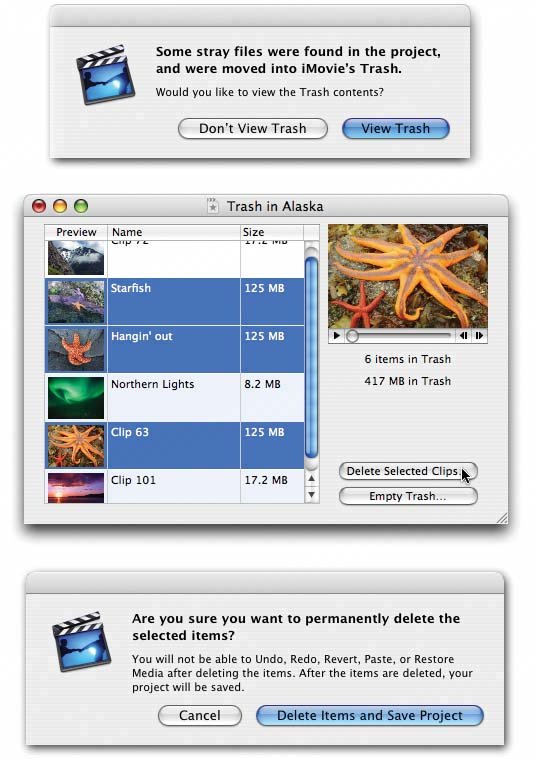 -
Emptying the Trash is very fast, even if there are thousands of clips in there. 5.3.1. The iMovie Disk-Space Conundrum It happens to everybody. Sooner or later, you'll wind up with a ton of stuff in your iMovie Trash. But when you empty it, the little "free disk space remaining" counter doesn't change at all. You had 2 gigs available before you empty the Trash, and the same amount after. This bizarre effect has to do with iMovie's incredible editing safety net, which brings good news and bad news to anyone who'd grown used to iMovie 4 and earlier versions. The blessings: -
You can chop, truncate, split, and shorten clips to your heart's contentand then, at any time, months or years later, restore what you'd eliminated. You can drag the right end of a shortened clip to reveal footage you'd previously hacked away, or you can use the Revert Clip to Original command at any time, even after emptying the Trash. ( In iMovie 4 and previous versions, emptying the Trash meant that portions you cut from clips were gone forever.) -
You can even restore or revert clips you've pasted into another project. -
You can pull a clip out of the Trash at any time until you empty it. -
When you empty the project Trash, you fling the associated video clip into the Mac's Trash (the one in the Finder). That gives you another safety net for recovering something you deleted by accident . The curse: -
These features work because iMovie quietly preserves the entire copy of every clip you place into your movie. If you chop off and delete the right half of a clip, emptying the Trash doesn't give you back one single byte of disk space. iMovie is hanging onto the entire original clip , just in case you change your mind someday. In other words, if you've used 1 minute of a 45-minute clip in your movie, emptying the Trash doesn't delete the remaining 44 minutes or give you back any disk space. So iMovie project files often wind up consuming huge amounts of disk space. The only time emptying the Trash actually frees up disk space, in fact, is if you've put an entire clip into it. If even one frame of it appears in the Timeline, iMovie still preserves the entire original clip on your hard drive. -
Copying and pasting clips between projects can make projects balloon in size . That's because, if you copy that 2-second clip from Project A into Project B, iMovie copies the entire, 45-minute underlying source file. In fact, if you copy two clips ("Laughing" and "Laughing/1") that are both derived from the same original clip, iMovie copies the entire underlying 45-minute source file twice . (Unless you copy both at the same time, that is.) -
When you drag a clip out of iMovie ( to the Finder, to iDVD, or anyplace else), iMovie HD copies the entire source file, not just the clip. -
When you delete a clip from the Trash window, you don't know whether or not other clips refer to the same original source file. Therefore, you never know whether or not you'll actually regain any disk space. If you, like thousands before you, sort of wish that iMovie wouldn't keep hanging onto these gigantic swaths of disk space unnecessarily, here are two workarounds worth exploring.
Note: In addition to the following after-the-fact tactics, don't miss the clip-shortening import trick described in Section 4.4.2.2.
5.3.1.1. Solution 1: The invisible title trick Suppose you're starting with a two-minute clip. You want to retain only a 30-second piece near the middleand you're sure you won't be needing the end pieces again. In this case, you can force iMovie to turn that middle chunk into a new, standalone clipand thereby permit the rest of the original clip to go into your digital dustbinby covering it up with a title . Ordinarily, of course, adding a title means superimposing text on your video; but in this case, you'll be adding a blank title. To do this, highlight the portion of the clip that you want to keep. Click the Editing button, then the Titles button. Click a title style, like Centered Title (your choice here makes no difference). Delete all dummy text that iMovie proposes. (See Section 7.1 for more on adding titles.) Now drag the Speed and Pause sliders until the Duration readout (just above the Add button) says :30 or whatever length you want the finished clip to be. Finally, click Add. iMovie responds by creating a new title clip, free of the baggage it once carried behind the scenes. You're not quite finished, however. After adding the title clip, drag it and the other pieces of the original clip to the iMovie Trash. Finallypointless as this may seemdrag only the title clip (called "Centered Title," for example) back into the movie track. (For some reason, the title clip doesn't surrender its ties to the original clip unless you do this Trash-and-back routine.) Now when you empty the Trash, you'll see your disk-space meter (next to the Trash icon) go up as your disk space is returned to you! 5.3.1.2. Solution 2: The export/ re-import trick Another approach: export the shortened clip and re-import it, cutting its cord to the full-size original. That is, highlight the clip, choose Share QuickTime, turn on "Share selected clips only," and choose Full Quality from the pop-up menu. Once youve saved the stand-alone clip to your hard drive, re-import it into your project (either by dragging its icon from the desktop or by using the File Import command.) Now you can delete the original long clip from your project. Ugly, but it works.  |