Section 2.7. Video Lighting: A Crash Course
2.7. Video Lighting: A Crash CourseToday's camera optics are good, but they're not human eyeballs. Every camera, from your camcorder to professional TV and film models, captures truer color , depth, and contrast if lighting conditions are good. The need for bright light grows more desperate if:
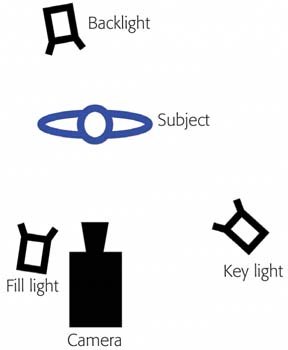
If your camcorder doesn't have a light attachment, or if you want to get more serious yet, consider deliberately lighting the scene, just like TV and film cinematographers the world over. Going to this extreme isn't always necessary, of course. If it's just you filming the New Year's Eve party, you're better off not asking the revelers to sit down and be quiet while you set up the lights. But when you're conducting interviews, shooting a dramatic film, making a video for broadcast, or making a QuickTime movie for distribution on a CD-ROM, lights will make your footage look much better. The following discussion is dedicated to illuminating those more important filming situations. When you want the very best footage, lit the way the pros would light it, the following guidelines, theory, and equipment suggestions will serve you well indeed. (If you're just shooting kids , relatives, or animals indoors, at least turn on every light in the room.) 2.7.1. Lighting BasicsCinematographers spend entire careers studying the fantastically complex science of lighting. Here's what they worry about. 2.7.1.1. ExposureExposure refers to lightthe amount of illumination the camera picks up. When the scene is too dark, you lose a lot of detail in dark shadows. Worse, your camcorder's AGC (Automatic Gain Circuit, the video equivalent of the audio-leveling circuitry described in the previous section) tries to amplify the available light. The result, which you can see for yourself by filming in dim light, is video noise (colored speckles) and unrealistic colors (black becomes a noisy , milky dark gray). If the scene is too bright, on the other hand, details can wash out, disappearing in white areas. 2.7.1.2. ContrastThe contrast ratio is the ratio of the brightest highlights in a scene to the darkest shadows. Professional filmmakers often set up huge arrays of extra lights to reduce the contrast ratio, thus evening out the illumination so that the camera can record more detail accurately. (When watching a movie being filmed, you sometimes see huge lights set up, even in daylight : they're there to fill in the shadow areas, so that the camera can "see," for example, the actors' eyes.) Film cameras can photograph details in a scene that has a 10:1 contrast ratio (highlights are 10 times brighter than the dark shadow areas). Video, on the other hand, can't capture details outside a contrast ratio of about 3:1 or 4:1. That's another reason lighting is much more important when using a camcorder, as noted above. 2.7.1.3. Hard light vs. soft lightHard light comes from a small light source falling directly on an object. It creates hard edges between the highlight and shadow areas. For example, when someone's standing in direct sunlight, the shadows on his face are harsh and dark. This high contrast emphasizes wrinkles , skin blemishes, baggy eyes, and other facial features. In other words, hard light is unflattering light. Soft light , on the other hand, is less direct, offering softer, smoother gradations of light from brightest to darkest areas. You get soft light from a large light source, usually reflected or diffused, like the outdoors light on an overcast day or the light reflected from the umbrellas used by photographers. The result: soft shadows or no shadows; everything is lit fairly evenly. Soft light is much more flattering to human subjects, because it de-emphasizes wrinkles and other facial contours. Unfortunately, soft light can also make your subjects appear flat and lifeless. Harder light can reveal contours , shapes , and textures, making objects more interesting and three-dimensional. The best video lighting, therefore, comes from direct light sources that are mechanically softened. That's why many video lights have milky translucent covers. 2.7.1.4. Key, fill, and backlightIn professional film and TV work, the most common lighting arrangement is called the three-point lighting setup . It requires that you set up at least three light sources, as shown in Figure 2-4:
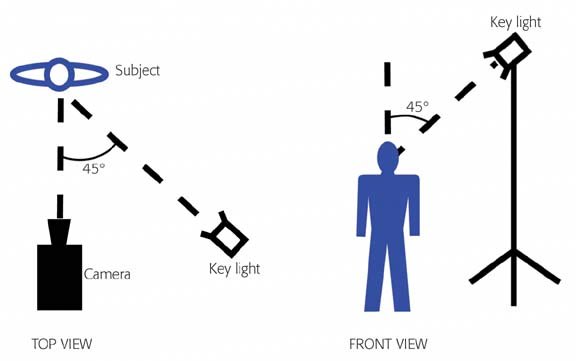
2.7.1.5. Color temperatureBelieve it or not, even ordinary daylight or room light also has a color . In general, daylight has a bluish cast, fluorescent light is greenish, and household bulbs give off a yellowish light. Filmmakers call these color casts the color temperature of the light. We don't usually notice the color casts of these common light sources because our eyes and minds have adjusted to it. DV camcorders usually do an excellent job of compensating to avoid noticeable color casts, thanks to the automatic white balance in the circuitry of every modern model. If, even so, you notice that certain shots are coming out too blue, green, or yellow, you can help the camcorder along by switching on one of its programs (as several manufacturers call them)presets for Daylight, Indoor Light, Snow and Ski, and so on. Each is represented in your viewfinder by an icon (such as a sun or a light bulb). When you use these presets, the camcorder shifts its color perception accordingly . And if even those adjustments don't fix a particular color-cast problem, your camcorder may offer manual white balance. White balancing means identifying to the camera some object that's supposed to look pure white, so that it can adjust its circuitry accordingly. To use the manual white-balance feature, focus on something white that's illuminated by the key lightfor example, a clean T-shirt or piece of paper. Zoom in until the white area fills the screen, then press the White Balance button. The camcorder responds by compensating for the dominant color in the light. 2.7.1.6. The 45/45 RuleThis lighting guideline suggests that the key light be at a 45-degree angle to the camera-subject line and at a 45-degree angle above the ground (see Figure 2-5). 2.7.2. General Guidelines for LightingThe preceding discussion gives you the theory of lighting design. Here's the executive summarya distillation of that information down into just a few points to remember for the most professional-looking lighting.
|
EAN: N/A
Pages: 203