14.2. QuickTime Player Pro If you've spent the $30 to upgrade to the Pro version of QuickTime Player, you've unlocked a number of additional features. Some of these are playback tricks described in the previous section; others are especially useful for iMovie work. Read on. 14.2.1. Presenting Your Movies After going to the trouble of editing down your footage (as described in Part 2) and exporting it as a QuickTime movie (as described in Chapter 12), what you may want to do most of all is to show the movie to other people. Even the non-Pro version of QuickTime Player can play movies, of course, but the Pro version offers a much better showcase for your work: the View  Present Movie command. Present Movie command. "Presenting" your movie is the best possible way to view a QuickTime movie on your screen. When you use this command (Figure 14-3), QuickTime Player blacks out the screen, automatically magnifies your monitor image (by choosing a lower resolution) so that the movie fills more of the screen, and devotes all the Mac's power to playing the movie smoothly. (To interrupt the movie, press  -period.) -period.) Figure 14-3. The Present Movie command makes the movie fill your screen (although enlargement makes the movie grainier and coarser). 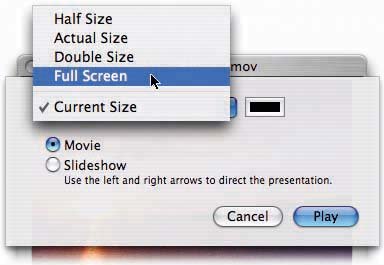
14.2.2. Editing Movies The most powerful feature you gain in the Pro version is its ability to edit QuickTime movies. You can rearrange scenes, eliminate others, and save the result as a new movie with its own name . All of this is perfectly possible within iMovie itself, of course, but sometimes you'll want to edit one of the QuickTime movies you've already exported from iMovieto make it shorter for emailing, for example.
Tip: QuickTime Player can open and edit DV clips, which is iMovie's format. In fact, you can drag any clip directly out of iMovie (either the Movie Track or the Clips pane) directly onto the QuickTime Player icon on your Dock, if it's there. (If not, you can drag the clip out of iMovie's window and onto the desktop; double-clicking opens it up in QuickTime Player.) This trick may come in handy if you want to edit a clip you've already imported, using some feature that's available only in QuickTime Player but not in iMovie.
14.2.2.1. Selecting footage Before you can cut, copy, or paste footage, QuickTime Player needs to provide a way for you to specify what footage you want to manipulate. Its solution: the two tiny gray triangles beneath the horizontal scroll bar, visible in Figure 14-4. These are the "in" and "out" points, exactly like the crop handles in iMovie. By dragging these triangles, you're supposed to enclose the scene you want to cut or copy.
Tip: You can gain more precise control over the selection procedure shown in Figure 14-4 by clicking one of the triangles and then pressing the right or left arrow key, exactly as when using the Scrubber bar under iMovie's Monitor window. Doing so expands or contracts the selected chunk of footage by one frame at a time.You may also prefer to select a piece of footage by Shift-clicking the Play button. As long as you hold down the Shift key, you continue to select footage. When you release the Shift key, you stop the playback, and the selected passage appears in gray on the scroll bar.
Figure 14-4. Figure 14-4: QuickTime Player Pro has a little-known subtitling feature, complete with freedom of type style. Copy some formatted text from a word processor; highlight a slice of footage in QuickTime Player; and choose Edit Add to Movie. The copied text appears as a subtitle on a black band , beneath the picture, as shown here. 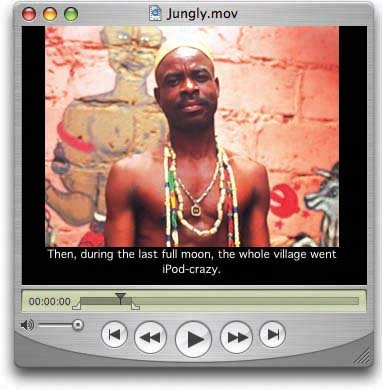
Once you've highlighted a passage of footage, you can proceed as follows : -
Jump to the beginning or end of the selected footage by pressing Option-right or -left arrow key. (This doesn't work if one of the handles is highlighted.) -
Deselect the footage by dragging the two triangles together again. -
Play only the selected passage by choosing View Play Selection Only. (The other Movie menu commands, such as Loop, apply only to the selection at this point.) -
Drag the movie picture out of the Player window and onto the desktop, where it becomes a movie clipping that you can double-click to view. -
Cut, copy, or clear the highlighted material using the commands in the Edit menu.
Tip: If you paste some copied text directly into QuickTime Player Pro, you get a 2-second title (such as an opening credit) at the current frame, professionally displayed as white type against a black background (Figure 14-4). QuickTime Player automatically uses the font, size , and style of the text that was in the text clipping. You can paste a graphic image, too; again, you get a 2-second "slide" of that still image.If you find it easier, you can also drag a text or picture clipping file directly from the desktop into the QuickTime Player window; once again, you get a two-second insert. To make the text or picture appear longer than 2 seconds, drag or paste it several times in a row.In either case, you specify the fonts, sizes, and styles of your low-budget titling feature by formatting the text that way before you copy it from your word processor. (This feature requires a word processor that preserves such formatting on the Clipboard. Stickies, TextEdit, Word, AppleWorks, and America Online are all examples.)
14.2.2.2. Pasting footage After cutting or copying footage, you can move it elsewhere in the movie. Specify where you want the pasted material to go by first clicking or dragging in the horizontal scroll bar, so that the black Playhead marks the spot; then choose Edit Paste. The selection triangles (and their accompanying gray scroll bar section) show you where the new footage has appeared. (That makes it easy for you to promptly choose Edit Cut, for example, if you change your mind.) There are several variations of the Paste command at your disposal, too. They work like this: -
The Edit Trim to Selection command is like the Crop command in iMovie, in that it eliminates the outer parts of the moviethe pieces that aren't selected . All that remains is the part you first selected. -
The Edit Add to Movie command adds whatevers on the Clipboard so that it plays simultaneously with the selected footagea feature that's especially useful when you're adding a different kind of material to the movie (see Figure 14-4). -
If you highlight some footage and then choose Edit Add to Selection & Scale, whatever youre pasting gets stretched or compressed in time so that it fits the highlighted region, speeding up or slowing down both audio and video. The effect can be powerful, comical, or just weird. (Can you say, "Alvin and the Chipmunks"?)
Tip: You can edit sounds exactly as you edit movies, using precisely the same commands and shortcuts. Use the File Open command in QuickTime Player Pro to locate a sound file you want to open. It opens exactly like a QuickTime movie, except with only a scroll barno picture.
14.2.3. Exporting Edited Movies After you've finished working on a sound or movie, you can send it back out into the world in any of several ways. 14.2.3.1. The Save As command If you choose Edit Save As, youre offered only two options, both of which can be confusing: -
Save as a reference movie . You'll almost never want to use this setting, which produces a very tiny file that contains no footage at all. Instead, it's something like an alias of the movie you edited. An edited file that you "save normally" works only as long as the original, unedited movie remains on your hard drive. If you try to email the newly saved file, your unhappy recipient won't see anything at all. -
Save as a self-contained movie . This option produces a new QuickTime moviethe one you've just finished editing. Although it consumes more disk space, it has none of the drawbacks of a "save normally" file. 14.2.3.2. The Export command Usually, your primary interest in using QuickTime Pro will be to export its edited clip, either for use in iMovie or to use in other programs (PowerPoint, Web pages, and so on). When you find yourself in that situation, choose File Export. The resulting dialog box should look familiar: Its the Expert Settings dialog box that appears when you save an iMovie project as a QuickTime movie (Section 12.1). This is your opportunity to specify the size, frame rate, color depth, special effects, and many other aspects of the movie you're about to spin off. This is also where you can convert the QuickTime movie into some other format: AVI (Windows movie) format, Image Sequence (which produces a very large collection of individual graphics files, one per frame), and so onor convert only the soundtrack to AIFF, System 7, or WAV (Windows) formats, for example. 14.2.3.3. How to Use QuickTime Player with iMovie But as an iMovie fan, what you'll probably want to do the most is open your iMovie clips in QuickTime Player Pro, make changes to them, and then save them for further use in iMovie. In that case, you'll probably adopt a routine like this. -
Make sure QuickTime Player Pro is represented on your screen . That is, make sure its icon is on your Dock, or else just open QuickTime Player so that it's running. -
In iMovie, drag the clip you want to edit directly onto QuickTime Player's Dock icon . You can drag the clip from either the Movie Track or the Clips pane, and you can also drag it into the QuickTime Player window, if it's visible. Either way, the movie clip opens before you. Edit it as described in this chapter. (The following pages walk you through some rather spectacular special-effect edits.) When you're finished, go on: -
Choose File Export. In the "Save exported file as dialog box, use the Export pop-up menu to choose "Movie to DV Stream ." Technically, iMovie can import any kind of QuickTime movie. But you've just created a real, live DV clip, in its original quality, exactly the kind iMovie works with. -
Save the file to the desktop . You're not allowed to save the file over the original iMovie clip, since QuickTime Player considers it still "in use." (That's a good thing, too. Imagine shortening a clip by a few seconds behind iMovie's backand then reopening the project! Chaos would reign.) -
Switch back to iMovie. Choose File Import, then navigate to the desktop and open the edited movie . It becomes a new iMovie clip, which you can use to replace the original, if you like. After the import, you can delete the one you saved to the desktop in step 4. |