Section 10.3. Reading Email
10.3. Reading EmailJust seeing a list of the names of new messages in Mail is like getting wrapped presentsthe best part's yet to come. There are two ways to read a message: using the preview pane, and opening the message into its own window. To preview a message, click its name in the list pane; the body of the message appears in the preview pane below. Don't forget that you can adjust the relative sizes of the list and preview panes by dragging the gray border between them up or down. To open a message into a window of its own, double-click its name in the list pane. An open message has its own toolbar, along with Previous and Next message buttons (which look like upward- and downward-pointing arrows). Once you've read a message, you can view the next one in the list either by pressing Ctrl +U (for the next unread message), or by clicking its name in the list pane. (If you're using preview mode, and haven't opened a message into its own window, you can also press the up or down arrow key to move from one message to the next.) 10.3.1. When Pictures are Part of the MessageSending pictures in email is a globally popular activitybut Mail doesn't want you to see them. Mail comes set up to block images, because these images sometimes serve as " bugs " that silently report back to the sender whether you received and opened the message. At that point, the spammers know that they've found a live, working email addressand, better yet, a sucker who opens mail from strangers. And presto, you're on their "safe senders" list, and the spam flood really begins. You'll know if pictures were meant to appear in the body of a message; see the strip that appears at the top in Figure 10-5.
10.3.2. How to Process a MessageOnce you've read a message and savored the feeling of awe brought on by the miracle of instantaneous electronic communication, you can handle the message in several ways. 10.3.2.1. Deleting messagesSometimes it's junk mail, sometimes you're just done with it; either way, it's a snap to delete a message. Click the Delete button on the toolbar, press the Delete key. (You can also delete a batch of selected messages simultaneously .) The messages don't actually disappear. Instead, they move to the Deleted Items folder. If you like, click this folder to view a list of the messages you've deleted. You can even rescue some simply by dragging them into another folder (even right back into the Inbox). Mail doesn't truly vaporize messages in the Deleted Items folder until you "empty the trash." You can empty it in any of several ways:
10.3.3. Replying to MessagesTo reply to a message, click the Reply button in the toolbar, or press Ctrl+R. Mail creates a new, outgoing email message, preaddressed to the sender's return address. (If the message was sent to you and a few other people, and you'd like to reply to all of them at once, click Reply All in the toolbar.) To save additional time, Mail pastes the entire original message at the bottom of your reply (either indented, if it's HTML mail, or marked with the > brackets that serve as Internet quoting marks); that's to help your correspondent figure out what you're talking about. Mail even tacks Re: ("regarding") onto the front of the subject line. Your insertion point appears at the top of the message box. Now, begin typing your reply. You can also add recipients, remove recipients, edit the subject line or the message, and so on. Tip: Use the Enter key to create blank lines within the bracketed original message in order to place your own text within it. Using this method, you can splice your own comments into the paragraphs of the original message, replying point by point. The brackets preceding each line of the original message help your correspondent keep straight what's yours and what's hers. Also, if you're using HTML formatting for the message, you can format what you've written in bold, italic, underlined , or even in another color for easier reading. 10.3.4. Forwarding MessagesInstead of replying to the person who sent you a message, you may sometimes want to forward the messagepass it onto a third person. To do so, click Forward in the toolbar, choose Message All that remains is for you to specify who receives the forwarded message. Just address it as you would any outgoing piece of mail. 10.3.5. Printing Messages Sometimes there's no substitute for a printout of an email messagean area where Mail shines. Click Print in the toolbar, choose File 10.3.6. Filing MessagesMail lets you create new folders in the Folders list; by dragging messages from your Inbox onto one of these folder icons, you can file away your messages into appropriate cubbies. You might create one folder for important messages, another for order confirmations from shopping on the Web, still another for friends and family, and so on. In fact, you can even create folders inside these folders, a feature beloved by the hopelessly organized. To create a new folder, see Figure 10-6.
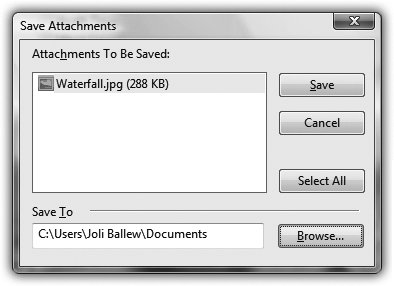
Tip: To rename an existing folder, right-click it and choose Rename from the shortcut menu. To move a message into a folder, drag it out of the list pane and onto the folder icon. You can use any part of a message's "row" in the list as a handle. You can also drag messages en masse onto a folder after selecting them. 10.3.7. Opening AttachmentsJust as you can attach files to a message, people can send files to you. You know when a message has an attachment because a paper-clip icon appears next to its name in the Inbox. To free an attached file from its message, releasing it to the wilds of your hard drive, use one of the following methods :
|

 Options
  Right-click the Deleted Items folder. Choose "Empty 'Deleted Items Folder" from the shortcut menu.
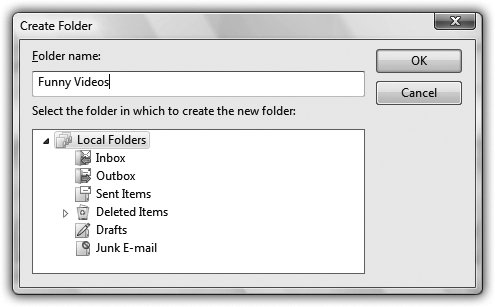
EAN: 2147483647
Pages: 175