Section 5.5. Three Ways to Open Photos in iPhoto
5.5. Three Ways to Open Photos in iPhotoiPhoto wouldn't be a terribly useful program if it let you view only postage stamp versions of your photos (unless, of course, you like to take pictures of postage stamps). Fortunately, iPhoto offers three ways to view your pictures at something much closer to actual size . You'll use these methods frequently when you start editing your photos, as described in Chapter 6. For the moment, though, it's useful to know about these techniques simply for the more common act of viewing the pictures at larger sizes. 5.5.1. Method 1: Right in the WindowThe easiest way to open a photo is simply to double-click a thumbnail. Unless you've changed iPhoto's settings, the photo opens in the main iPhoto window, scaled to fit into the viewing area. This is the way most people open pictures, at least at first. It's comforting to see landmarks like the Source list and toolbar buttons . The downside is that those other screen elements limit the size of the enlarged photo; that's why you might want to consider one of the other photo-opening methods described below. Tip: In iPhoto 6, you can open up more than one photo simultaneously in the Edit window. Just highlight two or more photos, and then double-click any one of them (or click the Edit button). The upper limit ranges from six to twelve photos, depending on the size of your screen. (If you choose more than iPhoto is prepared to handle, it opens up only one of the selected photos.)Either way, this new feature is a great way to compare similar shots for choosing the best one. Whenever you've opened a photo within iPhoto's window, by the way, you'll see a parade of other photo thumbnails at the top of the window. Feel free to switch to any other photo by clicking its little postage-stamp icon up there (or by clicking the big Previous/Next arrows at the bottom of the window). Or, if you'd rather hide the thumbnail browser to reclaim the space it's using, choose View To return to your thumbnail-filled, photo-organizing world, click the Done button (at the bottom-right corner of the screen). Or double-click the photo you're editing; the picture itself is a much bigger target than the little Done button. 5.5.2. Method 2: Individual Windows iPhoto's second method of opening photos is to send each picture into its own window. The advantage here is that you can scale the image up or down by making the window larger or smaller (drag its lower-right corner). You can close an open photo from the keyboard by pressing Figure 5-7. When you open photos in their own windows, you can look at several at the same time at reasonably good magnificationa critical feature when comparing similar shots. Plus, you can keep your other thumbnails in view, allowing you to easily open additional photos without closing the open ones.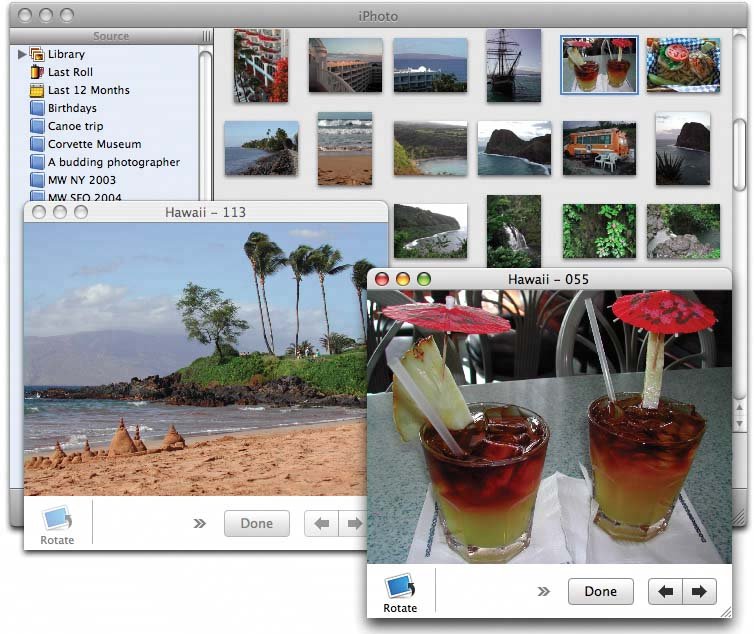 You can set up this separate-window system either permanently or on a case-by-case basis:
5.5.3. Method 3: Full-Screen ModeiPhoto 6 introduces yet another way to get a gander at a photo. Sure, all of these options make the program more complicated, but you'll really like this new feature; it's often the most effective of all. In full-screen mode, a selected photo fills your entire monitor, edge to edge. No menu bar, no toolbar, no Source listjust your big, glorious photo, blown up as big as it can go. This mode is much more interesting when you're editing photos, which is why it's described and illustrated at greater length in Chapter 6. Tip: You can also open several photos in full-screen mode simultaneously. If you highlight several thumbnails before entering full-screen mode, iPhoto displays them side-by-side. Once again, you can either tell iPhoto that you always want your photos to open this way, or you can invoke full-screen mode manually:
Or, if you're in a real hurry, just click the little Full Screen icon ( To exit full-screen mode, double-click anywhere on the photo, or click the Close Full Screen icon ( |
 Hide Thumbnails (Option- -T).
 EAN: 2147483647
Pages: 183
- ERP System Acquisition: A Process Model and Results From an Austrian Survey
- Enterprise Application Integration: New Solutions for a Solved Problem or a Challenging Research Field?
- Data Mining for Business Process Reengineering
- Intrinsic and Contextual Data Quality: The Effect of Media and Personal Involvement
- Healthcare Information: From Administrative to Practice Databases