| To set up the host to make it ready for access from afar, you first must prepare it to answer calls. Then you need to set up the remote computer to dial in. 21.2.1 Setting Up the Host PC If your host PC has its own private phone line ”the lucky thing ”here's how to prepare it for remote access: -
Choose Start  Control Panel. In the Control Panel window, double-click Network Connections. Control Panel. In the Control Panel window, double-click Network Connections. You see the icons for the various network connections you've created. -
In the task pane at the left side of the window, click "Create a new connection." As you might have predicted , something called the New Connection Wizard appears (Figure 21-1, top). Figure 21-1. The New Connection Wizard is the key to setting up two of XP's three remote access features: direct dialing and virtual private networking (VPN). To set it up, you answer its questions once on the host computer, and again on the laptop (or whatever machine you'll use to dial in). Shown here from top: the welcome screen, the all-important "Accept incoming connections" option on the Advanced Connection Options screen (which is what makes your PC answer the phone), and the User Permissions screen (where you indicate which account holders are allowed to dial in). 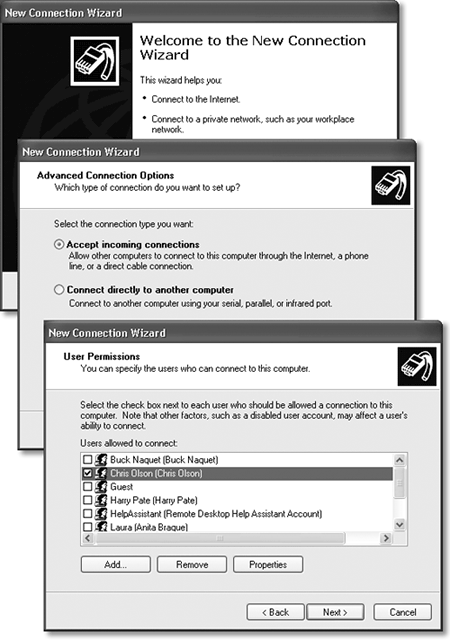 -
Click Next. On the next screen, click "Set up an advanced connection," and then click Next . Now the Advanced Connections Options screen appears. -
Ensure that the "Accept incoming connections" option is selected (Figure 21-1, middle). Then click Next. Now you're shown a list of the communication equipment your PC has ”including its modem. -
Turn on the checkbox for your modem. At this point, you could also click the Properties button and, in the resulting dialog box, turn on "Disconnect a call if idle for more than __ minutes." Doing so makes sure that your home PC won't tie up the line after your laptop in the hotel room is finished going about its business. Click OK. -
Click Next. Leave "Do not allow virtual private connections" selected, and then click Next. As shown in Figure 21-1 at bottom, you're now looking at a list of every account holder on your PC (Chapter 17). -
Turn on the checkboxes corresponding to the people who should be allowed to dial into this host PC. Don't turn on Guest, which amounts to a welcome mat for hackers. If you highlight a name and then click Properties, you can turn on the callback feature ”a security feature that, after you've dialed in, makes your host PC hang up and call you back at a specific number. You can either (a) specify a callback number at the host machine in advance, so that outsiders won't be able to connect, or (b) let the remote user specify the callback number, which puts most of the telephone charges on the host computer's bill (so that you can bypass obscene hotel long distance surcharges). Click OK to close the dialog box. -
Click Next. You're shown a list of networking protocols that Windows XP will make available to you when you call in. In general, you should simply confirm that all the checkboxes are turned on. (Highlighting "Internet Protocol (TCP/IP)" and clicking the Properties button may be useful to the paranoid , however. It lets you limit a remote caller to just this particular PC, instead of having full access to the network.) -
Click Next again, and then click Finish. A new icon in your Network Connections window, called Incoming Connections, is born. Your home-base PC is ready for connections. When the phone rings, the modem will answer it. (Of course, you shouldn't use this feature with the same phone line as your answering machine or your fax.) 21.2.2 Setting Up the Remote PC Next, go to the remote computer and get it ready to phone home. Here's what to do: -
Choose Start My Network Places. At the left side of the My Network Places window, click "Create a new connection." The New Connection Wizard appears. -
Click Next. Select "Connect to the network at my workplace," and then click Next. Now Windows wants to know if you'll be connecting via modem ("Dial-up connection" or via Internet ("Virtual Private Network connection"). -
Click "Dial-up connection," and then click Next. Type a name for your connection (like "Phone home"), and then click Next. Type a phone number for the line your home PC is connected to, and then click Next again. You'll have an opportunity to specify area codes and dialing codes later. -
On the final screen, turn on "Add a shortcut to this connection to my desktop," and then click Finish. You're now ready to establish a connection between the two computers. 21.2.3 Making the Call Once you've configured both computers, fire up the remote system and follow these steps to connect: -
Double-click the shortcut icon you created in step 4 above. If it isn't on your desktop, you should find it in your Network Connections window (which you can open from the Control Panel). The dialog box shown in Figure 21-2 appears. Figure 21-2. You're ready to phone home. If you click the Properties button, you can invoke one of the dialing rules you prepared while reading Section 10.6.1, which can save you a bit of fiddling around with area codes and access numbers . 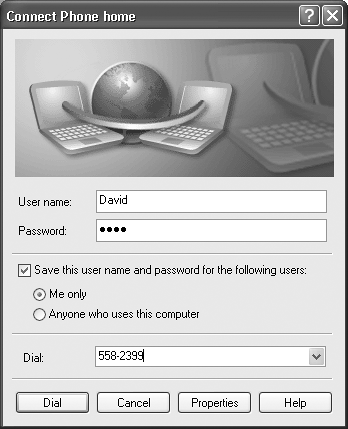 NOTE If you're using a laptop while traveling, you might have to tell Windows XP where you are before you attempt to connect. If you're in a different area code, open the Phone and Modem Options icon in the Control Panel. Make sure that you've specified your current location, complete with whatever fancy dialing numbers are required by it (see Section 10.6.1 for instructions on establishing these locations). Click the current location and then click OK. Now Windows knows what area code and prefixes to use. -
Type in your name and password, and double check the phone number. This is the same name and password you'd use to log in at the Welcome screen if you were sitting in front of the host PC (Chapter 17). If you've set up dialing rules (Section 10.6.1), you can choose the appropriate set of phone number segments by clicking the Properties button. -
Click Dial. That's all there is to it. Windows dials into your home PC, makes the connection, and ”if the phone number, name, and password are all correct ”shows you a balloon on your taskbar (Figure 21-3). Figure 21-3. Top: Congratulations ”you're in. (When two 56 K modems connect, alas, they're limited to the top uploading speed of either ”and that's about 33 K.) Bottom: Disconnect by right-clicking the notification area icon. (The X'ed-out network icon, by the way, represents the office Ethernet cable that's currently disconnected from this laptop, which is in a hotel room somewhere.) 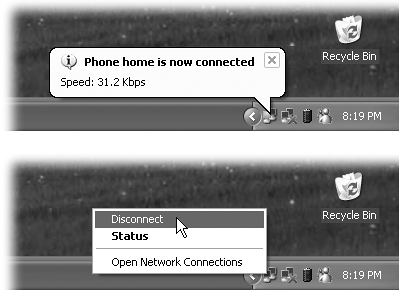 You're free to open up any shared folders, even use shared printers, on your network back home. And although it may make your brain hurt to contemplate it, you can even surf the Internet if your home PC has, say, a cable modem. NOTE Don't try to run any programs that reside on your host PC, however; you'll be old and gray by the time they even finish opening. If you try, the host computer must transmit all of the files that make up the program to your remote machine as it loads (see the box on Remote Networking vs. Remote Control). When you're finished with your email check, address lookup, document transfer, or whatever, right-click the little network icon in your notification area and choose Disconnect from the shortcut menu (Figure 21-3, top). NOTE If you're having trouble connecting, confirm that the name and password you're using are correct ”that's the number-one source of problems. If the remote system still doesn't recognize you, click the Properties button in the dialog box shown in Figure 21-2. On the General tab, make sure that your laptop's dialing the right number; on the Networking tab, confirm that all the checkboxes are turned on.  |