16.6 Task Scheduler
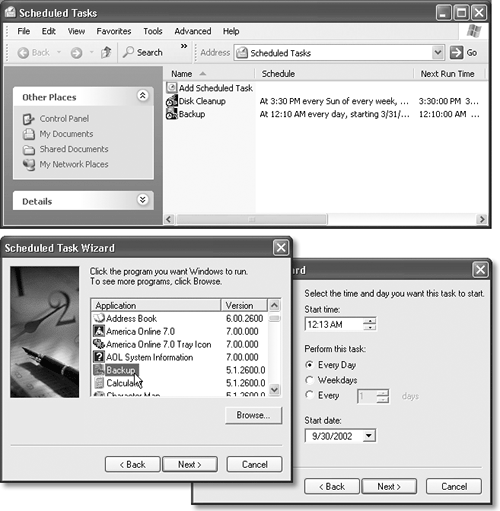
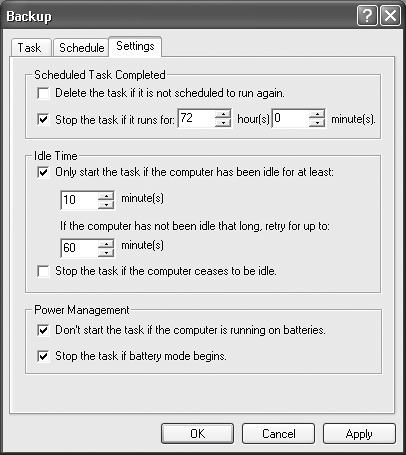
| The Scheduled Tasks window lets you set up Windows XP to open certain programs, utilities, and documents according to a schedule that you specify. Unfortunately, all it can do is open programs and documents on cue. Unless you're prepared to type in the special codes, called switches, the Scheduled Tasks window can't actually make them do anything once they're open. The tutorial on Section 16.6.4 offers more information about switches. To open the Task Scheduler (see Figure 16-10), choose Start Figure 16-10. Top: The Task Scheduler keeps a calendar for Windows XP. Tasks appear in the schedule when you enter them manually, or when other programs (such as the Maintenance Wizard) set them up. You can use the Task Scheduler window to add, modify, or remove tasks. (Make sure your computer is turned on during the time any task is supposed to run.) Bottom: The wizard asks you what you want to open, and how often. 16.6.1 Adding a Task to the SchedulerTo add a task to the schedule, double-click the Add Scheduled Task icon. A wizard appears; click Next . A list of programs now appears on your PC (Figure 16-10, bottom left). If the one you want to schedule is listed, click it. If not, click Browse, find and open its folder, and double-click its icon. Now you're asked how often you want the new task to run: every day, every week, and so on. Make a selection, then follow the wizard's prompts to schedule your task. For example, if you chose Monthly, you can tell the wizard which day of the month, and at which time (Figure 16-10, bottom right). Finally, because Windows XP can accommodate multiple user accounts (see the next chapter), and can even run your tasks while somebody else is logged in and using the computer, you'll have to enter your user name and password. Completing the wizard means you've successfully added a new icon to the Scheduled Tasks window (Start 16.6.2 Changing Scheduled TasksDouble-clicking a task's listing in the Task Scheduler window opens its Properties dialog box (Figure 16-11), where you can make several kinds of changes:
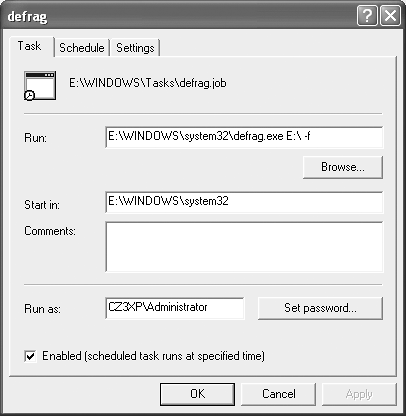
Figure 16-11. Some of the factory settings for scheduled tasks are a bit ridiculous. For example, it's probably a good idea to stop a task if it runs longer than 4 or 5 hours, not 72 hours. In fact, except for defragging the hard drive, most scheduled tasks should take less than an hour . The bottom section of the dialog box applies to laptop computers. 16.6.3 Start a Task ImmediatelyTo trigger one of the listed programs right now, right-click its listing in the Scheduled Tasks window and choose Run from the shortcut menu. (The task will run again at its next scheduled time.) 16.6.4 Pause All Scheduled Tasks If a schedule-triggering event is taking place on your PC while you're trying to work, thus slowing down the proceedings , you can suspend those background operations until your work is complete. Just open the Scheduled Tasks window and choose Advanced When you think it's OK for those background-scheduled tasks to carry on, "unpause" the scheduler by choosing Advanced 16.6.5 Stop Using Task Scheduler If you don't want any tasks to run, ever, open the Scheduled Tasks window and choose Advanced NOTE You can request that Windows XP notify you, the next time you log on, when a task didn't run at its appointed time (because the PC was turned off, for example). To set this up, open the Scheduled Tasks window and then choose Advanced 16.6.6 A Disk Defragmenter ExampleBefore the invention of the mouse, menus , and icons, computer geeks operated their machines solely at the command line ” a black window where you had to type cryptic commands to get anything done. Windows XP still has a command line (Start To make matters even less user-friendly, remember that Windows doesn't call programs by the same names you do. (Microsoft Word, for example, is really a program called winword.exe. ) To run a program from the command line, you have to call it by the same name Windows uses. You can find what that is by right-clicking the program's icon in the Start menu, choosing Properties from the shortcut menu, and looking at the Target field in the Properties dialog box. That's only one ingredient you'll need to run a program from the command line ”the others are command parameters called switches . These are usually dashes or slashes followed by letter and number combinations, like the second part of the command ping “t , and they tell the program what to do once you've opened it. Task Scheduler runs programs by executing command line strings like this. Putting together the correct switches to trigger the activity you want is not for the technically timid. But if you'd like to know what you're getting into, here's an example that demonstrates how to schedule Disk Defragmenter to run at a specific time (when you're sleeping, for example, and won't care that it's slowing down your PC). In fact, this is one of the most common uses of the Task Scheduler: using it to trigger common maintenance tasks without your involvement. 16.6.6.1 Programming Disk DefragmenterTo schedule a program like Disk Defragmenter, you must first learn what switches it understands. To discover which switches are available in a Windows XP program, open a Command Prompt window (Start Defrag -? When you press Enter, a help screen like this appears: Usage: Defrag <volume> [-a] [-f] [-v] [-?] volume Drive letter or mount point d:\ or d:\vol\mountpoint -a Analyze only -f Force defragmentation even if free space is low -v Verbose output -? Display this help text From this, you might discern that the command necessary to run the Disk Defragmenter on your hard drive (C:) is this: Defrag C:\ -f which means, "Use the defrag command on my C: drive; defragment it even if I don't have much free space." Always test your command line before you schedule it to run unattended. If the command behaves itself while you're watching, you can be confident that it will do the same when Task Scheduler runs unattended. To schedule the command, open the Scheduled Tasks program in the Control Panel. Double-click the Add Scheduled Task icon. The Scheduled Task Wizard appears; click Next to see the list of programs that the Task Scheduler offers to trigger. However, Disk Defragmenter isn't listed, so you must click Browse and navigate to the Local Disk (C:) On the final wizard screen, don't click Finish until you've first turned on "Open advanced properties for this task when I click Finish." After you click Finish, a special summary window appears, listing the program to be run: C:/WINDOWS/SYSTEM32/defrag.exe. Click in the Run box at the end of the command, press the Space bar, and then type C:\ (or whatever the drive letter is), another space, and then - f , as shown in Figure 16-12. Click OK. Figure 16-12. Disk Defragmenter is ready to roll. You've just told Disk Defragmenter to defrag the E: drive, and ”thanks to the "-f" switch ”to run whether it thinks you need it or not. Finally, you're asked to type in your password ”twice. When you click OK, your work is done. An icon for your scheduled task appears on the screen for the Disk Defragmenter schedule that you've just added, and it's prepared to run automatically at the times you specified. 16.6.7 Interpreting Results If you switch the Scheduled Tasks window into Details view by choosing View All you have to know about such exit codes is that, in most cases, a value of 0 (or 0x0) means that the program ran without a hitch. Anything else represents some kind of error message. If that's what you get, you, or somebody who knows about this kind of thing, should try running the command in the Command Prompt window in hopes of discovering why it's not working correctly. |
EAN: 2147483647
Pages: 230
 All Programs