Section 26.7. Spot Recording (Punch InPunch Out)


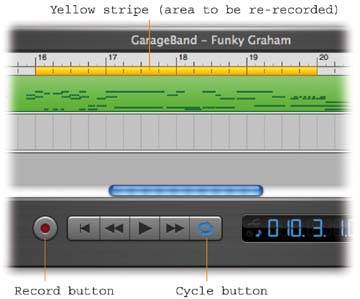
26.7. Spot Recording (Punch In/Punch Out)

If you're able to record an entire song perfectly the first time, with no mistakeswell, congratulations. Sony Records is standing by.

Most people, though, wind up wishing they could redo at least part of the recording. Usually, you played most of it fine, but botched a few parts here and there.

In the professional recording business, patching over the muffed parts is so commonplace, it's a standard part of the studio ritual . Clever studio software tools can play back the track right up until the problem section, seamlessly slip into Record mode while the player replays it, and then turn off Record mode when it reaches the end of the problem part, all without missing a beat. Recording engineers call this punching in and out .

Believe it or not, even humble GarageBand lets you punch in and punch out. Once you master this technique, you'll be very grateful.

Here's how it goes:

  1. Turn on cycling .

    Section 23.4 describes cycling in the context of playing a section of music over and over again. For recording, the steps are much the same (see Figure 26-6). In this case, though, the beginning and end of the yellow Cycle bar designate your punch-in and punch-out pointsthe part you're going to rerecord.

  2. Set up your metronome and tempo. Turn on the Count In command (in the Control menu) .

    In this case, Count In is very important; it makes GarageBand play the one measure of music that precedes your punch-in point. (You don't have to position the Playhead for this exercise. Whenever Cycling is turned on, the Playhead always snaps to the beginning of the yellow stripe when playing or recording begins.)

  3. Begin recording (by pressing the letter R key, for example) .

    During the countoff measure, you don't just hear metronome clicksyou also hear the existing music in that preceding measure. GarageBand begins recording after the countoff, as the Playhead reaches the yellow cycle area.

    As you record, you'll also hear the old materialthe part you're trying to rerecord. Don't worry, though; it will disappear after you replace it. (If it bothers you, delete it manually before punching in.)

    GarageBand doesn't play past the end of the yellow bar. Instead, it loops back to the beginning of the yellow bar and keeps right on recording. (This loop-record feature is the key to cumulative recording , described next .) If you nailed it on the first take, just stop playing.

    Figure 26-6. Click the Cycle buttonor press the letter C keyto make the yellow "repeat this much" bar appear at the top of the screen. Drag the ends of the yellow bar to identify the musical section you'll be loop-recording. (If you don't see the yellow bar, or if you want it to appear in a totally different section of the piece, drag through the lower section of the beat ruler.)


  4. Press the Space bar (or click the Play button) to stop recording .

    When you play back the piece, GarageBand flows seamlessly from your original take to the newly recorded "patch" section.


Tip: This punch-in/punch-out routine is the only way to go if your goal is to rerecord precisely measured sections.When the parts you want to rerecord have nicely sized " bookends " of silence before and after, though, there's a more casual method available. Just play the piece from the beginningand "ride" the letter R key on your keyboard. With each tap, you jump into and out of Record mode as the piece plays. This manual punch-in/punch-out method offers another way to record over the bad sections and preserve the good ones.


iLife 05. The Missing Manual
iLife 05: The Missing Manual
ISBN: 0596100361
EAN: 2147483647
Year: 2005
Pages: 314
Authors: David Pogue

flylib.com © 2008-2017.
If you may any questions please contact us: flylib@qtcs.net