Section 1.2. Music from CDs
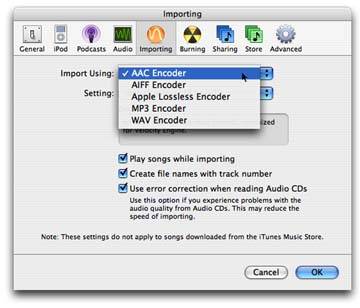
1.2. Music from CDsRipping a CD means "converting its recordings into digital files on the computer." (Too bad recording industry executives didn't know that when they accused Apple's "Rip, Mix, Burn" ad campaign of promoting piracy. They evidentlyand incorrectlythought that "rip" meant "rip off.") With the proper iTunes settings, ripping a CD track and preparing it for use with the iPod is fantastically easy. Here's how to go about it. 1.2.1. Phase 1: Choose an Audio File FormatBefore you get rolling with ripping, decide which format you want to use for your music files: MP3, AAC, AIFF, WAV, or Apple Lossless (Figure 1-4). This may be more choice than you really wanted, but learning the pros and cons of each format is worth the effort, especially if you're about to commit a huge stack of CDs to digital format. You don't want to have to convert them all a second time.
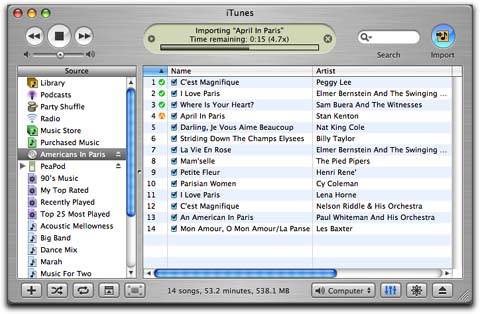
1.2.1.1. MP3Suppose you copy a song from a Sheryl Crow CD directly onto your computer, where it takes up 47.3 MB of hard disk space. Sure, you could now play that song without the CD in your CD drive, but you'd also be out 47.3 megs of precious hard drive real estate. Now say you put that Sheryl Crow CD in your computer and use your favorite encoding program to convert that song to an MP3 file. The resulting MP3 file still sounds really good, but only takes up about 4.8 MB of space on your hard driveabout 10 percent of the original. Better yet, you can burn a lot of MP3 files onto a blank CD of your ownup to 11 hours of music on one disc, which is enough to get you from Philadelphia to Columbus on Interstate 70 with tunes to spare. MP3 files are so small because the compression algorithms use perceptual noise shaping , a method that mimics the ability of the human ear to hear certain sounds. Just as people can't hear dog whistles, most recorded music contains frequencies that are too high for humans to hear; MP3 compression discards these sounds. Sounds that are blotted out by louder sounds are also cast aside. All of this space-saving by the compression format helps to make a smaller file without overly diminishing the overall sound quality of the music. New portable MP3 player models come out all the time, but many people consider the iPod's arrival in 2001 to be a defining moment in the history of MP3 hardware. Tip: MP3 is short for MPEG Audio, Layer 3. And MPEG stands for Moving Pictures Experts Group , the association of engineers that also defined the specifications for the DVD video format, among others. 1.2.1.2. AACThe Advanced Audio Coding format may be relatively new (it became official in 1997), but it has a fine pedigree. Scientists at Dolby, Sony, Nokia, AT&T, and those busy folks at Fraunhofer collaborated to come up with a method of squeezing multimedia files of the highest possible quality into the smallest possible spaceat least small enough to fit through a modem line. During listening tests, many people couldn't distinguish between a compressed high-quality AAC file and an original recording. What's so great about AAC on the iPod? For starters, the format can do the Big Sound/Small File Size trick even better than MP3. Because of its tighter compression technique, a song encoded in the AAC format sounds better (to most ears, anyway) and takes up less space on the computer than if it were encoded with the same quality settings as an MP3 file. Encoding your files in the AAC format is how Apple says you can stuff 15,000 songs onto a 60 GB iPod. The AAC format can also be copy-protected (unlike MP3), which is why Apple uses it on the iTunes Music Store. (The record companies would never have permitted Apple to distribute their property without copy protection.) Note: You can think of AAC as the Apple equivalent of WMA, the copy-protected Microsoft format used by all online music stores except Apple's. For better or worse , the iPod doesn't recognize copy-protected WMA files; it can download $1-a-song music only from Apple's iTunes Music Store. Since the iPod can play several different audio formats, you can have a mix of MP3 and AAC files on the device if you want to encode your future CD purchases with the newer format. If you want to read more technical specifications on AAC before deciding, Apple has a page on the format at www.apple.com/mpeg4/aac. Note: AAC is the audio component of MPEG-4, a video format that's designed to get high-quality video compressed enough to travel over computer networks (even pokey old modem lines) and still look good onscreen. 1.2.1.3. WAVThe iPod was designed to handle AAC and MP3 formats the most efficiently , but it's not limited to them. WAV, for example, is a standard Windows sound format, going all the way back to Windows 95. (Macs can play WAV files, too.) Windows fans download WAV recordings for everything from TV-show snippets to start-up sounds. A WAV song usually sounds better than the same song in MP3but takes up more room. 1.2.1.4. AIFFThe AIFF standard (Audio Interchange File Format) can create sound files that sound spectacularin fact, these are the audio files on commercial music CDsbut they hog hard drive space. For example, if you stick Prince's Purple Rain CD into your computer, double-click the disc icon, and drag the song file for "Let's Go Crazy" onto your desktop, you'll soon have a 46.9 MB AIFF file on your hard drive. Although the sound fidelity is tops, the files are usually ten times bigger in size than MP3s. Apple originally developed the AIFF standard, but AIFF files play on other operating systems, too. Note: If you insist on putting gargantuan files like AIFFs on your iPod, you'll have to worry about running out of battery power as well as disk space.A modern iPod comes with a 32 MB memory chip. Yes, it serves as skip protection, because it stores 25 minutes' worth of MP3 or AAC music. But it also serves as a battery-life enhancer , because the hard drive stops spinning whenever the music plays from the memory buffer.If you have big song files on the iPod, the memory buffer holds less music. When it runs out of music data, the iPod has no choice but to read from the hard drive, which runs your battery down much faster. 1.2.1.5. AudibleYou can listen to more than just music on your iPod; you can also listen to the spoken word. Not books on tape, exactly, but more like books on MP3courtesy of www.audible.com. There, you can find over 25,000 spoken recordings to download. These are downloadable versions of the same professionally produced audio books you see in stores: the latest bestsellers in popular genres, children's books, and even old science fiction faves like Neal Stephenson's Snow Crash . Details on Section 4.6. 1.2.1.6. Apple Lossless EncoderAs you probably know, a program like iTunes creates MP3 and AAC files by throwing away some of the audio data (mostly stuff you can't hear). Geeks call these lossy formats. But for true audiophiles with impeccable taste and bionic ears, lossy formats make music sound thin, tinny and screeching. Of course, WAV and AIFF are lossless no audio data is lostbut these files take up a huge amount of hard-drive space, to the tune of 40 to 50 MB per pop song. In iTunes 4.5 and later, you can use the Apple Lossless Encoder instead. It offers great-sounding files that take up about half the space of an uncompressed CD track. (It requires not only iTunes 4.5 or later, but also QuickTime 6.5.1. and iPod Update 2004-04-28 or later.) Tip: Before you stack up the CDs next to the computer for an afternoon of ripping, you may want to test your format preferences by ripping test songs in various formats. Let your ears tell you which format and bit rate sounds best to you. 1.2.2. Phase 2: Choose a Bit RateThat's a lot of sound-file formats to choose from, so here's some simple advice: most people use either the familiar old MP3 format or the spunky new AAC option. AIFF and WAV formats may offer better sound quality than MP3 and AAC, but result in larger file sizes, which takes up more space on your hard drive and your iPod, if you have one. AAC usually creates files sound significantly better than an MP3 recorded at the same bit rate , given you high audio quality in a small file size. Now, bit rate may sound like one of those unbelievably geeky computer terms (which it is), but it plays a big role in how your music sounds when you snag a song from a CD and convert it to MP3 or AAC format. When it comes to sound quality, all digital audio files are not created equal. The bit rate has to do with the number of bits ( binary digits tiny bits of computer data) used by one second of audio. The higher the number of bits listed, the greater the amount of data contained in the file, and the better the sound quality. Tip: Eight bits make a byte. So why are audio files measured in kilobits (thousands of bits), and not the more familiar kilobytes?Force of habit. Geeks measure size and storage capacity in bytes, but network speeds and data-transfer speeds have always been measured in bits. When you encode an MP3 file, the transfer and compression of the audio data into the new format is measured in kilobits. Files encoded with lower bit rate settingslike 64 kilobits per seconddon't include as much audio information from the original sound file. They sound thin and tinny compared to a file encoded at, say, 160 kbps. Just as you can't compare megahertz ratings across different chip families (like Pentium III vs. Pentium 4), you can't compare bit rates between AAC and MP3 files. A 128 kbps AAC file generally sounds much better than a 128 kbps MP3 file. In fact, tests by the group that developed the AAC standard found that a 96 kbps AAC file generally sounds better than a 128 kbps MP3 file. (Your ears may differ .) As a bonus, the AAC version takes up much less space on your hard disk and iPod. You probably don't want to encode AAC files lower than 128 kbps, though, as the sound quality will begin to suffer noticeably. For both formats, the higher the bit rate, the larger the file size. For example, an MP3 file encoded at 160 kbps sounds a heck of a lot better than one recorded at 96but takes up over twice as much disk space (1.5 MB vs. 700 KB).
For MP3s, most people find that 128 kbps is a good compromise of file size and sound quality. At that rate, MP3 files take up roughly one megabyte of space per minute of music. The 128 kbps rate is considered high quality for the AAC formatwhich is why iTunes comes factory set to 128 kbps. (Songs for sale in the iTunes music store are 128 kbps AAC files, too.) You're not stuck with the 128 kbps rate for your own home-ripped tracks. If you're a classical music fan and want to hear every nuance of a symphony, go for 160 or even 192 kbps. On the other hand, if you're listening to garage rock while strolling city streets , 96 kbps may sound fine, while giving you plenty of room on your iPod. To make this kind of change, choose iTunes Note: The iPod can also play files encoded in the MP3 VBR format, in which sophisticated software has adjusted the song's bit rate continuously along its length. (VBR stands for Variable Bit Rate.) The song winds up using more data during sonically complex parts of a song (higher bit rates) and lower settings during simpler parts . By constantly adjusting the bit rate, a MP3 VBR file conserves space more efficiently than a song encoded at a high bit rate all the way through.To set up iTunes for MP3 VBR, go to Preferences, select Importing  MP3 Encoder. From the Setting pop-up menu, choose Custom to find the option for VBR encoding. MP3 Encoder. From the Setting pop-up menu, choose Custom to find the option for VBR encoding. There are two ways to remedy the problem: You can type the information in manually, or let iTunes go on the Internet to find out for itself. 1.2.3.1. The manual methodAfter you load up a CD, you can type in all of the song information for each track. To do so, click the track's name once to highlight its row, and then a second time to open up the renaming box. Edit away. Tip: You can edit the information in the Artist, Album, or Genre columns the same way. You should consider this purely theoretical information, however; you'd be nuts to go about naming your CDs and tracks this way. Read on. 1.2.3.2. The online way If you have an Internet connection, choose iTunes Behind the scenes, it's consulting a massive, comprehensive CD Database (CDDB), maintained by a company called Gracenote (www.gracenote.com). After iTunes sends information from the disc to the Gracenote CDDB servers, the database identifies the album and sends back the song titles and other data for iTunes to display. (Firewall software may interfere with downloading CD track information. If you suspect that problem, ask your administrator to confirm that your computer's Internet settings are correct.) If you don't have a high-speed connection, you may not want the computer dialing up every time you insert a CD. In that case, turn off "Connect to the Internet when needed." Instead, you may prefer to ask for the CD information when you're already connected to the Internet. Just choose Advanced 1.2.4. Phase 4: Convert the Song to a Digital Audio FileOnce the songs on the CD have been identified, the song and artist names, time, and other information pops up in the main part of the window, as shown in Figure 1-6. Each song has a checkmark next to its name, indicating that iTunes will convert and copy it onto the computer when you click the Import button. If you don't want the entire albumwho wants anything from Don McLean's American Pie album besides the title track?you can turn off the songs you don't want. Once you've picked your songs, click Import in the upper-right corner of the screen. Tip: You can Convert Selection to MP3 (or whatever format you have chosen for importing). You can also use this menu item to convert songs that are already in your library to different audio formats. As the import process starts, iTunes moves down the list of checked songs (Figure 1-6), ripping each one to a file in your Home Once the importing is finished, each imported song bears a green checkmark, and iTunes signals its success with a little melodious flourish. And now you have some brand new files in your iTunes music library. 1.2.5. Phase 4: Add Cover ArtworkSongs you download from the iTunes Music Store (Chapter 4) often include artwork, usually a picture of the album cover. iTunes displays the pictures in the lower-left corner of its main window. But you shouldn't have to be a slave to the artistic tastes of some faceless, monolithic record company; you can install any art you like for any song. If Pachelbel's Canon in D makes you think of puppies, you can have baby dachshund photos appear in the iTunes window every time you play that song. The only stipulation is that the graphic you choose must be in a format that QuickTime can understand: JPEG format, GIF, PNG, TIFF, or Photoshop, for example. Just keep in mind that the bigger the image size, the bigger the overall file size of the audio file and the more hard drive space you fill up.
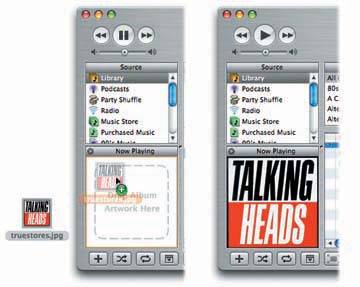
1.2.5.1. Adding an image to an individual song: drag-and-drop methodTo add an image file to a song you're listening to in iTunes, click the Show/Hide Song artwork button at the bottom of the iTunes window. The artwork pane appears. As shown in Figure 1-7, faint gray words appear in the pane, telling you exactly where to drag the image file. Just drag any graphics file right off of the desktop (or any other Finder folder) and into this space to install it there. Tip: If you find an image on the Web that you love, right-click (or Control-click) it and choose Download Image to Disk to save it to your hard drive (the wording depends on your browser). Most browsers nowadays let you drag images off the Web page onto your desktop, too. Either way, you can drag the resulting graphic into the iTunes artwork pane.
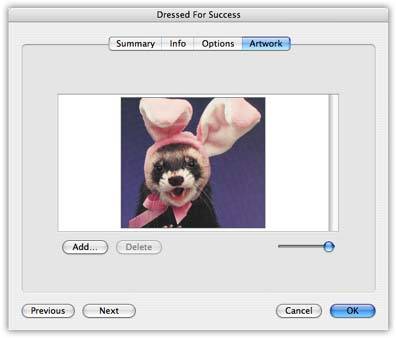
1.2.5.2. Adding an image to an individual song: dialog box methodInstead of dragging a graphic off your desktop, you may prefer to use the Get Info dialog box, where at least you can inspect the image before accepting it. Figure 1-8 shows the way. Tip: You can even install multiple graphics for an individual song. Just drag multiple images into the artwork pane; thereafter, you can click through them with the arrows at the top of the Selected Song bar. If you use the Get Info dialog box shown in Figure 1-8, you can click Add, and then
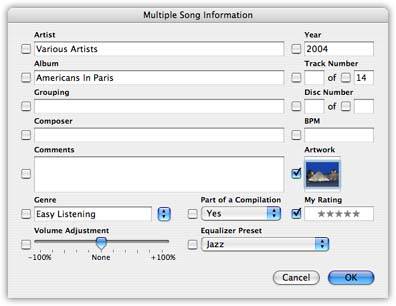
1.2.5.3. Adding an image to an entire album To select the same art for all the songs on an album (or by the same artist), saving yourself a little time, open the iTunes browser by clicking the eyeball icon at the top right of the screen. Click the name of an artist or album in the browser, and then press In the Multiple Song Information dialog box (Figure 1-9), turn on the Artwork checkbox, and then double-click in the white area. In the window that opens, navigate to and select the image file you want to use for all the songs on the album, and then click OK. (Of course, you can also drag a graphic into this white box, right off your desktop.) You'll see a progress bar as iTunes applies the artwork and any other group settings you've chosen for the files. Click OK, confirm your decision one last time, and then enjoy the new album art. Tip: You can apply the same image over and over again into all the songs in the same playlist . Visit http://malcolmadams.com/itunes and download a copy of the "Selected Artwork to All in Playlist" AppleScript. The next time you have an image that you want to associate with all the songs on a particular playlist, just fire up that script.
|
EAN: 2147483647
Pages: 314