Section 16.2. Inserting and Rendering a Title
16.2. Inserting and Rendering a TitleWhen you've taken into consideration all the options described so far in this chapter, you probably have a good feel for how this title is going to look once it's inserted into your movie. Now it's time to commit it to digital film. 16.2.1. Dragging the Title into the Movie TrackTo place the title you've selected into Movie Track, proceed as follows :
16.2.2. Rendering BeginsNow iMovie begins to render the title effect. In other words, it creates a new clip that incorporates both the original footage and the text you're superimposing. In some ways, this title-rendering process resembles the transition-or effect-rendering process described in the previous chapter. For example, you can stop it by pressing either the Esc key (in the upper left of your keyboard) or
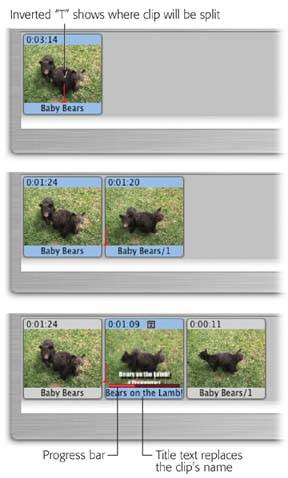
The longer the title is to remain onscreen, the longer the rendering process takes. But exactly as when rendering transitions, you can continue to do other work in iMovie (or even in other programs) while the title is rendering. In fact, you can play titles before they're fully baked, to see what they'll look like in your final movieanother handy preview feature that doesn't require you to wait until the rendering is finished. You can even have several titles rendering simultaneously, although iMovie slows down quite a bit if you have more than, say, three titles rendering at once. The bright red progress bar creeps along the bottom of the clip, as shown in Figure 16-6. In other words, a title in the Movie Track doesn't have its own icon, as a transition does. Instead, you get to see a miniature illustration of what it's going to look like. (Tiny lettering appears directly on the superimposed clip icon to help you identify it as a title clip.) As soon as you've finished dragging a title into the Movie Track, the affected clip's name instantly changes. It takes on the words of your actual title (or as much as will fit; if the name is wider than the clip icon, you see an ellipsis "like this"). If the clip was called, for example,"Chris closeup,"iMovie renames it "Shoestring Productions presents ," or whatever your title says. (You can see this effect, too, in Figure 16-6.) As a bonus, a tiny letter T appears in the upper-right corner of the "slide" in the Clip Viewer, a friendly reminder that you've applied a title to it. 16.2.3. How Titles Chop Up Your ClipsAs Figure 16-6 illustrates, it's not enough that you split your clip if you want the title to begin partway into the footage. iMovie may chop up your clips on its own, according to this scheme:
iMovie may still chop up the final clip in the sequence, however, to accommodate the tail end of the title sequence. Tip: If the title is long enough, it can gobble down a number of individual clipsand turn them into a single title clip in your Movie Track. This can be a sneaky way to organize your movie, as described in the box on the facing page.
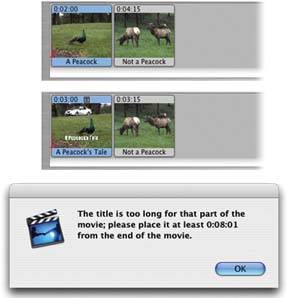
16.2.4. Checking the ResultWhen the rendering process is completeor even before it's completecheck out the effect. Click the title clip in the Movie Track and press the Space bar to view the title clip, or Shift-click the clips before and after the title clip (and then press the Space bar) to see how the title looks in the context of the clips around it. Or just drag the Playhead back and forth across the title to see how it looks. If the title isn't quite what you wantedif it's the wrong length, style, or font, or if there's a typo, for exampleyou can change its settings as described in the next section. If the title wasn't at all what you wantedif it's in the wrong place, for exampleyou can undo the entire insertion-and-rendering process by highlighting the title clip and pressing the Delete key (or choosing Edit 16.2.5. Editing a TitleEditing a title is easy. Click the title clip's icon in the Movie Track. Then click the Titles button, if the list of titles isn't already open . Now you can adjust the title style, the text of the title itself, the title's timing, the direction of motion, or any other parameters described in the first part of the chapter. When you're finished, click the Update button just below the Preview button. iMovie begins the rendering process again, putting in place a brand-new title, and splitting the superimposed footage in a different place, if necessary. Note: The good news is that your ability to edit the title isn't subject to the availability of the Undo command. In other words, you can revise the settings for a title at any time, even if you've saved the project (and therefore wiped out your Undo trail).But if you've applied multiple superimposed titles, as described in the box below, you can revise only the most recent title you've applied to a particular clip. 16.2.6. Deleting a TitleAs noted previously, a title clip is just a clip. You might wonder , therefore, how you can remove a title without also deleting the footage it affects. Yet sure enough, iMovie remembers what your clips looked like before you overlaid a title. You can click a title clip at any time, press the Delete key, and then watch iMovie restore the original footage. True, pressing Delete on a conventional clip deletes it, but pressing Delete on a title clip simply deletes its "titleness." The clip to its right merges back into its formerly text-overlaid portion, leaving only one clip instead of two. Now, if you've moved the clip that follows the title clip, and you then delete the title clip, iMovie will still put back the underlying footage that it consumed, but it may no longer be where you expect it to be. The program can't "splice" the footage back onto the beginning of a clip from which it was split, because iMovie doesn't know where that clip is (you might even have deleted it). If you move the clips back into their original sequence after deleting the title, the footage will still be continuous, but there might now be a cut or break where the title ended, as if you had split the clip at that point.
|
 Split Video Clip at Playhead
EAN: 2147483647
Pages: 314