Section 4.8. Monitor Settings: All Versions
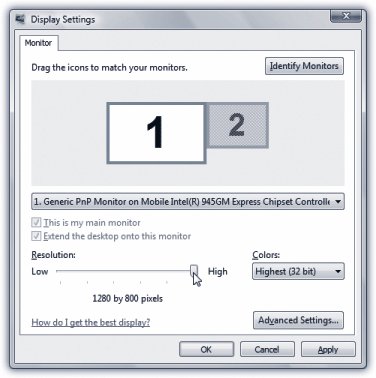
4.8. Monitor Settings: All VersionsYou wouldn't get much work done without a screen on your computer. It follows , then, that you can get more work done if you tinker with your screen's settings to make it more appropriate to your tastes and workload. And boy, are there a lot of settings to tinker with. You can find them by right-clicking the desktop; from the shortcut menu, choose Personalize. In the resulting dialog box, click Display Settings. The window shown in Figure 4-8 appears.
4.8.1. ResolutionThe Resolution slider snaps to the various possible resolution settings that your monitor's software driver makes available: 800 x 600, 1024 x 768, 1280 x 800, and so on. When using a low-resolution setting, such as 640 x 480, the size of the pixels (dots) that constitute your screen image increase, thus enlarging the picturebut showing a smaller slice of the page. This setting is ideal, for example, when playing some small-window Web movie, making it fill more of the screen.
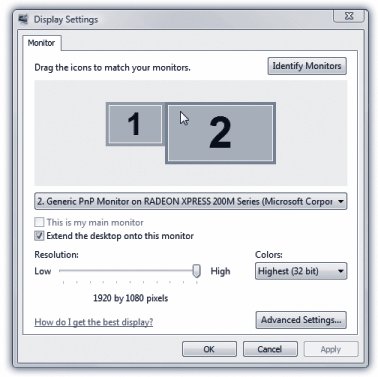
At higher resolutions (such as 800 x 600 or 1024 x 768), the pixels decrease, reducing the size of your windows and icons, but showing more overall area. Use this kind of setting when you want to see as much screen area as possible: when working on two-page spreads in a page-layout program, for example. 4.8.2. ColorsToday's monitors offer different color depth settings, each of which permits the screen to display a different number of colors simultaneously . This pop-up menu varies by video driver, but generally offers settings such as Medium (16-bit), which was called High Color in previous versions of Windows; High (24-bit), once known as True Color; and Highest (32-bit). In the early days of computing, higher color settings required a sacrifice in speed. Today, however, there's very little downside to leaving your screen at its highest setting. Photos, in particular, look best when you set your monitor to higher-quality settings. The Low (8-bit) optionif you even have itmakes photos look blotchy. It displays only 256 colors on the screen, and is therefore useful only for certain computer games that, having been designed to run on ancient PCs, require the lower color setting. (In that case, you shouldn't set your whole system to 256 colors just to run these older games . Instead, you should use the new compatibility mode described on page 236.) 4.8.3. Multiple MonitorsIf your PC has two or more graphics cards, one graphics card with multiple connections, or a standard laptop video-out connector, you can hook up a second monitor or a projector. You can either display the same picture on both screens (which is what you'd want if your laptop were projecting slides for an audience), or create a gigantic virtual desktop, moving icons or toolbars from one monitor to another (Figure 4-9). The latter setup also lets you keep an eye on Web activity on one monitor while you edit data on another. It's a glorious arrangement, even if it does make the occasional family member think you've gone off the deep end with your PC obsession .
To bring about that extended-desktop scenario, click the icon that represents screen 2 (the external one), and then turn on "Extend the desktop onto this monitor." (If you can't figure out which screen is screen 2, click the Identify Monitors button in the upper-right corner.) Tip: Plugging in a projector generally inspires Windows to present a clean, simple dialog box that asks a simple question: Where do you want to send your screen image? To the PC's screen, to the projector, or to both?This is an extremely thoughtful touch for laptop luggers, because it avoids the staggeringly confusing keyboard-based system you previously had to use. That's where you'd press, for example, F8 three times to cycle among the three modes: image on laptop only (projector dark), image on projector only (laptop screen dark), or image on both at once. Vista's method is much easier. 4.8.4. Advanced settingsIf you click the Advanced button on the Settings tab, you're offered a collection of technical settings for your particular monitor model. Depending on your video driver, there may be tab controls here that adjust the refresh rate to eliminate flicker, install an updated adapter or monitor driver, and so on. In general, you'll rarely need to adjust these controlsexcept on the advice of a consultant or help-line technician. |
EAN: 2147483647
Pages: 284