15.1. Importing Video, Music, and Photos: Home Basic ¢ Home Premium ¢ Ultimate You open Movie Maker by choosing Start  All Programs Windows Movie Maker. (If youre using the Business or Enterprise version of Vista, you're out of luck. You're obviously far too busy with big corporate projects to be mucking around with movies.) All Programs Windows Movie Maker. (If youre using the Business or Enterprise version of Vista, you're out of luck. You're obviously far too busy with big corporate projects to be mucking around with movies.) The Movie Maker screen appears, as shown in Figure 15-1. Its left-side Tasks pane indicates the three major steps you'll take to put a movie together: Import, Edit, and Publish To. 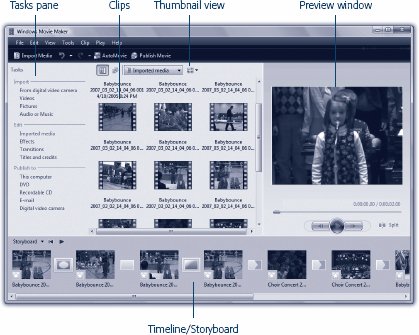 | Figure 15-1. Windows Movie Maker's Tasks pane provides quick access to the most-used menu options. The other major working areas of the program are all identified here. You'll do most of your work in the Storyboard or Timeline view at the bottom of the screen . | |
Behind the scenes, Windows creates a folder called Videos in your Personal folder. This is where you'll find icons representing the various video clips that you capture from your camcorder. (You'll also find a Sample Videos folder there to fool around with until you get your equipment-buying act together.) The first step is to bring in some video to edit. Proceed in either of these ways: -
From a camcorder . The best quality comes when you import video from a digital (DV) camcorder, one that records on MiniDV cassettes. Next , you need a FireWire card (about $60), if your PC didn't come with a built-in FireWire port. (It may be called an IEEE-1394 or i.Link port.) On the side of almost every digital camcorder model is a special connector, a FireWire port, that connects to the FireWire card with a FireWire cable . This single cable communicates both sound and video between the PC and the camcorder, in both directions. Prepare to dedicate a lot of hard drive space. Digital video footage takes up 3.6 MB per second of videoenough to fill up 13 GB per hour of tape. The Vista version of Movie Maker can even import high-definition video from one of the new consumer HD camcorders. Keep in mind, however, that this video takes up even more space on the hard drive and is much slower to work with.
Note: In Vista, Movie Maker can no longer import analog video (from a VCR, for example) through a video capture card you've installed. You can edit such videos, but only if you first import them using whatever software came with your card.Movie Maker is also not much good at importing video from camcorders that use wacky formats like miniature DVDs or hard drives . Here again, you're left on your own to get that video onto the hard drivethen you can import it as files, as described next.
-
Use existing pictures or movies . You can use Movie Maker to edit movie files you've imported from your digital camera or downloaded from the Internet, too; in fact, you can drag them in directly from Photo Gallery (Chapter 13). You can even splice together still photos to create a living photo album.
Tip: Actually, there's another great way to use Movie Maker: highlight a bunch of pictures in Photo Gallery (Chapter 13) and then click "Make a Movie" on its toolbar. Presto! A new Movie Maker project opens, with all of the photos imported and ready to drag to the Timeline.
Most intriguingly of all, you can also import TV shows you've recorded in Media Center (Chapter 16) and edit them. Chop out the ads, the recaps, and the credits, and maybe save the result to a DVD for watching (or, rather, your kids ' watching) on road trips. 15.1.1. Capturing Footage from a Camcorder To capture footage, hook up your digital camcorder to the PC's FireWire jack. (Some models also work with a USB 2.0 jack.) Then: -
Put the camcorder in Playback mode . This primary switch may also be labeled VCR or VTR. -
In the task list, under Import, click "From digital video camera." The Import Video wizard appears. -
Type a name for the video file you're about to create, and choose a folder for saving it. (Vista proposes your Videos folder.) Click Next. Specify whether you want the whole tape or just selected scenes, and then click Next . If you opted for the whole tape, the camcorder rewinds and begins to play its entire contents into your PC. Otherwise, you arrive on the control screen shown in Figure 15-2. You can now control the camcorder by remote control. You can inspect the video as it arrives on your hard drive by watching it in the Preview window. 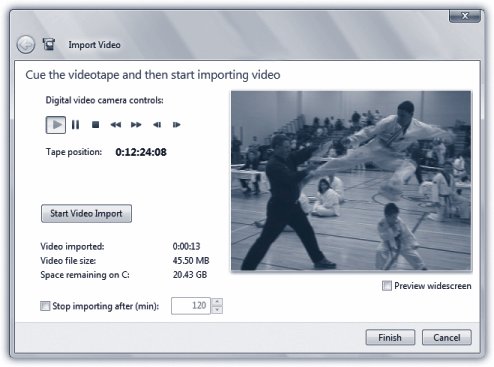 | Figure 15-2. Use the Play, Stop, Rewind, Fast Forward, and Pause buttons to find the scenes on the camcorder that are worth importing. Once you've got everything cued up, use the Start Video Import (Stop Video Import) button to control the transfer of footage to your hard drive . | | -
As the video plays, click Start Video Import and Stop Video Import, as necessary, so that you capture only the scenes you want to edit . You can tap the S key to start and stop importing, too. -
When you've reached the end of the good stuff, click Finish . Repeat this process until you've captured all the pieces needed to create your masterpiece. When it's all over, you wind up back in Movie Maker, where each imported scene appears as its own thumbnail. Skip ahead to "Editing Video." 15.1.2. Importing Pictures, Movies, and Sounds from the Hard Drive You don't necessarily need a camcorder to fool around with Movie Maker. You can also bring any movie or picture file on your hard drive into your Movie Maker project; just click the appropriate link in the task pane, in the Import setting (Videos, Pictures, Audio or Music). At that point, the standard Open File dialog box opens. Find and import the files you want to work with.
Tip: Remember the usual shortcuts that let you select multiple files at once. To grab a sequential batch in the dialog box, click the first file, then Shift-click the last. You can also Ctrl-click to select or deselect individual files (the first, third, and fifth, for example).
Movie Maker turns each imported file into a clip, which you can edit, chop up, or manipulate, as described in the following paragraphs.
Tip: To the ancient question, "What is the sound of one hand clapping?" you can now add, "What is the duration of a still picture?" As far as Windows is concerned , the answer is, "Five seconds." When you drag a still-image clip into your Timeline, as described below, Windows gives it a 5-second proposed duration. To make a still image stay on the screen for a longer or shorter interval, simply drag its right-hand triangle on the ruler, as shown in Figure 15-3.
As your cinematic career flourishes, you can create multiple folders in the pane at left to hold the clips from various projects. Choose View Collections (to replace the Tasks pane with the Collections pane); right-click "Imported media; then, from the shortcut menu, choose New Collection Folder. You can drag clips from one folder to another to suit your obsessive tendencies. |