3.5. Smart Folders

 <  Day Day Up  >  

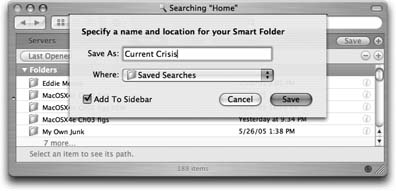
Once you've grown comfortable with the layout of the Search dialog box, you may notice the little Save button in the upper-right corner. That button generates a Smart Folder ”a self-updating folder that, in essence, performs a continual, 24- hour search for the criteria you specify. (Smart folders are a lot like smart albums in iPhoto and iTunes, smart folders in Mail, and so on.)


Note: In truth, the smart folder performs a search for the specified criteria at the moment you open it . But because it's so fast, and because it's always up to date, it feels as though it's been quietly searching all along.

Figure 3-13. Mac OS X can preserve your search as a smart folder on the desktop. (If you turn on Add to Sidebar, you'll also make the smart folder available as a single-click icon in your Sidebar.) You can stash a smart folder in your Dock, too, although it doesn't display a pop-up menu of its contents, as normal folders do.


POWER USERS' CLINIC
The Raw Power of the Raw Query

You may have just slogged through 20 pages of Spotlight details ”but if you can believe it, there are another 40 or 60 to be written. It turns out that the Spotlight most people see is only a subset of the true power awaiting in Tiger.

For example, what if you wanted to see all the files you've opened in the last 24 hours except email messages and address book entries? Or what if you want to round up all PDF documents and PostScript files you've opened in the last week? Using the Spotlight tools that most people see, you wouldn't be able to set up searches or smart folders that are quite that smart.

Fortunately for the true Tiger geek, Spotlight also understands a query language ”a programming-like syntax that lets you establish far more specific and nuanced searches. You can use it to pull off stunts that would be impossible using the Spotlight menu or window alone.

To read about the basics of the query language, start at http://developer.apple.com/macosx/spotlight.html; it will lead you to a number of Web pages that explain the full scope of Spotlight's internal lingo.

You may also get a kick out of studying how Spotlight uses the query language itself. To do that, create a smart folder, Get Info on it, and, on the General panel, inspect the string of query text that Spotlight generated behind the scenes (as shown here).

What you'll learn is that the basic search command always begins with kMDItem. To search for something by its file type, your query should begin with kMDItemContentType ; for when you last opened it, use kMDItemLastUsedDate ; and so on.

For example, here's how you'd type a query that up all files that contain the keyword "kumquat": kMDItem- Keywords == "*kumquat*" . (The double = symbol means "equal." You can also use <, >, <=, and so on. The asterisks are wildcards that mean, "There may be other text here, or not; it's still a good match.")

To signify "and," use two ampersands, like this: &&. For "or," use two vertical bars, like this: .

Once you've read more about this query language, you can build much more complicated searches. This one, for example, finds all audio files, whose author is either Kevin or Steve, that were modified in the last week:

 ((kMDItemAuthors == "Kevin"wc    kMDItemAuthors = "Steve"wc) &&          (kMDItemContentType ==  "audio"wc  kMDItemContentType = "video"wc))  && (kMDItemFSContentChangeDate == $time.  this_week) 

And here's how you'd find all PDF documents and PostScript files with a single search:

 ((kMDItemContentTypeTree = 'com.adobe.pdf')     (kMDItemKind = 'Post-Script document')) 

And where, you may ask, are you supposed to type all these queries? You have two options.

In the Finder, when you choose File Find to produce the Search dialog box, choose Other from the Kind pop-up menu. In the list of six gazillion search parameters, choose Raw Query. You can type your elaborate search string into the text box that appears.
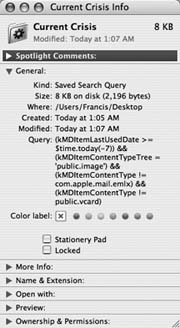
Second, you can open Terminal (Chapter 16) and use Spotlight's Unix equivalent. The main command you want to learn about is mdfind . For example, at the Terminal prompt, you could type mdfind "kMDItemAcquisitionModel == 'Canon PowerShot S70'" (and then press Enter) to see a list of all photos you took with that particular camera model.

Spotlight: The Missing Manual ? Hmm. Has a nice ring to it, doesn't it?


Here's the most common example (and one you can't replicate in any other operating system, by the way). You choose File Find. You set up the pop-up menus to say "Last Opened and "This week." You click Save. You name the smart folder something like Current Crises, and save it on your desktop (Figure 3-13).

From now on, whenever you double-click that smart folder, it opens to reveal all of the files you've worked on in the last week or so, neatly clustered into category groups the way Spotlight loves to do. The great part is that these items' real locations may be all over the map, scattered in folders all over your Mac and your network. But through the magic of the smart folder, they appear as though they're all in one neat folder.


Tip: If you decide your original search criteria need a little fine-tuning, open up the smart folder. At the upper-right corner of the window, click Edit. You're back on the original setting-up-the-search window. Use the pop-up menus and other controls to tweak your search setup, and then click the Save button once again.Or better yet: To save your newly modified criteria as a second smart folder, preserving your original, hold down the Option key. Now the Save button says Save As. Cool!
 <  Day Day Up  >  


Mac OS X. The Missing Manual
Mac OS X Snow Leopard: The Missing Manual (Missing Manuals)
ISBN: 0596153287
EAN: 2147483647
Year: 2005
Pages: 506
Authors: David Pogue

flylib.com © 2008-2017.
If you may any questions please contact us: flylib@qtcs.net