| You can view the files and folders in a desktop window in any of three ways: as icons; as a single, tidy list; or in a series of neat columns . Figure 1-12 shows the three different views. Every window remembers its view settings independently. You might prefer to look over your Applications folder in list view (because it's crammed with files and folders), but you may prefer to view the less populated Users folder in icon view, where the larger icons are easier to double-click. 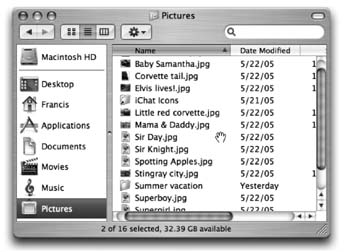 | Figure 1-11. Position your mouse inside a Finder list-view window. You can scroll up and down by pressing  and Option as you drag. As you drag, the cursor changes shape, becoming a white-gloved butler 's hand. Where can you get that kind of service these days? and Option as you drag. As you drag, the cursor changes shape, becoming a white-gloved butler 's hand. Where can you get that kind of service these days?
(This trick used to work in icon views, too; it let you scroll diagonally, which was even more useful. Ah, well Apple giveth, and Apple taketh away.) | |
WORKAROUND WORKSHOP
How Much Is That Doggie in the Window? | | The status bar shows you disk-space information for the entire disk, but not how much disk space this particular window's contents occupy. To find out that piece of information, make sure that no icon in the window is highlighted. Then choose File  Get Info (or press -I). The resulting Info window, which is described in more detail at the end of the next chapter, shows the size of the folder or disk whose window you're browsing, along with other useful statistics. Get Info (or press -I). The resulting Info window, which is described in more detail at the end of the next chapter, shows the size of the folder or disk whose window you're browsing, along with other useful statistics. |
To switch a window from one view to another, just click one of the three corresponding icons in the window's toolbar, as shown in Figure 1-12. You can also switch views by choosing View as Icons (or View as Columns, or View as List), which can be handy if youve hidden the toolbar. Or, for less mousing and more hardbodied efficiency, press -1, -2, or -3 for icon, list, or column view, respectively.  | Figure 1-12. From top: The same window in icon view, list view, and column view. Very full folders are best navigated in list or column views, but you may prefer to view emptier folders in icon view, because larger icons are easier to click.
Remember that in any view (icon, list, or column), you can highlight an icon by typing the first couple letters of its name . In icon or list view, you can also press Tab to highlight the next icon (in alphabetical order), or Shift-Tab to highlight the previous one. | |
|