14.8. ColorSync
| < Day Day Up > |
14.7. Fonts ”and Font BookOver the years , Macintosh fonts have improved considerably. No longer must you pray to the printer gods that your beautiful flyer won't come out with jagged-looking type because you chose the wrong font type , one that doesn't have smooth edges.
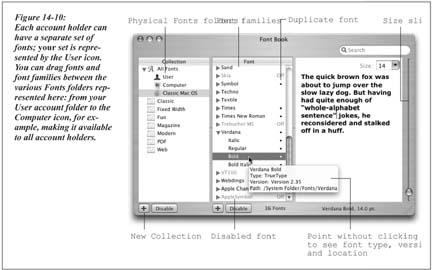
Mac OS X delivers type that is all smooth, all the time . Fonts in Tiger's formats ” called TrueType, PostScript Type 1, and OpenType ”always look smooth onscreen and in printouts, no matter what the point size . Tiger comes with a program that's just for installing, removing, inspecting, and organizing fonts. It's called Font Book (Figure 14-10), and it's in your Applications folder. 14.7.1. Where Fonts LiveIf you're used to Mac OS 9 or Windows , one of the most confusing changes is that there's no longer one single Fonts folder for your computer. There are now five Fonts folders. The fonts you actually see listed in the Fonts menus and Font panels of your programs are combinations of these Fonts folders' contents. They include:
With the exception of the essential system fonts, you'll find an icon representing each of these locations in your Font Book program, described next . Note: And just to make life even more exciting, Adobe's software installers may donate even more fonts to your cause, in yet another folder: your Home Application Support folder. 14.7.2. Font Book: Installing and Managing FontsOne of the biggest perks of Mac OS X is its preinstalled collection of over 50 great-looking fonts ”"over $1,000 worth," according to Apple, which licensed many of them from type companies. In short, fewer Mac users than ever will wind up buying and installing new fonts. But when you do buy or download new fonts, you're in luck. There's no limit to the number of fonts you can install. 14.7.2.1. Looking over your fontsRight off the bat, Font Book is great for one enjoyable pursuit: looking at samples of each typeface. Click Computer, for example, click the first font name , and then press the down-arrow key. As you walk down the list, the rightmost panel shows you a sample of each font (Figure 14-10). You can also open any font family's flippy triangle (or highlight its name and then press the right arrow) to see the font variations it includes: Italic, Bold, and so on. Tip: When you first open Font Book, the actual text of the typeface preview(in the right panel) is pretty generic. Don't miss the Preview menu, though. It lets you substitute a full display of every character (choose Repertoire) ”or, if you choose Custom, it lets you type your own text, as illustrated in Figure 14-10. 14.7.2.2. Eliminating duplicatesSince your Mac accesses up to five folders containing fonts, you might wonder what happens in the case of conflicts . For example, suppose you have two slightly different fonts, both called Optima, which came from different type companies, and are housed in different Fonts folders on your system. Which font do you actually get when you use it in your documents? The scheme is actually fairly simple: Mac OS X proceeds down the list of Fonts folders in the order shown above, beginning with your own home Fonts folder. It only acknowledges the existence of the first duplicated font it finds. If you'd rather have more control, open Font Book. A bullet ( ¢) next to a font's name is Font Book's charming way of trying to tell you that you've got copies of the same font in more than one of your five Fonts folders. You might have one version of Comic Sans in your own Home Library Fonts folder, for example, and another in your Mac's main Fonts folder. Click the one that you want to keep and then choose Edit Resolve Duplicates. Font Book turns off all other copies, and the bullet disappears. 14.7.2.3. Adding, removing, and hiding fontsHere's what you can do with Font Book:
Note: When you install, remove, disable, or enable a font using Font Book, you see the changes in the Font menus and panels of your Cocoa programs immediately. You won't see the changes in open Carbon programs, however, until you quit and reopen them.And when you use Font Book to manipulate fonts in Classic, not only must you quit your open Classic programs ”you must actually restart Classic itself to see the changes in your Font menus. 14.7.2.4. Font collectionsA collection , like the ones listed in the first Font Book column, is a canned set of fonts. Apple starts you off with collections called things like PDF (a set of standard fonts used in PDF files) and Web (fonts you're safe using on Web pages ”that is, fonts that are very likely to be installed on the Macs or Windows PCs of your Web visitors ). But you can create collections called, for example, Headline or Sans Serif, organized by font type. Or you can create collections like Brochure or Movie Poster, organized by project. Then you can switch these groups of fonts on or off at will, just as though you'd bought a program like Suitcase. To create a new collection, click the leftmost + button to create a new entry in the Collections column, whose name you can edit. Then click one of the font storage locations ”User, Computer, or Classic Mac OS ”and drag fonts or font families onto your newly created collection icon. (Recognize this process from playlists in iTunes, or albums in iPhoto?) Each font can be in as many different collections as you want. To remove a font from the collection, click its name and then press Delete. You're not actually removing the font from your Mac, of course ”only from the collection. Tip: Each time you create a new font collection, Mac OS X records its name and contents in a little file in your Home folder Library FontCollections folder.By copying these files into the Shared folder (see Section 12.6.2), you can make them available to any one who uses the Mac. If your sister, for example, copies one of these files from there into her own Home folder Library FontCollections folder, she'll see the name of your collection in her own Fonts panel. This way, she can reap the benefits of the effort and care you put into its creation. 14.7.2.5. Font librariesA font library is a new concept in Tiger. It's another perk for people whose Macs are on a corporate network. A library is a lot like a collection, except that it can include fonts that aren't actually on your machine ”they're on some server elsewhere on the network. Once you've added some fonts to a library, you can even set up collections within that library.
To create a library, choose File New Library; the library appears in the Collection list at the left side of Font Book. Now you can drag fonts into it, or set up collections inside it by highlighting the library's icon and choosing File New Collection. 14.7.2.6. Exporting fontsNext time you submit a design project to a print shop or graphics bureau , you won't have to worry that they won't have the right fonts. Tiger makes it easy to collect all the fonts you used in a document and then export them to a folder, ready to submit, along with your document, to the print shop. Use the Services Font Book Create Collection From Text command (Section 5.9.3.5). Font Book opens and shows you a new collection it's created, containing all the fonts used in your document. Click the collection and then choose File Export Collection. The software prompts you to name and choose a location for the exported fonts folder. Note: The Create Collection From Text command doesn't work in all programs, but you can always build and export a collection manually. 14.7.3. The Fonts PanelAs noted in Chapter 5, some existing Mac programs have simply been touched up ”Carbonized, in the lingo ”to be Mac OS X “compatible. Choosing fonts in these programs works exactly as it always has on the Mac: You choose a typeface name from the Font menu or a formatting palette.
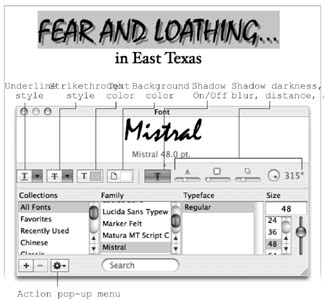
Things get much more interesting when you use Cocoa programs (Section 5.8), like TextEdit, iPhoto, and Mail. They offer a standard Mac OS X feature called the Fonts panel. If you're seated in front of your Mac OS X machine now, fire up TextEdit or Pages and follow along. 14.7.3.1. Choosing fonts from the Fonts panelSuppose you've just highlighted a headline in TextEdit, and now you want to choose an appropriate typeface for it. In TextEdit, you open the Fonts panel (Figure 14-11) by choosing Format Font Show Fonts (c-T). If you've ever used Font Book, this display should look familiar. The first column lists your Collections, as described above. The second column, Family, shows the names of the actual fonts in your system. The third, Typeface, shows the various style variations ”Bold, Italic, Condensed, and so on ”available in that type family. (Oblique and Italic are roughly the same thing; Bold, Black, and Ultra are varying degrees of boldface.) The last column lists a sampling of point sizes. You can use the size slider, choose from the point-size pop-up menu, or type any number into the box at the top of the Size list. 14.7.3.2. Designing collections and favoritesAt the bottom of the Fonts panel is a gear-shaped pop-up menu just like the Action menu in Finder windows. It offers a few useful tools for customizing the standard Fonts panel.
|
| < Day Day Up > |
EAN: 2147483647
Pages: 506