12.4. Editing Accounts
| < Day Day Up > |
12.3. Paren'tal ControlsIf you're setting up a Standard account, the Paren'tal Controls tab affords you the opportunity to shield your Mac ”or its very young, very fearful, or very mischievous operator ”from confusion and harm. This is a helpful feature to remember when you're setting up accounts for students, young children, or easily intimidated adults. (This tab is available for Admin accounts, too, but it's empty except for a "Nothing to see here!" sort of message.) Tiger introduces a lot more peace of mind for paren'ts than other operating systems. You can specify exactly who your kids are allowed to communicate with via email (if they use Mail) and instant messaging (if they use iChat), what Web sites they can visit (if they use Safari), what programs they're allowed to use, and even what words they can look up in the new Tiger Dictionary. Here are all the ways you can keep your little Standard account holders shielded from the Internet ”and themselves . For sanity 's sake, the following discussion refers to the Standard account holder as "your child." But some of these controls ”notably those in the Finder & System category ”are equally useful for people of any age who feel overwhelmed by the Mac, are inclined to mess it up by not knowing what they're doing, or who are tempted to mess it up deliberately. Note: If you use any of these options, the account type listed on the Accounts panel changes from "Standard" to "Managed." 12.3.1. MailWhen you turn on this checkbox, a list box appears. Here, you can build a list of email addresses, corresponding to the people you feel comfortable letting your kid exchange email with. Click the + button below the list, type the address, press Enter, lather, rinse, repeat. Tip: No, you can't drag cards in from your Address Book; that would be much too simple. But after clicking the + button to create a new row in the list (in Edit mode), you can drag just the email address out of an Address Book card that you've opened up. For reasons explained in a moment, turn on "Send permission emails to" and plug in your own email address.
Now then: When your youngster uses Apple's Mail program to send a message to someone who's not on the approved list, he gets the message shown at top in Figure 12-6. If he clicks Ask Permission, then your copy of Mail shortly receives a permission-request message (Figure 12-6, middle); meanwhile, the outgoing message gets placed in limbo in his Drafts folder. If you add that person's address to the list of approved correspondents, then the next time your young apprentice clicks the quarantined outgoing message in his Drafts folder, the banner across the top lets him know that all is well ”and the message is OK to go out (Figure 12-6, bottom). 12.3.2. Finder & SystemWhen you turn on this checkbox, you see the options shown in Figure 12-7. (In Mac OS X 10.3, these controls appeared on their own panel called Security.) Use these options to limit what your Standard-account flock is allowed to do. You can limit them to using certain programs, for example, or prevent them from burning DVDs, changing settings, or fiddling with your printer setups.
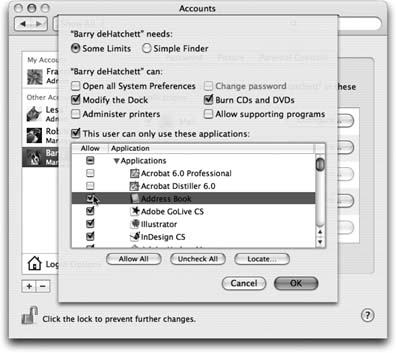
(Limiting what people can do to your Mac when you're not looking is a handy feature under any shared-computer circumstance. But if there's one word tattooed on its forehead, it would be "Classrooms!") On the panel that pops up when you click Configure, you have two options: Some Limits and Simple Finder. 12.3.2.1. Some LimitsBy tinkering with the checkboxes here, you can declare certain programs off-limits to this account holder, or turn off his ability to remove Dock icons, burn CDs, and so on. You can restrict this person's access to the Mac in several different ways:
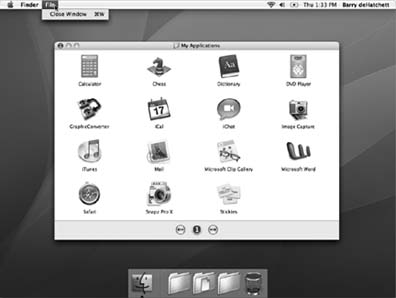
Note: The "Allow supporting programs" checkbox means, "Let the permitted programs open up secondary programs that they rely on." For example, if you've OK'd Photoshop CS2, this checkbox would mean that this account holder can also use the Adobe Bridge utility that serves as Photoshop's fi le browser. 12.3.2.2. Simple FinderIf you're really concerned about somebody's ability to survive the Mac ”or the Mac's ability to survive them ”click the Simple Finder button (shown at top in Figure 12-7). Then turn on the checkboxes of the programs that person is allowed to use. Suppose you're the lucky Mac fan who's been given a Simple Finder account. When you log in, you discover the barren world shown in Figure 12-8. There are only three menus (a, Finder, and File), a single onscreen window, no hard drive icon, and a barebones Dock. The only folders you can see are in the Dock. They include:
The only programs with their own icons in the Dock are Finder and Dashboard. Otherwise, you can essentially forget everything else you've read in this book. You can't create folders, move icons, or do much of anything beyond clicking the icons that your benevolent administrator has provided. It's as though Mac OS X moved away and left you the empty house.
Although the Simple Finder is simple, any program (at least, any that the administrator has permitted) can run from Simple Finder. A program running inside the Simple Finder still has all of its features and complexities ”only the Finder has been whittled down to its essence. This, of course, is one of the downfalls of the Simple Finder concept. It's great for streamlining the Finder, but novices won't get far combating their techno-fear until the world presents us with Simple Keynote, Simple Mail, and Simple Microsoft Word. Still, it's better than nothing. In any case, as shown in Figure 12-8, the available programs' icons appear, up to 12 on a "page," with page buttons and previous/next buttons at the bottom of the screen. The Simple person can't move, rename, delete, sort, or change the display of them ”merely click them. When Simple people try to save documents, they find that although the Save box lists the usual locations (Desktop, Applications, and so on), they can in fact save files only into their own Home folders or subfolders inside them. 12.3.3. iChatThese paren'tal controls work a lot like the Mail limits described above. When you turn on the iChat checkbox, an empty list appears, which you can fill with the buddy-list names of everyone it's OK for your kid to chat with. This time, though, you do get some help from the operating system. When you click the + button to add a name, your own Address Book list pops open. You can add a name to the list by clicking it and then clicking Select Buddy. (Even though you see everyone in your address book, you're allowed to choose only people with an AIM-compatible address listed in the Instant Messaging box.) When your underling fires up iChat, she discovers that her Buddy List is empty except for the people you've identified. If she tries to click the + button to add a buddy list, she gets only an error message. Handling the teenage hissy fit is your problem. 12.3.4. SafariThis feature is designed to limit which Web sites your kid is allowed to visit. But you don't build the list of approved Web sites right in the dialog box, as you do with mail and chat addresses. Instead, you're supposed to set up your kid's copy of Safari (after logging in with his account). Turn off paren'tal controls, for the moment, by choosing Safari Preferences, clicking Security, and turning off "Enable paren'tal controls." Enter your administrator's name and password. Now set up his copy of Safari so that all of the approved sites appear on the Bookmarks bar (Section 21.1.2.1 has instructions). Everything else will be off-limits. When you're finished building the Bookmarks bar, return to Preferences and turn paren'tal controls back on. You've just clipped your youngster's wings to the extent that he can't use the Bookmarks menu , can't type in a Web address into the address bar, can't use the Google search box, and so on. If he tries, he'll see a message that invites him to add the desired Web site to the Bookmarks bar, thereby making it an approved site ”but he can do that only with an administrator's name and password. Put simply, your kid need to call you over to do the job, and that's your opportunity to see what he's up to. Tip: Your kid is allowed to visit any Web page within the specifi ed Web site. So if you put www.nytimes.com on the Bookmarks bar, he can also visit www.nytimes.com/movies, for example. One more point: The paren'tal controls work only in Safari, iChat, and Mail. If you've got other browsers, chat programs, and email programs on the hard drive, remember to keep your kid out of them, using the application-limit controls described earlier.
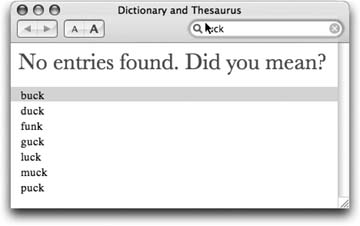
12.3.5. DictionaryAs you know from Chapter 10, Mac OS X Tiger comes with a complete electronic copy of the New Oxford American Dictionary . And "complete," in this case, means "it even has swear words." Turning on this checkbox is like having an Insta-Censor ¢. It hides most of the naughty words from the dictionary whenever your young account holder is logged in (Figure 12-9). |

| < Day Day Up > |
EAN: 2147483647
Pages: 506
- Challenging the Unpredictable: Changeable Order Management Systems
- The Effects of an Enterprise Resource Planning System (ERP) Implementation on Job Characteristics – A Study using the Hackman and Oldham Job Characteristics Model
- Context Management of ERP Processes in Virtual Communities
- Intrinsic and Contextual Data Quality: The Effect of Media and Personal Involvement
- A Hybrid Clustering Technique to Improve Patient Data Quality