| Now that you understand basic arranging, let's use some more advanced techniques as you finish the song. Doubling a Track with Mixed Instruments The next section of your Techno80s song is an example of blending both techno and classic rock instruments to double a track. In the last lesson, you doubled a piano track with a strings track to mirror the melody. In this exercise, you'll use two different electric guitar sounds to add some classic rock instrumentation to this techno song. Doubling a track is an advanced arranging technique that is used to make a musical part stronger. Doubling is also called fattening a track. 1. | Press Cmd-L to open the Loop Browser (if it is not already open).
Note The Loop Browser will no longer show your 80s search results because you closed the project. | 2. | Click the Guitars keyword button to search for guitar loops.
| 3. | Locate the Ambient Guitar 01 loop in the results list.
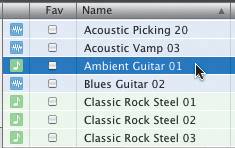 | 4. | Click the Ambient Guitar 01 loop in the results list to preview the loop.
| 5. | Click again to stop previewing the loop.
Now that you've previewed the loop, you are ready to add it to the Timeline.
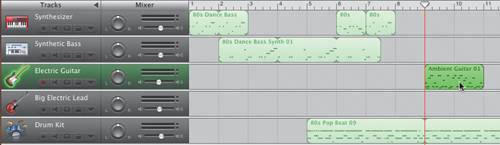
| 6. | Select the Electric Guitar track (third track from the top) in the Timeline.
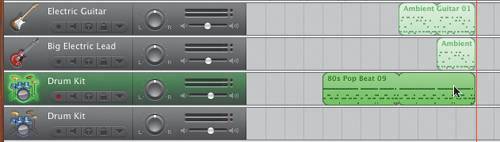
| 7. | Click-drag the Ambient Guitar 01 loop from the browser to the beginning of the 9th measure in the Electric Guitar track.
The Ambient Guitar 01 region appears in the track between the 9th and 11th measures.
 Since the Ambient Guitar 01 loop is a Software Instrument region, you can change the sound by changing the instrument for the track. Since the Ambient Guitar 01 loop is a Software Instrument region, you can change the sound by changing the instrument for the track.
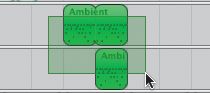
| 8. | Option-drag the Ambient Guitar 01 region to the track below (the Big Electric Lead track) to double the region.
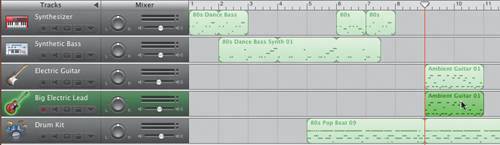 You should now have two identical Ambient Guitar 01 regions in the electric guitar tracks. You should now have two identical Ambient Guitar 01 regions in the electric guitar tracks.
| 9. | Play the doubled guitar tracks to hear how they sound together.
They sound good, but let's make it sound like the Electric Guitar starts the riff, then the Big Electric Lead guitar joins in.
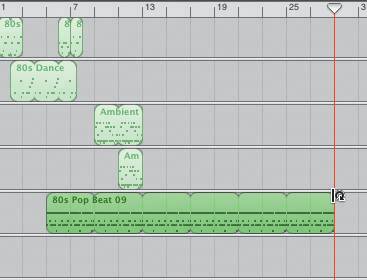
| 10. | Move the playhead to the beginning of the 13th measure.
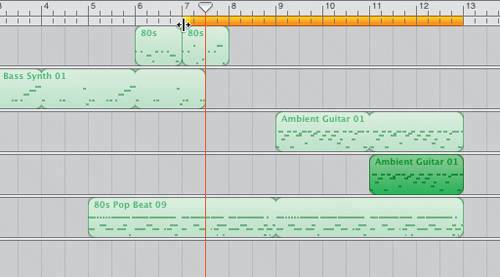
| 11. | Click-drag the upper-right corner of the region in the Electric Guitar track to extend (loop) the region to the playhead position (end of the 12th measure).
 | 12. | Select the region in the Big Electric Lead track and move it until it ends at the playhead position.
 Now both guitar regions end at the end of the 12th measure.
| 13. | Press the left arrow key five times to move the playhead back five measures in the Timeline.
| 14. | Press Cmd-S to save your progress.
| 15. | Play the song from the transition at the beginning to the guitar section.
Notice how it sounds like two separate guitar players playing the same part. This is because you had one start before the other joined in.
|
If this was a song with lyrics, the first part of the song would be the first verse, and the guitar part would be the chorus or pre-chorus. When you played the song again, did you notice the musical gap between the synthesizer and guitar parts? The gap is there by design to let the song breathe. That's right. Breathe. Rule #4: Add a few breaks in the music so your song can breathe. Musical parts all playing together at full throttle for an extended period of time can be exhausting for both the musicians and the listener. If you build in a few breaks for changes or transitions in the song, you give the instrument parts a chance to take turns, and the song a chance to change. Songs with vocal lyrics have built-in breaks between the verses and chorus because the vocalist needs to take a breath from time to time. When you take instrument breaks in the song as you transition from one section to the next, you keep the audience in suspense as to what they will hear next. Will it be a bass? Will it be another synthesizer riff? Perhaps a cowbell? Previewing vs. Auditioning Loops Now that you know that the break in music between the synths and guitars is intentional, let's introduce another classic rock instrument: the electric bass. Instead of previewing the different bass selections in the browser, you will audition the loops with the rest of the song. What's the difference between previewing and auditioning loops? It's simple. Previewing a loop means that you play it in the Loop Browser to hear what it sounds like. Auditioning a loop means that you are listening to it in the browser while the song is playing in the Timeline. Previewing loops is great for finding loops you like, and adding basic tracks to the Timeline. Auditioning loops is important when you need to find loops that fit well with a song, or partial song, that is already in the Timeline. Before you start auditioning loops, it's a good idea to set a cycle region for the part of the song you want to audition. 1. | Click the Cycle button to view the cycle region.
| 2. | Click-drag the middle of the existing cycle region (yellow bar) and slide it to the right until it ends at the beginning of the 13th measure.
 Note If you accidentally clear your cycle region instead of moving it, just click-drag your pointer in the Cycle Region Ruler to draw a new region. | 3. | Click-drag the left edge of the cycle region until it starts at the beginning of the 7th measure.
 Now that the cycle region is in place, you're ready to audition some bass loops to find one that works with this song. Now that the cycle region is in place, you're ready to audition some bass loops to find one that works with this song.
| 4. | Click the Reset button in the Loop Browser to clear the search results and deselect the Guitars button.
| 5. | Click the Bass button to search for bass loops.
| 6. | Type slap in the Search field and press Return to narrow the list to Slap Bass loops.
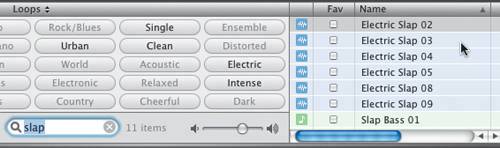 The list now shows 11 different Slap Bass choices to audition. The list now shows 11 different Slap Bass choices to audition.
Note If you are working with Jam Packs or additional loops, your list may be different than the picture, and you may have more than seven Slap Bass choices. Remember, as you audition loops, you are looking for a bass loop that sounds good in the gap between synths and guitars. It also needs to sound good with the guitar part. This bass loop is the transition instrument that leads the song from the techno into the classic rock guitar section.
| 7. | Click the Play button in the transport controls to start playing the cycle region in the Timeline.
| 8. | Click the first bass loop in the search results to hear it with the cycle region.
| 9. | Press the down arrow to move to the next loop down in the list.
If you need to raise or lower the volume of the loops you are auditioning, you can use adjust the Preview Volume slider located at the bottom of the Loop Browser.
 | 10. | Use the up and down arrows to audition the different loops until you find one that has the right classic rock bass guitar sound.
Note If you are working with a slower computer and have trouble processing the song with the loops you are auditioning, you can skip this step. | 11. | Press the spacebar to stop playback.
Which bass loop did you like best? I like the Electric Slap 09 loop, because it's edgy and fits with the groove of the whole song. Let's try using the Electric Slap 09 bass in the song. If you want to try a different bass part, you can after this lesson.
| 12. | Press C to close the cycle region.
| 13. | Move the playhead to the beginning of the 8th measure, which is also the beginning of the gap or break between instrument parts.
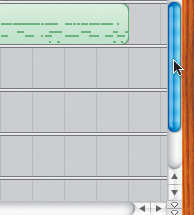
| 14. | Click the scroller on the right side of the window and drag it down to view the lower tracks in the Timeline.
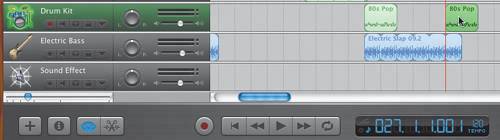
 | 15. | Locate the Electric Bass track, which is the second track from the bottom.
| 16. | Click-drag the Electric Slap 09 region from the Loop Browser to the playhead position on the Electric Bass track.
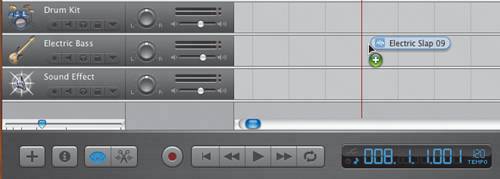 The Electric Slap 09 region appears in the Electric Bass track in the Timeline. The Electric Slap 09 region appears in the Electric Bass track in the Timeline.
| 17. | Click-drag the upper-right corner of the Electric Slap 09 region to extend it to the end of the 12th measure.
The extended region will be five full loop segments in length.
 | 18. | Press Cmd-L to close the Loop Browser.
| 19. | Press Cmd-S to save your progress.
| 20. | Play the entire song in the Timeline to hear the new bass part in context with the rest of the song.
|
Creating a Turnaround with the Drum Tracks Another advanced music arranging technique is creating a drum turnaround. You could easily use the same drum region for an entire song, but it will sound repetitive and won't be very interesting or dynamic. Instead, let's create a turnaround with the drum tracks. What's a turnaround? A turnaround is when a part changes either to lead the song in a new direction or to turn the song back around to a familiar part, like chorus or verse. Turnarounds can also be used to lead the song to the big finish or ending. There are many techniques for creating turnarounds. One method is to add a different drum part to the existing drum tracks. Another method is to double an existing drum part on another track and offset the second part so it starts on a different beat. The result is an enhanced drum part that feels like the drummer just kicked it up a notch to lead the song in a new direction. To create the turnaround, you'll start by extending the existing drum part. 1. | Select the 80s Pop Beat 09 region in the Timeline.
 | 2. | Click-drag the upper-right corner of the 80s Pop Beat 09 region and extend it to the beginning of the 29th measure.
 Now that you have extended the drum beat, you can split the track and use part of it for the turnaround. You'll split the second-to-last loop segment of the drum region.
| 3. | Click the empty track space next to the 80s Pop Beat 09 region to deselect all regions in the Timeline.
| 4. | Click the 80s Pop Beat 09 region to select the region, and only that region.
| 5. | Move the playhead to the beginning of the 21st measure.
Note When you split a region (Cmd-T), it will actually split all the selected regions on all tracks at the playhead position. For this reason, it's important to make sure only the region or regions on different tracks you want to split are selected. | 6. | Press Cmd-T to split the selected region in the track at the playhead position.
| 7. | Press the right arrow key four times to move the playhead to the beginning of the 25th measure.
| 8. | Press Cmd-T to split the region again at the new playhead position.
 You now have three separate drum regions in the top Drum Kit track.
| 9. | Press the down arrow to select the second Drum Kit track.
Next you are going to move the middle drum region one track lower than the others.
| 10. | Click-drag the middle 80s Pop Beat 09 region from the Drum Kit track above and move it to the track that is below the top Drum Kit track.
 | 11. | Press Ctrlright arrow to zoom into the Timeline until you can read each measure number in the Beat Ruler.
| 12. | Click-drag the scroller at the bottom of the Timeline until you can view the Timeline between the 17th and 25th measures.
It's OK if you see more of the Timeline than the 17th to the 25th measures.
| 13. | Move the playhead to the 2nd beat of the 18th measure (18.2.1.001).
| 14. | Click-drag the drum region in the lower Drum Kit track to the left until it starts at the playhead position.
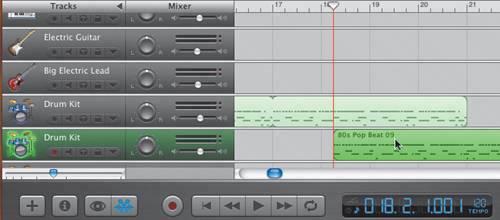 | 15. | Press the left arrow twice to move the playhead two measures to the left.
| 16. | Play the doubled-offset drum tracks to hear how they sound together.
|
Notice how it sounds like the drummer did something differenta turnaroundand the drum part turns around back to the original beat. This technique works with most steady drum beats. Finishing the Turnaround The final step in the drum turnaround is to add another percussion loop at the end. Instead of the turnaround leading the song back to a familiar sound, it will lead to a new sound that kicks off the end of the song. 1. | Locate the third Drum Kit track (the lowest Drum Kit track) in the Timeline.
| 2. | Move the playhead to the beginning of the 22nd measure.
This is where you will place the new drum part.
| 3. | Press Cmd-L to open the Loop Browser and click the Reset button to deselect any keywords.
| 4. | Type Pop Beat in the Search text field and press Return.
| 5. | Click-drag the 80s Pop Beat 07 loop from the browser to the playhead position on the lowest Drum Kit track.
| 6. | Press the left arrow key several times to move the playhead before the drum turnaround.
| 7. | Listen to the finished turnaround.
|
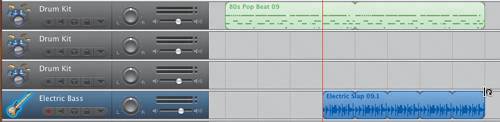
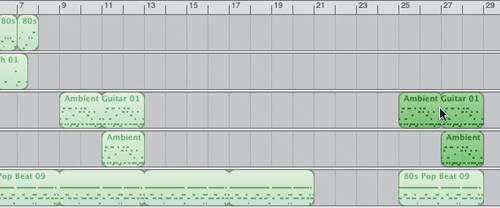
Building the Song with Established Parts Most songs contain two or three sections that repeat several times, such as the verses or chorus. Now that you've introduced the main instrument parts for the song and arranged them in the Timeline, you can copy and paste them in the Timeline. Once you've repeated a section of the song, you can make subtle changes to keep the parts from getting stale. There are different ways to copy and paste regions in the Timeline. Let's review the different methods as you duplicate some of the existing parts of the song. 1. | Press Ctrlleft arrow to zoom out of the Timeline until you can clearly see the bass region and the drum turnaround section in the Timeline.
| 2. | Option-drag the Electric Slap 09.1 bass region and move the duplicate region so it starts at the beginning of the 22nd measure.
 | 3. | Click-drag the upper-right corner of the duplicated bass region and extend it one loop segment.
The extended region should end at the beginning of the 28th measure.
 Now let's copy and paste the doubled guitar section.
| 4. | Click-drag the empty track space to the left of the top guitar region and move the mouse to the right and down to lasso (select) both guitar regions.
The lasso needs to start in the blank track space of the highest or lowest track.
 | 5. | Option-drag either selected region and drag the duplicate so that it starts at the beginning of the 25th measure.
 Next, you'll copy and paste the region on the Synthetic Bass track. Next, you'll copy and paste the region on the Synthetic Bass track.
| 6. | Click the 80s Dance Bass Synth 01 region in the Synthetic Bass track to select the region.
| 7. | Press Cmd-C to copy the selected region.
| 8. | Press the left arrow key to move the playhead to the beginning of the 16th measure.
The left arrow key only moves the playhead one measure at a time, so you will need to press the left arrow several times.
| 9. | Press Cmd-V to paste the copied region at the playhead position.
The playhead moves several measures to the right after you paste the region.
For the next copy and paste maneuver, you will select two regions in the same track and paste both at the same time.
| 10. | Shift-click the first and third regions in the Synthesizer track to select both regions.
 | 11. | Press Cmd-C to copy both regions.
| 12. | Move the playhead to the beginning of the 14th measure.
| 13. | Press Cmd-V to paste both regions starting at the 14th measure.
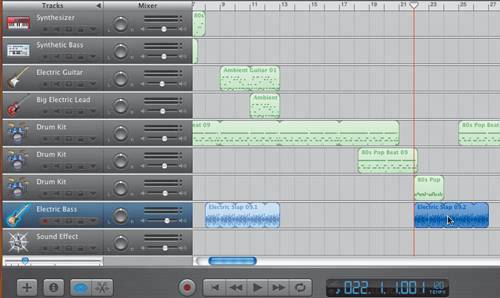
 Both pasted regions appear in the track. Now let's duplicate the region in the lowest Drum Kit track. Both pasted regions appear in the track. Now let's duplicate the region in the lowest Drum Kit track.
| 14. | Option-drag the region in the lowest Drum Kit track to duplicate the region and move the duplicate so it starts at the beginning of the 27th measure.
 | 15. | Press Cmd-S to save your work.
|
As you can see, copy, paste, and duplicate are very useful tools for arranging a song once you have the main parts in the Timeline. Now you know how to create the sections of a song, such as a verse and chorus, and then copy and paste those sections to repeat them later in the song. |