| The first free-form tool that you'll work with is the Bezier tool. The Bezier tool allows you to create shapes with both straight and curved lines. When you set the Bezier control points, remember the connect-the-dots drawings. The idea isn't to draw everything, just the outline of the shape. A good rule to remember is to set a new control point each time the outline of the shape changes direction. Just like in a connect-the-dots drawing, you need to place the control points in order either clockwise or counterclockwise around the object. When you make it all the way around the shape, click the first control point again to complete the shape. Once the outline of the shape is complete, it will automatically be filled with white color to create a solid shape. You can then change the fill color, just as you change the color of a circle or rectangle shape. Since this is an exercise, don't worry about catching every detailed ripple in the leaf. You can always refine your shape later. The first step in creating a free-form shape with the Bezier tool is to select the tool. There are two ways to select the Bezier tool: - Press B (for Bezier tool).
- Select the Bezier tool from the Create tool set on the toolbar.
1. | Press B to select the Bezier tool.
Bezier tool on the toolbar 
Bezier tool 
Two things happen when you press B: The Bezier tool icon becomes highlighted in the toolbar, and your pointer becomes a Bezier tool that looks like the head of a fountain pen.
Now that you have the tool, let's set some control points. Your goal is to create a shape that looks like the leaf in the upper left of the frame.
| 2. | Starting at the top of the leaf and working your way around the shape clockwise, click the Bezier tool around the outer edge of the leaf at each place where the leaf shape changes direction.
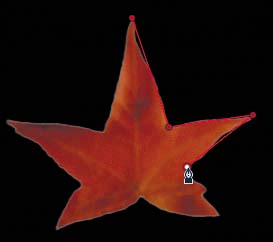
| 3. | After you have set control points all the way around the leaf, click the first point to close the shape.

The Bezier control points are connected by red lines to create a shape filled with the default color: white.
| 4. | Press Cmd-S to save your progress.
|
Modifying the Bezier Vertices Now that you've set the Bezier control points to create a rough shape, you can clean it up by adjusting the Bezier point vertices. What are vertices? The word is the plural form of vertex. A vertex is the point at which two sides of a plane figure or an angle intersect. Your elbow is a vertex at which your forearm and upper arm intersect. Your elbows are vertices of your body shape. You can keep a vertex linear (a straight angle) or make it smooth (curved) like the curve of your neck as it connects to your shoulders. Motion provides three ways to modify the Bezier shape. You can move the control point to a new location, which will change the shape accordingly; you can add another control point (vertex) by Ctrl-clicking anywhere along the outside of the shape; and you can smooth the point by adding a Bezier handle. Let's try all three methods. 1. | Drag one of the control points on the shape up, down, right, or left to reposition it along the leaf shape.
| 2. | Ctrl-click along the outline of the shape (the red line) and select Add Point from the contextual menu.
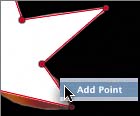
The new control point includes a handle that you can use to curve lines extending from that point.
You can also delete control points by Ctrl-clicking them and selecting Delete Point from the contextual menu.
| 3. | Ctrl-click the new point and select Delete Point from the contextual menu.
Now let's try smoothing the point on the lower-center vertex of the shape.
| 4. | Ctrl-click the point in the lower center and select Smooth from the contextual menu.

The lines on the left and right of the selected vertex are smooth (curved), and two gray Bezier handles appear on the left and right sides of the selected point. You can drag the Bezier handles to manipulate the shape and curvature of the lines. Bending the handle bends the corresponding line of the shape; extending the handle extends the curvature of the line.
Let's try it.
| 5. | Drag the right Bezier handle downward to bend the right side of the vertex.

To bend the lines to the left and right of the vertex independently, you can hold down the Command key while you drag the handle.
| 6. | Hold down Command and drag the left Bezier handle downward to curve the line to the left of the selected vertex.
| 7. | Experiment with the different points to finish the leaf shape using the Bezier tool.
| 8. | Press Cmd-S to save your progress.
|
|