Understanding Opacity How Opacity Works Premiere Elements supports the Friendly Ghost Effect through the use of a function called "opacity," which you may more readily understand as "transparency." That is, it's the quality (or lack of) "see-throughness," if you will, of a video clip. 
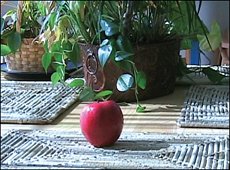
When used by itself (that is, over an empty track or "nothingness"), decreasing opacity on a clip will appear to make the clip darker, as shown in the image at left (which is set at 50% opacity). When used over another clip, the second clip acts as a background clip (as shown in the sequence of pictures at the bottom of these two pages). When two clips are for the most part identical, with only one element changing (specifically, it's becoming transparent, or in other words, losing opacity) it appears that only that element is changing, when, in fact, everything in that clip is actually changing. An Apple Appears to Appear Along the bottom of these two pages are illustrations from two clips, superimposed over each other. One is of a table without an apple; the other clip of the same table, with an apple placed on top. The opacity of the "apple" clip is set to gradually increase over time, from 0% to 100%. This makes it seem as if the apple is appearing out of thin air. (This particular effect can also be accomplished by cross-dissolving from one clip to the other.) 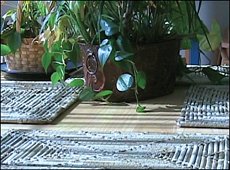
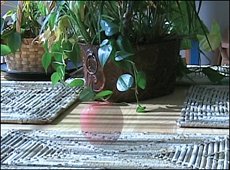
This works because all other elementsthe table, the placemats, the plantsare exactly the same in each shot. The only difference is the apple. This is simply an illusion, a kind of a magic trick created with a camcorder and video editing software. Requirements for Success Even in the clips below, which were filmed literally within seconds of each other, you can begin to see the shadows shifting as the sun moves slowly in the sky. This is rule number one whenever you plan to use the Opacity control in this way: the sun is your enemy. As light and shadows change, the effect will become less and less convincing. Film as quickly as you can whenever you are creating scenes like these. The second requirement for success is the tripod. Without one, you will fail. It's that simple. Even the slightest variation in angle or position from one clip to the other and the whole thing is ruined. It simply won't be believable. If you don't have a tripod or a monopod, find a way to rest the camcorder on a table, chair, shelf, or other rock-solid surface. One Last Thing One last trick of the trade. Once you switch on your camcorder to film your clips for this type of project, don't turn it off. This no doubt seems counter-intuitive because people (or their hands, in the case of props being moved in and out of the scene) will be filmed. This may appear to give the "trick" away, but it really won't. Remember, back in your "studio," you can edit all that out. What you don't want when filming is even the slightest change in the camcorder's position, which even the gentlest pressing of the Record button to stop and start filming can do. 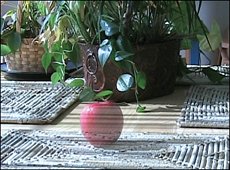
|