Storing a Macro in a Document Library
Each OpenOffice.org document is a library container able to contain macros and dialogs. When a document contains the macros that it uses, possession of the document implies possession of the macros. This is a convenient distribution and storage method. Send the document to another person or location and the macros are still available and usable.
The traditional method of introducing a programming language is by writing a program that somehow outputs the message "Hello World." Entire Web sites exist with the sole purpose of showing "Hello World" programs in as many different programming languages as possible (for example, see http://www2.latech.edu/~acm/HelloWorld.shtml ). Choosing not to break with tradition, my first macro shows a variation of "Hello World."
Step 1. Create a Library
All OOo documents, regardless of document type, may contain macros. To add a macro to any OOo document, the document must be open for editing. Start by opening a new text document, which will be named "Untitled1"- assuming that no other untitled document is currently open . When a document is created, OpenOffice.org creates an empty library named Standard. The Standard library, however, remains empty until a new module is manually created. Use the Macro dialog to organize libraries and modules: select Tools Macros Macro (see Figure 1 ).
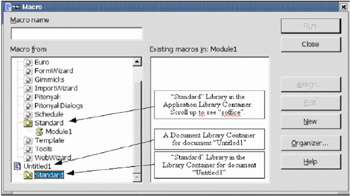
Figure 1: Use the Macro dialog to create new macros and organize libraries.
The "Macro from" list shows the available library containers; this includes every open document as well as the application library container. The application library container is named "soffice", but this is not shown in Figure 1. The document library containers are listed below the "soffice" container using the document's assigned name . Most library containers already have a library named Standard. Double-click a library container icon to toggle the display of the contained libraries. Double-click a library to toggle the display of the contained modules.
| Note | The application library container is named "soffice" because of ties with StarOffice from Sun Microsystems. OpenOffice.org is based on code from StarOffice, and the two products continue to share a common code base. |
In Figure 1, the Standard library in the untitled document is highlighted. This library was automatically created when the new document was created. The document currently contains no modules-remember that macros are stored in modules. Although you could click the New button to create a new module, don't! The point of this section is to create a new library.
| Tip | Do not store your macros in the Standard library. Create a new library with a descriptive name and store your macros there. When a library is appended it will overwrite an existing library with the same name. If all of your libraries are named Standard, this prevents you from appending your libraries to other library containers. |
Click the Organizer button to open the Macro Organizer dialog (see Figure 2 ). As with the Macro dialog, all of the library containers are listed. In other words, each document is listed, as is the "soffice" application library container. In Figure 2, the Standard library is highlighted in the document "Untitledl"; scroll down the list to find "Untitledl" if required. The Macro Organizer dialog is a tabbed dialog, and the tab in focus is Modules. As the name implies, the Modules tab deals with modules. Here's a description of the items in this dialog:
-
The New Module button creates a new module in the selected library.
-
The New Dialog button creates a new dialog in the selected library.
-
The Delete button deletes the currently selected module; it's not available unless a module is selected.
-
The Edit button opens the currently selected module for editing in the IDE; it's not available unless a module is selected.
-
The Close button closes the Macro Organizer dialog.
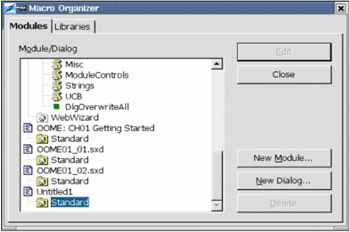
Figure 2: Use the Macro Organizer dialog to organize modules.
The purpose of this section is to create a meaningfully named library that is contained in the "Untitledl" document. Click the Libraries tab to deal with libraries (see Figure 3 ).
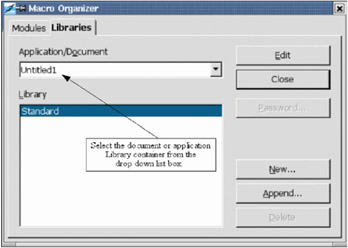
Figure 3: Use the Macro Organizer dialog to organize libraries.
When this portion of the dialog is displayed, the application library container (soffice) is selected in the Application/Document list. Select the "Untitledl" document so that the changes are made to the untitled document. The buttons displayed on the Libraries tab affect libraries, not modules. Here are their descriptions:
-
The New button creates a new library in the selected document or application.
-
The Password button allows you to assign or change the password for the selected library. Note that you cannot assign a password to the default library.
-
The Delete button deletes the currently selected module; it's not available unless a module is selected.
-
The Append button provides a mechanism for copying a library from another library container (document or application) to the library container selected in the Application/Document list. Library management is discussed later in this chapter.
-
The Edit button opens the currently selected library for editing in the IDE.
-
The Close button closes the Macro Organizer dialog.
Click the New button to create a new library (see Figure 4 ). Although the default name is "Library 1," it is better to choose a meaningful name such as "MyFirstLibrary" or "TestLibrary." Click OK to create it.
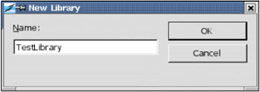
Figure 4: Choose a meaningful name for the library.
The Macro Organizer now contains the newly created library in the Library list (see Figure 5 ).
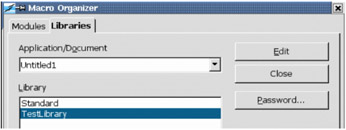
Figure 5: The document now contains the library named TestLibrary.
Step 2. Create a Module
Macros are stored in a module, so the next step is to create a module in the newly created library. Assuming that the Macro Organizer (see Figure 3) is still open, select the Modules tab (see Figure 6 ).
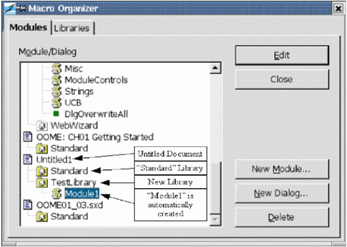
Figure 6: The TestLibrary contains one module named Module 1.
The newly created TestLibrary is now displayed in the Macro Organizer. Select TestLibrary or any module contained in that library, and then click the New Module button to create a new module (see Figure 7 ). The default name is Module 1; choose a more descriptive name for the module and click OK to create it.
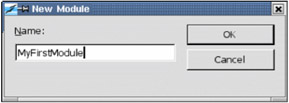
Figure 7: Choose a meaningful module name.
| Tip | Use descriptive module names to avoid confusion. This is important when moving between modules. |
A common mistake is to highlight the wrong library container in either the Macro dialog or the Macro Organizer dialog. The most common mistake is to select a library or module in the application container (soffice) rather than a specific document. Find the document name in the list. The document name is determined by the title as set in the document's Properties dialog. Use File I Properties to open the document's Properties dialog. The title is set from the Description tab. If no title is set, the file name is used instead.
| Warning | Two documents with the same title in the document's Properties dialog use the same name in the Macro dialog, the Macro Organizer dialog, and the window title. This is confusing, so try to avoid it. |
Step 3. Enter Your First Macro
If the Macro Organizer dialog is still open, you can highlight the newly created module and click the Edit button. This will open the Basic IDE. Another option is to use the Macro dialog. If the Macro Organizer dialog is open, click the Close button to open the Macro dialog. If the Macro Organizer dialog is not open, select Tools I Macros I Macro to open the Macro dialog (see Figure 8 ).
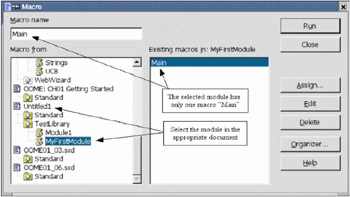
Figure 8: Select a specific macro.
Here's a description of the buttons in the Macro dialog:
-
The Run button runs the selected macro. The macro is selected in the right-hand list, and its name also appears in the top-left input box labeled "Macro name."
-
The Close button closes the Macro dialog.
-
The Assign button associates a macro with a specific event. Assigning macros to events is discussed later.
-
The Edit button opens the IDE and edits the selected macro.
-
The Delete button deletes the selected macro. This button is present only if a module is selected. If a library or document is selected in the "Macro from" list, the Delete button changes to New. The New button creates a new macro in the selected library.
-
The Organizer button opens the Macro Organizer dialog.
-
The Help button opens the help system.
The purpose of the Macro dialog is to operate on individual macros. Select MyFirstModule and click the Edit button to open the Basic IDE; see Figure 9 ). One empty subroutine, Main, is automatically created when a module is created. The new button on the Macro dialog creates a second empty subroutine, Macro 1. The IDE shown in Figure 9 was opened by clicking the library and then clicking the New button. Delete these subroutines and replace them with the code in Listing 1 .
| |
Sub main HelloWorld2() End Sub Sub HelloWorldl Print "Hello World One" End Sub Sub HelloWorld2 Print "Hello World Two" End Sub
| |
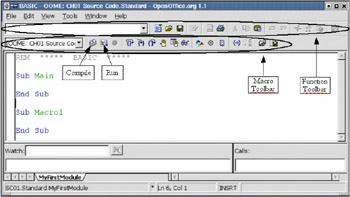
Figure 9: Develop macros in the IDE.
The IDE contains a Macro toolbar and a Function toolbar as labeled in Figure 9. (Most of the icons on the Macro toolbar are identified in Figure 13.) Rest your mouse cursor on a toolbar icon for a few seconds to read the text that appears; this provides a hint at what that icon does.
Click the Compile icon to check the macro for syntax errors. No message is displayed unless an error is found (see Figure 10 ). The Compile icon compiles only the current module.
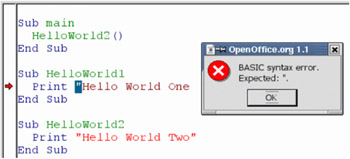
Figure 10: Click the Compile icon to find syntax errors such as a missing double quotation mark.
Modify the code in Listing 1 to demonstrate an error. Remove the second double quotation mark from the Print statement in HelloWorldl (see Figure 10). Then click the Compile icon. A dialog displays a relevant error message for the first error encountered . The error message in Figure 10 indicates that a double quotation mark was expected but not found. The first double quotation character is highlighted, and a red arrow marks the line with the error. Click the OK button to close the error dialog, fix the line by adding a double quotation mark at the end, and then compile the code again.
Click the Run icon to run the first routine in the current module. It is not necessary to click the Compile icon first, because clicking the Run icon automatically compiles every module in the current library. Clicking the Run icon runs only the first routine in the module. For Listing 1, the Run icon runs the first subroutine, which is named "main." The main subroutine calls the HelloWorld2 subroutine, displaying the dialog shown in Figure 11 . Click OK to close the dialog, or click Cancel to to stop the macro.
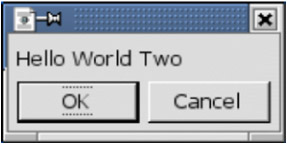
Figure 11: Click OK to close the dialog.
The Run icon always runs the first macro in the current module. As a result, a different approach is required to run HelloWorld1. To run HelloWorld1, you can use one of the following methods :
-
Place HelloWorld1 first in the module and click the Run icon.
-
Modify the main subroutine to call HelloWorld1 rather than HelloWorld2.
-
Use the Macro dialog (shown in Figure 8) to run any routine in the module.
-
Add a button to your OpenOffice.org document that calls HelloWorld1. This method is discussed later.
-
Assign the macro to a keystroke. To do this, click Tools Configure to open the Configuration dialog, and then select the Keyboard tab. Macro libraries are at the bottom of the Category list. You can also find this by clicking Tools Macros Macro, selecting the specific macro, and then clicking the Assign button to launch the Configuration window. Various tabs in this dialog allow you to assign the macro to execute as a menu item, from a keyboard key, a toolbar icon, or a system event.
-
Add an icon to the toolbar that calls HelloWorld1.
To use the Macro dialog to run any subroutine in a module, follow these steps:
-
Select Tools Macros Macro to open the Macro dialog (see Figure 8).
-
Find the document that contains the module in the "Macro from" list.
-
Double-click a library to toggle the display of the contained modules.
-
Select the module to display the contained subroutines and functions in the "Existing macros in: <selected module name>" list.
-
Select the desired subroutine or function to run-for example, HelloWorld1.
-
Click the Run button to run the subroutine or function.
| Tip | When developing a subroutine, first place it in a module so you can quickly run it by clicking the Run icon. Another solution is to use the first subroutine to call another, as shown in Listing 1. This is faster than using the Macro dialog. |
The code used in this chapter is available in an OpenOffice.org text document named SCO1.sxw. Download and open this document. When a document containing macros is opened, OpenOffice.org issues a warning (see Figure 12 ). This warning is to help you avoid accidentally running a macro containing a virus. Although you can still manually run any macro using the Macro dialog, macro buttons in the document will not function. Click Run to fully enable the macro buttons added to SCOl.sxw.
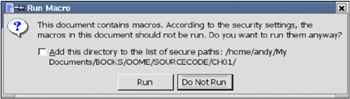
Figure 12: You just opened an OpenOffice.org document that contains a macro.
| Tip | You can configure a document to run a macro automatically when the document loads. This is how a macro virus spreads by using documents. If you don't expect a document to contain a macro, you should always click Do Not Run. This prevents any macro from running automatically when the document is loaded. |
SCO1.sxw contains three buttons: Main, Hello World 1, and Hello World 2. Each button is configured to run the corresponding subroutine when the button is clicked. The buttons do nothing if you click Do Not Run when the document is loaded.
It is possible to add a directory to the list of "secure paths." If you are certain that a path contains documents that you can safely trust not to contain macro viruses, you can check the box, and the path will be added to the list of secure paths. In the future, all documents loaded from the same location will be considered safe, and macros will always run.
EAN: 2147483647
Pages: 203