Search Forms with Additional Fields
| < Day Day Up > |
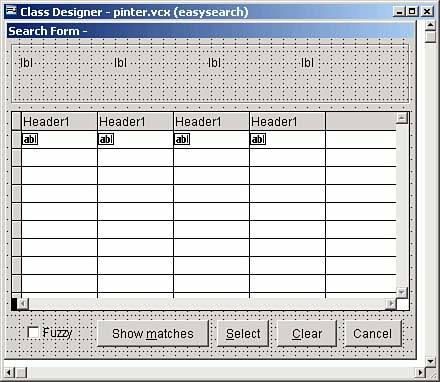
| How easy is it to allow users to construct a search string from any of several fields? It's easy if you hard-code each form individually. A Generic Search Form in Visual FoxProI've built a generic form class that allows you to create a custom search form in a couple of minutes in FoxPro. The basic form class is shown in Figure 9.9. Figure 9.9. A generic search form in Visual FoxPro. Form properties are described in Table 9.1. Table 9.1. Search Form Properties
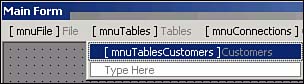
You might wonder why the form has no input fields. The reason is that an input field might be a combo box, a text box, or a date picker. All this form requires is that you name the fields Search1 , , SearchN . I've written the code to allow up to four fields, but you can increase it to any number you want. Listing 9.10 shows the Init code for the class. Listing 9.10. The Search Form's Init CodeWITH THISFORM .Caption = [Search form - ] + .Name + [ (Main Table: ] ; + TRIM(.TableName)+[) Data access: ] + .Access NumWords = GETWORDCOUNT(.ColNames,[,]) IF NumWords > 4 S = [This class only supports a maximum of 4 fields, sorry] MESSAGEBOX( S, 16, _Visual FoxPro.Caption ) RETURN .F. ENDIF FOR I = 1 TO NumWords .Field(I) = GETWORDNUM(.ColNames, I,[,]) .Heading(I) = GETWORDNUM(.ColHeadings,I,[,]) .ColWidth(I)= GETWORDNUM(.ColWidths, I,[,]) ENDFOR WITH .Grid1 .ColumnCount = NumWords .RecordSource = THISFORM.ViewName .RecordSourceType = 1 GridWidth = 0 FOR I = 1 TO NumWords .Columns(I).Header1.Caption = THISFORM.Heading (I) GridWidth = GridWidth + VAL( THISFORM.ColWidth(I) ) FldName = THISFORM.ViewName + [.] + THISFORM.Field (I) .Columns(I).ControlSource = FldName ENDFOR Multiplier = ( THIS.Width / GridWidth ) * .90 FOR I = 1 TO NumWords .Columns(I).Width = VAL( THISFORM.ColWidth(I) ) * Multiplier ENDFOR .Refresh ENDWITH * Look for any controls named SEARCHn (n = 1, 2, ... ) FOR I = 1 TO .ControlCount Ctrl = .Controls(I) IF UPPER(Ctrl.Name) = [MYLABEL] && That is, if it starts with "MyLabel" Sub = RIGHT(Ctrl.Name,1) && Determine the index IF TYPE ( [THISFORM.Search] + Sub ) = [O] * A search field of the same number exists Ctrl.Visible = .T. Ctrl.Enabled = .T. Ctrl.Caption = .Heading(VAL(Sub)) .SearchFieldCount = MAX ( VAL(Sub), .SearchFieldCount ) ENDIF ENDIF ENDFOR .SetAll ( "Enabled", .T. ) ENDWITH The Load event code verifies that necessary parameters have been supplied, and creates a View to hold returned records (see Listing 9.11). This is necessary because the table that's being queried can't be the carrier for the filtered records used to pick a record from the target table. Listing 9.11. The Load Event CodeWITH THISFORM IF EMPTY ( .TableName ) MESSAGEBOX( [Table name not entered], 16, _Visual FoxPro.Caption ) RETURN .F. ENDIF IF EMPTY ( .ColNames ) Msg = [ColNames property not filled in.] MESSAGEBOX( Msg, 16, _Visual FoxPro.Caption ) RETURN .F. ENDIF IF EMPTY ( .ColWidths ) .ColWidths = [1,1,1,1,1] ENDIF IF EMPTY ( .ColHeadings ) .ColHeadings = .ColNames ENDIF .Access = oDataTier.AccessMethod .ViewName = [View] + .TableName oDataTier.CreateView ( .TableName ) ENDWITH The Show Matches button does the heavy lifting (see Listing 9.12). The DataTier object described in Chapter 3, "Building a Visual Fox Pro Application for SQL Server," and expanded in Chapter 5, "Adding Internet Access," creates the View cursor and gets the filtered data. Notice how the search can be made "fuzzy", that is, the "%" character is placed both before and after the string entered by the user . Listing 9.12. The Show Matches Button Click Code WITH THISFORM Fuzzy = IIF ( THISFORM.Fuzzy.Value = .T., [%], [] ) STORE [] TO Expr1,Expr2,Expr3,Expr4 FOR I = 1 TO .SearchFieldCount Fld = [THISFORM.Search] + TRANSFORM(I) + [.Value] IF NOT EMPTY ( &Fld ) LDD = IIF ( VARTYPE( &Fld) = [D], ; IIF ( .Access = [DBF],[{],['] ), ; IIF ( VARTYPE( &Fld) = [C], ['],[]) ) RDD = IIF ( VARTYPE( &Fld) = [D], ; IIF ( .Access = [DBF],[}],['] ), ; IIF(VARTYPE( &Fld) = [C], ['],[]) ) Cmp = IIF ( VARTYPE( &Fld) = [C], [ LIKE ],[ = ] ) Pfx = IIF ( VARTYPE( &Fld) = [C], Fuzzy, [] ) Sfx = IIF ( VARTYPE( &Fld) = [C], [%],[] ) Exp = [Expr] + TRANSFORM(I) &Exp = [ AND UPPER(] + .Field(I) + [)] + Cmp ; + LDD + Pfx + UPPER(ALLTRIM(TRANSFORM(EVALUATE(Fld)))) + Sfx + RDD ENDIF ENDFOR lcExpr = Expr1 + Expr2 + Expr3 + Expr4 IF NOT EMPTY ( lcExpr ) lcExpr = [ WHERE ] + SUBSTR ( lcExpr, 6 ) ENDIF lcOrder = IIF(EMPTY(.OrderBy),[],[ ORDER BY ] ; + ALLTRIM(STRTRAN(.OrderBy,[ORDER BY],[]))) Cmd = [SELECT * FROM ] + .TableName + lcExpr + lcOrder oDataTier.SelectCmdToSQLResult ( Cmd ) SELECT ( .ViewName ) ZAP APPEND FROM DBF([SQLResult]) GO TOP .Grid1.Refresh IF RECCOUNT() > 0 .cmdSelect.Enabled = .T. .Grid1.Visible = .T. .Grid1.Column1.Alignment = 0 .Caption = [Search Form - ] + PROPER(.Name) ; + [ (] + TRANSFORM(RECCOUNT()) + [ matches)] ELSE .Caption = [Search Form - ] + PROPER(.Name) MESSAGEBOX( "No records matched" ) .cmdSelect.Enabled = .F. ENDIF KEYBOARD [{BackTab}{BackTab}{BackTab}{BackTab}{BackTab}] ENDWITH It's useful to be able to clear all of the input fields and start over. The code for this is shown in Listing 9.13. Listing 9.13. The Clear Button Click Event Code WITH THISFORM FOR I = 1 TO .SearchFieldCount Fld = [THISFORM.Search] + TRANSFORM(I) + [.Value] IF VARTYPE ( &Fld ) <> [U] lVal = IIF ( VARTYPE( &Fld) = [C], [], ; IIF ( VARTYPE( &Fld) = [D], {//}, ; IIF ( VARTYPE( &Fld) = [L], .F., ; IIF ( VARTYPE( &Fld) $ [IN], 0, [?])))) &Fld = lVal ENDIF ENDFOR ENDWITH The Select button's Click code stores the record key to be returned in the class's ReturnValue property, as shown in Listing 9.14. Listing 9.14. The Select Button Click Event CodeWITH THISFORM lcStrValue = TRANSFORM(EVALUATE(.KeyField)) .ReturnValue = lcStrValue .Release ENDWITH The Unload event closes the view opened in the Load event and returns the value from this modal form, as shown in Listing 9.15. Listing 9.15. The Unload Event CodeWITH THISFORM IF USED ( .ViewName ) USE IN ( .ViewName ) ENDIF RETURN .ReturnValue ENDWITH To use the EasySearch class, type CREATE FORM FindCustomer AS EachSearch FROM Pinter Add a text box, a combo box, and a date picker. Name them Search1 , Search2 , and Search3 because the program uses the control's name to find and match controls to code. Be sure to set the tab order. Enter values for the TableName , KeyField , and FieldList properties. Finally, enter FindCustomers as the value of the SearchForm property in the Customers form. Recompile and run the application, and it ought to work. That's a lot of functionality for essentially no code. In the rapid prototyping world that most FoxPro developers inhabit, it doesn't get any better. And we're about to inhabit the .NET world, so let's do the same thing in Visual Basic .NET. Building the EasySearch Form Class in Visual Basic .NETThe same class can be built in Visual Basic .NET, and except for the relatively complicated matter of data access in .NET, the code is quite similar. Create a new Windows Forms project named EasySearch. Because this will be an inheritable form, change the Output type to Class Library. Add the field declarations shown in Listing 9.16 to the class. Listing 9.16. Field Declarations for the EasySearch Class#Region " Declarations " Private _FieldNames As String = "" Private _TableName As String = "" Private _KeyField As String = "" Private _KeyValue As String = "" Private _OrderBy As String = "" Public ConnStr As String = "" Public ds As New DataSet #End Region Then, add property procedures to allow the developer to supply the few properties that are required, as shown in Listing 9.17. Listing 9.17. Property Procedures for the EasySearch Class#Region " Property procedures " Public Property KeyValue() As String Get Return _KeyValue End Get Set(ByVal Value As String) _KeyValue = Value End Set End Property Public Property FieldNames() As String Get Return _FieldNames End Get Set(ByVal Value As String) _FieldNames = Value End Set End Property Public Property TableName() As String Get Return _TableName End Get Set(ByVal Value As String) _TableName = Value End Set End Property Public Property KeyField() As String Get Return _KeyField End Get Set(ByVal Value As String) _KeyField = Value End Set End Property Public Property OrderBy() As String Get Return _OrderBy End Get Set(ByVal Value As String) _OrderBy = Value End Set End Property #End Region The Click events for the various buttons on the form do the important tasks , as shown in Listing 9.18. Listing 9.18. Event Code for the EasySearch Class #Region " My event code " Private Sub cmdCancel_Click( _ ByVal sender As System.Object, ByVal e As System.EventArgs) _ Handles cmdCancel.Click KeyValue = "" Hide() End Sub Private Sub cmdSelect_Click( _ ByVal sender As System.Object, ByVal e As System.EventArgs) _ Handles cmdSelect.Click Dim Recno As Integer = Me.BindingContext(ds, TableName).Position KeyValue = ds.Tables(0).Rows(Recno).Item(KeyField).ToString Hide() End Sub Private Sub cmdShowMatches_Click( _ ByVal sender As System.Object, ByVal e As System.EventArgs) _ Handles cmdShowMatches.Click Dim Cmd As String = "" Dim Delim As String = "" Dim Ctrl As Control Dim Fuzzy As String = "" If chkFuzzy.Checked Then Fuzzy = "%" Else Fuzzy = "" End If For Each Ctrl In Controls If Ctrl.Name.ToUpper.StartsWith("SEARCH") Then If Ctrl.Text.Length > 0 Then Cmd = Cmd + " AND " + Ctrl.Name.Substring(6) ; + " LIKE '" + Fuzzy + Ctrl.Text + "%'" End If End If Next If Cmd.Length > 0 Then Cmd = " WHERE " + Cmd.Substring(5) If FieldNames.Length = 0 Then FieldNames = "*" Cmd = "SELECT " + FieldNames + " FROM " + TableName + Cmd If OrderBy <> "" Then Cmd = Cmd + " ORDER BY " + OrderBy Dim cn As New SqlClient.SqlConnection cn.ConnectionString = ConnStr cn.Open() Dim cm As New SqlClient.SqlCommand cm.CommandText = Cmd cm.Connection = cn ds.Clear() Dim da As New SqlClient.SqlDataAdapter da.SelectCommand = cm da.Fill(ds, TableName) If ds.Tables(TableName).Rows.Count = 0 Then MsgBox("No records match", MsgBoxStyle.Exclamation, Application.ProductName) cmdSelect.Enabled = False Else DataGrid1.DataSource = ds DataGrid1.DataMember = TableName cmdSelect.Enabled = True End If End Sub The Load event loads the connection string from Config.txt and enables the input controls, as shown in Listing 9.19. Listing 9.19. Load Event Code for the EasySearch Class Private Sub EasySearch_Load( _ ByVal sender As System.Object, ByVal e As System.EventArgs) _ Handles MyBase.Load Dim DataAccess As New DataAccessManager.DataAccessFileManager DataAccess.ReadFile() ConnStr = DataAccess.ConnString DataAccess = Nothing Dim Ctrl As Control For Each Ctrl In Controls If Ctrl.Name.ToUpper.StartsWith("SEARCH") Then Ctrl.Enabled = True Next End Sub #End Region Using the Visual Basic .NET EasySearch Form ClassTo use this class, add it to a project and compile it. Note that the DLL that's produced is ..\EasySearch\bin\EasySearch.dll . You'll need that when you create an inherited form based on it. First, however, be aware that the EasySearch form is meant to be used by a form that is itself inherited from the BaseForm class. Create a Windows Forms project with a single form, change its name to MainForm both internally and externally, and add a MainMenu control. I usually right-click on the MainMenu control and select Edit Names, then enter names that match the pad's location within the menu. In Figure 9.10, I've entered a minimalist menu of four entries, then selected Edit Names to show the names that I've chosen . Figure 9.10. A MainMenu control. I created a form called frmCustomers based on the BaseForm class developed in Chapter 4, "A Visual Basic .NET Framework for SQL Server." To do this, I right-clicked on the project, then selected Add, Inherited Form from the resulting context menu. The dialog that appears first asks for a name for the new form (frmCustomers), then asks from where to inherit the form. This is where you select Browse and browse to the location of BaseForm.dll , probably back in the Chapter4\BaseForm\bin directory. If you add the BaseForm project to the current solution, the selection will appear on page 3 of the dialog under Project Components. However, BaseForm doesn't have to be part of the current project in order to inherit from it. Add a few fields from the Customer table to the form, using the controls that we subclassed ( MyText , MyCombo , and so on). Recall that the names of these controls should be a three-character prefix (for example, txt , cmb ) plus the name of the corresponding table column. Similarly, create an inherited form called FindCustomers inherited from EasySearch.dll . Add two MyText controls and a MyCombo control to the top of the form, labeling them Customer Name, Contact Name, and Region/State. Name the controls SEARCHCompanyName , SEARCHContactName , and SEARCHRegion , so that the class code can find them. Be sure to fill in the TableName , KeyField , and FieldNames properties. Finally, go back to the frmCustomers and add this one line of code anywhere in the Load event: SearchForm = New findCustomers Until I come up with a better way to specify this than through Reflection, this gives the most bang for the buck. Compile and run the application. Inherited forms are a great way to build prototypes for clients . If you decide to add a feature or tweak the way that all of your forms of a given type work, you simply change the class code, and the change is reflected in all of your screens. What Can Possibly Go Wrong?While I was building this application, I kept getting an error that I couldn't seem to pin down in the code. I finally stopped to read the error message, and it said something about not having referenced a key field. I had specified CustomerID , so I was mystified. Then I went into the Enterprise Manager and looked at the table; I had neglected to set CustomerID as the Primary Key for the Customers table. This highlights one of the peculiarities of our profession. The data is part of the solution. If you don't normalize tables, you make the programming job all that much harder. Similarly, SQL and Visual Studio .NET use the existence of a Primary Key field to make their job easier. In particular, the CommandBuilder object uses the Primary Key to construct the UPDATE command. Without the key, it doesn't know where to go. So make sure that your tables are spot on before you start programming against them. |
| < Day Day Up > |
EAN: 2147483647
Pages: 130