New Features in Visual FoxPro 8
| < Day Day Up > |
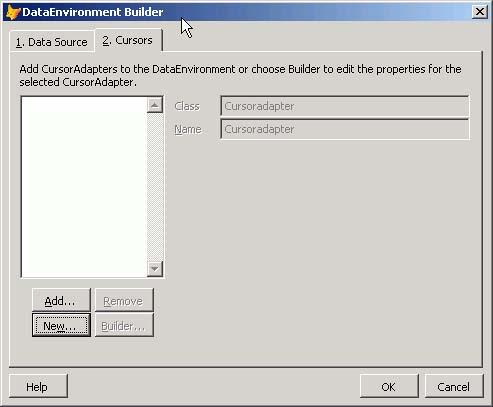
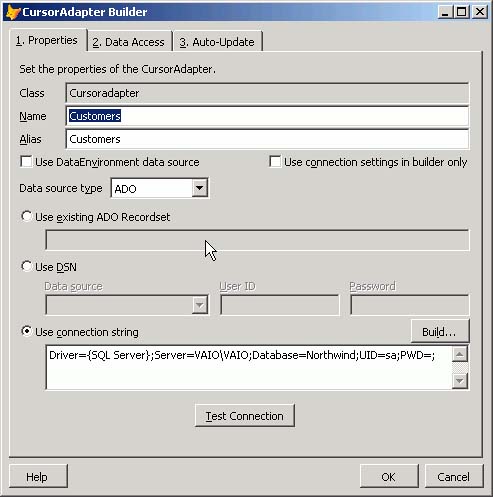
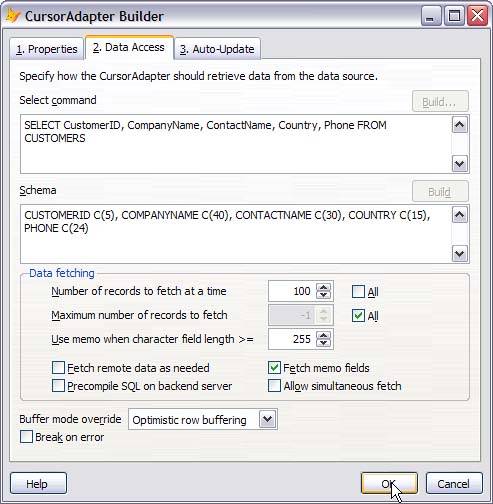
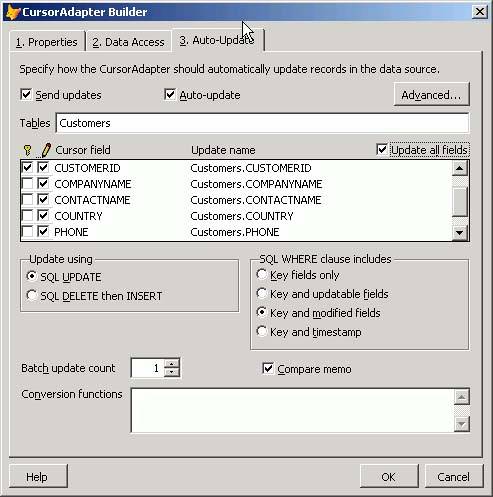
| FoxPro 8 is in my opinion the most important Visual FoxPro upgrade since FoxPro 2.6 for Windows. It includes the Task Pane, which adds all sorts of new features and makes it easier to use features both new and old. It adds the CursorAdapter and DataAdapter classes, which greatly simplify access to any sort of data store, including SQL Server and XML Web Services. The CursorAdapter ClassThe CursorAdapter class permits us to deal with data of any sort, from DBFs to SQL Server to other ODBC data sources to XML Web Services, in a single way. Two new builders ease the transition, although when you know what's required, you may prefer to write the few required lines of code yourself. When you open the Data Environment of a form and right-click anywhere on the design surface, the context menu will appear. It contains an option to Add CursorAdapter. When you know what properties are required and how to code them, you'll use this. For the moment, click on the Builder option. The dialog shown in Figure 6.2 will appear. Figure 6.2. The DataEnvironment Builder. On the DataEnvironment Builder dialog screen shown in Figure 6.2, there are four data source types: ADO, Native (DBF), ODBC, and XML. This time, choose ADO. Click on the Use Connection String radio button and fill in the connection string shown. The Build button will walk you through the process. If your server isn't " (local)" , substitute the correct name ; if you've changed the UserID and Password, change them as well. Test the connection, and then select Page 2, Cursors . Note that the connection strings for ADO and for ODBC are different. The ADO connection string to connect to the Northwind database is this: Provider=SQLOLEDB.1;Persist Security Info=False;User ID=sa; Initial Catalog=Northwind;Data Source=(local) whereas the ODBC connection string is this: Driver={SQL Server};Server=(local);Database=Northwind;UID=sa;PWD=; Figure 6.3 shows the resulting dialog. Figure 6.3. The Add Cursors page of the CursorAdapter Builder. Click on New to start up the CursorAdapter Builder. A cursor named Cursor1 with a single field named F1 will be added to the Data Environment in preparation for specifying the fields that we want, and the modal CursorAdapter Builder will appear. I'm going to supply the name Customers for both the Cursor and its Alias. I again specify ADO as the Data Source Type. I'm going to specify customers from California for this screen, so I select tab 2, Data Access, and enter the following SELECT command: SELECT ; Customers.CustomerID, ; Customers.CompanyName, ; Customers.ContactName, ; Customers.Country, ; Customers.Phone ; FROM Customers ; WHERE Region='CA' The Schema edit box is instantly populated with the body of a CREATE CURSOR command: CUSTOMERID C(5), COMPANYNAME C(40), CONTACTNAME C(30), COUNTRY C(15), PHONE C(24) The Data Access page should look like the one shown in Figure 6.4. Figure 6.4. The Data Access page of the CursorAdapter Builder. Page 3 of the CursorAdapter Builder allows me to instruct the CursorAdapter to automatically send UPDATE and/or INSERT commands to SQL Server as changes are made. If you're only using the records for display, you can leave this page unchanged. Click OK to save the changes. Updates can either be done one row at a time, or as a batch for all records in the cursor. The only issue is performance; if sending all changes at once will cause an unacceptable delay, send one each time a row changes. I've selected all fields and specified that CustomerID is the key field, as shown in Figure 6.5. Figure 6.5. Specifying the fields to update and the key. Add a grid, change the RecordSource to Customers, and use Ctrl+E to run the form. Change the ContactName from Jaime Yorres to Joe Smith and close the form. Run the form again to verify that your changes were indeed saved to SQL Server. You can also open the Query Analyzer, select the Northwind database, and enter the same SELECT command we used to populate the CursorAdapter . Sure enough, you just updated a SQL table without using any code. Recall from Chapter 2 that we can write our own CommandBuilder to create an UPDATE command. The BuildUpdatecommand function shown in Listing 6.3 will build the command string, and SQLExec ( Handle, Cmd ) will execute it. Listing 6.3. The BuildUpdateCommand FunctionFUNCTION BuildUpdateCommand PARAMETERS pTable, pKeyField Cmd = [UPDATE ] + pTable + [ SET ] FOR I = 1 TO FCOUNT() Fld = UPPER(FIELD(I)) IF Fld = UPPER(pKeyField) LOOP ENDIF IF TYPE ( Fld ) = [G] LOOP ENDIF Dta = ALLTRIM(TRANSFORM ( &Fld )) IF Dta = [.NULL.] DO CASE CASE TYPE ( Fld ) $ [CMDT] Dta = [] CASE TYPE ( Fld ) $ [INL] Dta = [0] ENDCASE ENDIF Dta = CHRTRAN ( Dta, CHR(39), CHR(146) ) * get rid of single quotes in the data Dta = IIF ( Dta = [/ /], [], Dta ) Dta = IIF ( Dta = [.F.], [0], Dta ) Dta = IIF ( Dta = [.T.], [1], Dta ) Dlm = IIF ( TYPE ( Fld ) $ [CM],['],; IIF ( TYPE ( Fld ) $ [DT],['],; IIF ( TYPE ( Fld ) $ [IN],[], []))) Cmd = Cmd + Fld + [=] + Dlm + Dta + Dlm + [, ] ENDFOR Dlm = IIF ( TYPE ( pKeyField ) = [C], ['], [] ) Cmd = LEFT ( Cmd, LEN(Cmd) -2 ) ; + [ WHERE ] + pKeyField + [=] ; + + Dlm + TRANSFORM(EVALUATE(pKeyField)) + Dlm RETURN Cmd ENDFUNC Which would you rather use? If you want to manually code the CursorAdapter class, it's not difficult. Use the Properties sheet to see which properties were set by the builder: Alias = [Customers] DataSourceType = [ADO] Name = [Customers] Tables = [Customers] Tag = [Driver={SQL Server};Server=VAIO\VAIO;Database=Northwind;UID=sa;PWD=;] Flags = 0 Three additional properties contain the notation See Init : SelectCmd: See Init UpdatableFieldList: See Init UpdateNameList: See Init The code written by the builder and placed in the Init of the DataEnvironment , shown in Listing 6.4, explains these three entries. Listing 6.4. The Init Code Generated by the Builder in Our Example local llReturn do case case not pemstatus(This, '__VFPSetup', 5) This.AddProperty('__VFPSetup', 0) case This.__VFPSetup = 2 This.__VFPSetup = 0 return endcase llReturn = dodefault() *** Setup code: DO NOT REMOVE ***<SelectCmd> text to This.SelectCmd noshow SELECT ; Customers.CustomerID, ; Customers.CompanyName, ; Customers.ContactName, ; Customers.Country, ; Customers.Phone ; FROM Customers ; WHERE region='CA' endtext ***</SelectCmd> ***<KeyFieldList> text to This.KeyFieldList noshow CUSTOMERID endtext ***</KeyFieldList> ***<UpdateNameList> text to This.UpdateNameList noshow CUSTOMERID Customers.CUSTOMERID, COMPANYNAME Customers.COMPANYNAME, CONTACTNAME ; Customers.CONTACTNAME, COUNTRY Customers.COUNTRY, PHONE Customers.PHONE endtext ***</UpdateNameList> ***<UpdatableFieldList> text to This.UpdatableFieldList noshow CUSTOMERID, COMPANYNAME, CONTACTNAME, COUNTRY, PHONE endtext ***</UpdatableFieldList> *** End of Setup code: DO NOT REMOVE *** Select connection code: DO NOT REMOVE local loConnDataSource set multilocks on loConnDataSource = createobject('ADODB.Connection') ***<DataSource> loConnDataSource.ConnectionString = ; [Driver={SQL Server};Server=VAIO\VAIO;Database=Northwind;UID=sa;PWD=;] ***</DataSource> loConnDataSource.Open() This.DataSource = createobject('ADODB.RecordSet') This.DataSource.CursorLocation = 3 && adUseClient This.DataSource.LockType = 3 && adLockOptimistic This.DataSource.ActiveConnection = loConnDataSource *** End of Select connection code: DO NOT REMOVE if This.__VFPSetup = 1 This.__VFPSetup = 2 endif return llReturn This looks a little complicated, but it's not bad when you understand what's happening. Note the enhancements to the TEXT TO < propertyname > command that allow you to populate properties on the fly. Finding Your CursorAdapterIf you use a cursor, you can use SELECT ( cursorname ) and you're there. But a CursorAdapter is a class, not a cursor. So how do you find it? The new GetCursorAdapter function is the answer. To find the CursorAdapter for a cursor and fill the cursor, you can use this: oCA = GetCursorAdapter ( [Customers] ) oCA.CursorFill NOTE If GetCursorAdapter is called without a parameter, it uses the current select area. Controlling the CursorAdapter 's Actions in CodeThere are a number of properties that you can set to determine how the CursorAdapter operates. As you look at them, you will be reminded of the settings for remote views in FoxPro 7. That's because the CursorAdapter is the replacement for remote views. Table 6.3 shows the most important CursorAdapter properties. Table 6.3. CursorAdapter Properties
Table 6.5 shows the most important CursorAdapter methods . Table 6.5. CursorAdapter Methods
Final Thoughts on the CursorAdapterIt's clear that the new CursorAdapter class is reason enough to upgrade to FoxPro 8 if you're using SQL Server. It makes SQL access trivially easy. But wait, there's more. The XMLAdapter ClassFoxPro 7 had three functions ( CursorToXML() , XMLToCursor() , and XMLUpdateGram() ), which constituted collectively the entire toolkit for dealing with XML. The XMLAdapter class added in Visual FoxPro 8 greatly enhances FoxPro support for XML. You can use the XMLAdapter to read XML and convert it to a FoxPro cursor. You can also use it to create XML strings. Using an object instantiated from an XMLAdapter , you can store one or more table objects and describe XML tables as cursors. The XMLADapter is based on MSXML 4.0 Service Pack 1 or later, which is installed in the "Install Prerequisites" phase of the installation of Visual FoxPro 8. Using the XMLAdapter , you can
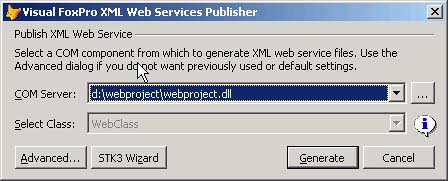
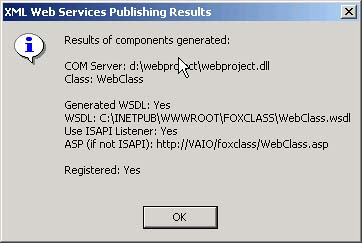
Reading an XDRYou can use an XMLAdapter to read an XDR and convert it to an XSD. XDR is the proprietary XML schema developed by Microsoft and used internally. However, it's not used elsewhere, so you usually need to send XML with an XSD schema. The example in Listing 6.5 shows how to do this. In the example, the TEXT command is used to build the sample XDR. If you ever needed to do this, you would probably be reading it from a file sent by an application that was only able to create XDR output. Listing 6.5. Converting an XDR Schema to XSD Using an XMLAdapter Object TEXT TO cXML NOSHOW <xml xmlns:s='uuid:BDC6E3F0-6DA3-11d1-A2A3-00AA00C14882' xmlns:dt='uuid:C2F41010-65B3-11d1-A29F-00AA00C14882' xmlns:rs='urn:schemas-microsoft-com:rowset' xmlns:z='#RowsetSchema'> <s:Schema id='RowsetSchema'> <s:ElementType name='row' content='eltOnly'> <s:AttributeType name='xmlfield' rs:number='1' rs:writeunknown='true' rs:nullable='true'> <s:datatype dt:type='number' rs:dbtype='currency' dt:maxLength='8' rs:scale='4' rs:precision='6' /> </s:AttributeType> <s:extends type='rs:rowbase'/> </s:ElementType> </s:Schema> <rs:data> <z:row xmlfield='12.12'/> </rs:data> </xml> ENDTEXT CLOSE DATABASES ALL CLEAR LOCAL oXMLAdapter as XMLAdapter oXMLAdapter = NEWOBJECT('XMLAdapter') oXMLadapter.LoadXML(cXML) IF oXMLAdapter.Tables.Item(1).Fields.Item(1).DataType <> "Y" THEN ? 'Failed' ELSE oXMLAdapter.Tables.Item(1).ToCursor() oXMLAdapter.XMLNamespace="" oXMLAdapter.ReleaseXML(.F.) oXMLAdapter.XMLSchemaLocation='c:\myxmlfile.xsd' oXMLAdapter.ToXML('c:\myxmlfile.xml',,.T.) oXMLadapter2 = NEWOBJECT('xmladapter') oXMLAdapter2.XMLSchemaLocation='c:\myxmlfile.xsd' oXMLAdapter2.LoadXML('c:\myxmlfile.xml',.T.,.T.) ENDIF Reading XML into a CursorThe XMLAdapter contains a Tables collection, which uses an XMLTable object to create a cursor. Previously, we used an MSXML2.DOMDocument object to load an XML string, and then used the XMLToCursor() function to create a cursor (see the example in Chapter 5, "Adding Internet Access"). In Visual FoxPro 8, the corresponding code would be as shown in Listing 6.6. Listing 6.6. Creating a Cursor from an XML File oxml.LoadXML("xml1.xml",.T.) && Read the file (second parm is "is this a file?") oTable =oxml.Tables.Item(1) && Get a reference to the XMLTable object otable.ToCursor(.F.,"ABC") BROWSE&& Cursor "ABC" Building a DiffgramFoxPro 7 had an XMLUpdateGram() function that got me really excited until I read the documentation. What it says is essentially : If you want to use this to update a table, write the function to do so yourself. In its online documentation, Microsoft explains the difference between a diffgram and an updategram. In an MSDN article, Rich Rollman explains (and I'm paraphrasing here) that an updategram is an XML string that documents changes made to a SQL Query result. However, updategrams are not supported by ADO, SQL Server, SQLXML, or the XMLDOM. They can't call stored procedures, and there are no ADO or DOM methods that know how to process them. They're just data. Diffgrams are what we thought updategrams were. The ADO.NET DataSet object knows how to apply them, as does XML 4. That's what the XMLAdapter implements. Listing 6.7 demonstrates how to implement a diffgram. In this code, I simulate a client program that changes the data, and a server that receives the changes and applies them. (The code in the following three listings is actually part of a single program, called DiffgramDemo.PRG in the source code.) Listing 6.7. Client-Side Code to Return a Record and Edit ItLOCAL loXMLHTTP AS [MSXML2.IXMLHTTPRequest] loXMLHTTP = CREATEOBJECT ( [MSXML2.XMLHTTP.4.0] ) Cmd = [SELECT * FROM CLIENTS WHERE ClID = 1] Cmd = CHRTRAN ( Cmd, [ ], [+] ) loXMLHTTP.Open([GET], [http://localhost/Fox/GetClientRecord.asp?cmd=] + Cmd ) loXMLHTTP.Send() XMLTOCURSOR (loXMLHTTP.ResponseBody) CursorSetProp([Buffering],5) BROWSE TITLE [Make changes and press Ctrl+W to save them] This is where the user changes the data. I've used a browse, although a nice edit screen would accomplish the same goal. Pressing Ctrl+W ends the editing phase, and the program continues (see Listing 6.8). Listing 6.8. Client-Side Code to Generate a Diffgram and Return It to the ServerLOCAL oXML AS XMLAdapter oXML = CREA ( "XMLAdapter" ) oXML.AddTableSchema ( "Clientes" ) oXML.IsDiffGram = .T. oXML.UTF8Encoded = .T. oXML.ToXML ( "lcXML", "", .F., .T., .T. ) LOCAL loXMLHTTP AS [MSXML2.IXMLHTTPRequest] loXMLHTTP = CREATEOBJECT ( [MSXML2.XMLHTTP.4.0] ) loXMLHTTP.AddPostVar ( lcXML ) loXMLHTTP.Open([POST], [http://localhost/Fox/ActualizarRegistroCliente.asp] ) loXMLHTTP.Send() At this point, we'll assume that the server has received the contents of the post buffer. You could use an XML Web Service written in FoxPro, or a WebConnection server. In either case, assume that you're now in the server code shown in Listing 6.9. NOTE I'm going to use MessageBox to display the data in this example. This is just for instructional purposes; you can't use MessageBox in a Web service. Listing 6.9. Server-Side Code to Receive and Process the DiffgramoXML.LoadXML ( lcXML ) MESSAGEBOX( "Diffgram loaded", 48, "Received by Web Service" ) LOCAL oCA AS CursorAdapter oCA = CREATEOBJECT ( [CursorAdapter] ) oCA.DataSource = "Native" oCA.CursorAttach ( "Clients" ) LOCAL oTable AS XMLTable oTable = CREATEOBJECT ( [XMLTable] ) oTable = oXML.Tables.Item(1) oField = oTable.Fields.Item(1) oField.KeyField = .T. oTable.ApplyDiffGram ( "Clients", oCA, .T. ) CLOSE TABLES CLOSE DATABASE That's all it takes to use diffgrams to update remote tables. This is undoubtedly easier than building an INSERT , DELETE , or UPDATE string at the client and sending it to the server. And notice that we're using FoxPro tables here, which means no royalties for accessing our data. Of course, you can update a cursor here, then pass the changes on to SQL Server. I personally believe that the combination of a FoxPro middle tier and a SQL Server database is the best way to build Internet-enabled database applications. But if the cost of licensing by the seat is an issue, there are solutions for everyone. Don't tell Microsoft; it might reduce their enthusiasm for FoxPro. Building an XML String from a FoxPro CursorConverting a FoxPro table to XML requires only four lines of code: USE customers loxml.addTableSchema("Customers") loxml.ToXML("lcxml") MESSAGEBOX( lcxml ) Building a Web Service in FoxPro 8You can build a Web service in FoxPro 8 in minutes. Create a project named WebProject in a directory called WebProject . Add a code file called WebClass , and enter the following code: * WebClass.PRG DEFINE CLASS WebClass AS Custom OLEPUBLIC Function StateList AS String SELECT * FROM D:\WebProject\States INTO CURSOR XStates CURSORTOXML( "XStates", "lcXML" ) USE IN States USE IN XStates RETURN lcXML ENDFUNC ENDDEFINE Compile it as a multithreaded DLL. Then, open the Task Pane and select Publish Your XML Web Service. Click on the button with the three little dots and select the DLL you just created. The dialog should look like Figure 6.6. Figure 6.6. The XML Web Services Publisher dialog. TIP If you're recompiling after trying to use the service, the Internet Information Server will have it in use, and you'll get the message file access is denied ( dllname ) ; open a command window and type IISRESET to free it. Click on the Advanced button and verify that the only checked methods are the ones you want to expose, and then click on the Generate button. You should see the message box shown in Figure 6.7. Figure 6.7. The XML Web Services Publisher Results dialog. If you instantiate the DLL directly, you can see the output. This code oWS = CREATEOBJECT ( "WebProject.WebClass" ) ? oWS.StateList produces this output (I didn't list all of the states): <?xml version = "1.0" encoding="Windows-1252" standalone="yes"?> <VFPData> <xstates> <stateabbr>AL</stateabbr> <statename>Alabama</statename> </xstates> <xstates> <stateabbr>CA</stateabbr> <statename>California</statename> </xstates> <xstates> <stateabbr>DE</stateabbr> <statename>Delaware</statename> </xstates> <xstates> </VFPData> Using this code remotely is extraordinarily easy in Visual FoxPro 8. Open a form on another machine, put a grid on the form, and set the RecordSource to States . It doesn't exist yet, but it will. Open the Load event of the form. Now, open the Toolbox, and click on My Web Services. The WebClass service you just registered is there! Drag and drop it into the load event, and you'll only have to add the two shaded lines in the following code: LOCAL loWebClass AS "XML Web Service" * LOCAL loWebClass AS "MSSOAP.SoapClient30" * Do not remove or alter following line. * It is used to support IntelliSense for your XML Web service. *_VFPWSDef:loWebClass=http://localhost/WebClass.wsdl,WebClass,WebClassSoapPort LOCAL loException, lcErrorMsg, loWSHandler TRY loWSHandler = NEWOBJECT("WSHandler",IIF(VERSION(2)=0,"",; HOME()+"FFC\")+"_ws3client.vcx") loWebClass = loWSHandler.SetupClient("http://localhost/WebClass.wsdl", ; "WebClass", "WebClassSoapPort") Call your XML Web service here. * ex: leResult = loWebClass.SomeMethod() lcXML = loWebClass.StateList && ADD THIS LINE XMLToCursor ( locXML, "States" ) && ADD THIS LINE CATCH TO loException lcErrorMsg="Error: "+TRANSFORM(loException.Errorno)+" - "+loException.Message DO CASE CASE VARTYPE(loWebClass)#"O" * Handle SOAP error connecting to web service CASE !EMPTY(loWebClass.FaultCode) * Handle SOAP error calling method lcErrorMsg=lcErrorMsg+CHR(13)+loWebClass.Detail OTHERWISE * Handle other error ENDCASE * Use for debugging purposes MESSAGEBOX(lcErrorMsg) FINALLY ENDTRY Press Ctrl+E, and the form runs as advertised. You can use an XMLAdapter to move this data to a cursor, then save changes as a diffgram and send the diffgram back to another function in the Web service, which uses the code shown there to update the original data table. For me, the ability to quickly and easily build FoxPro Web services is the biggest improvement in version 8. FoxPro Data Access Notes and CommentsData access in FoxPro is easy for simple tasks , and not much harder for more complex ones. In .NET, it's also pretty easy. This is partly due to the fact that XML is not just a transport in .NET; XML is how Microsoft spells D-B-F. |
| < Day Day Up > |
EAN: 2147483647
Pages: 130