Section 13.8. Checkboxes, Radio Buttons, and Borders
13.8. Checkboxes, Radio Buttons, and BordersSuppose you are the software developer for Acme Software Titles, a software business specializing in computer games. You want to develop an applet-based order form that customers can use to order software over the Web. At the moment you have three software titlesa chess game, a checkers game, and a crossword puzzle game. The assumption is that the user will choose one or more of these titles from some kind of menu. The user must also indicate a payment optioneither E-cash, credit card, or debit card. These options are mutually exclusivethe user can choose one and only one.
Problem statement Let's design an applet interface for this program. Unlike the previous problem, where the input was a numeric value, in this problem the input will be the user's selection from a menu. The result will be the creation of an order. Let's suppose that this part of the task happens behind the scenesthat is, we don't have to worry about creating an actual order. The output the user sees will simply be an acknowledgment that the order was successfully submitted.
Interface design There are several kinds of controls needed for this interface. A conventional way to have users indicate their purchase decisions is to have them click a Submit button. They should also have the option to cancel the transaction at any time.
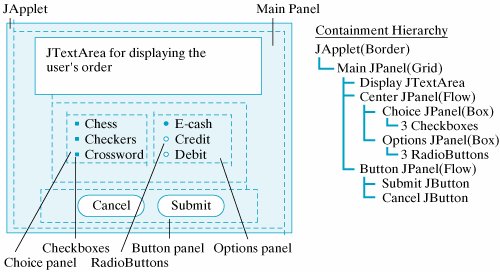
What components do we need? In addition to these button controls, a couple of menus must be presented, one for the software titles, and one for the payment choices. The Swing and AWT libraries provide many options for building menus. One key requirement for this interface is the mutually exclusive payment options. A conventional way to handle this kind of selection is with a JRadioButtona button that belongs to a group of mutually exclusive alternatives. Only one button from the group may be selected at one time. The selection of software titles could be handled by a collection of checkboxes. A JCheckbox is a button that can be selected and deselected, and that always displays its current state to the user. Using a checkbox will make it obvious to the user exactly what software has been selected. To complete the design, let's use a JTextArea again to serve as something of a printed order form. It will confirm the user's order and display other messages needed during the transaction. Given these decisions, we arrive at the design shown in Figure 13.25. In this case, our design uses a JPanel as the main container instead of using the top window itself. The reason for this decision is that we want to use Swing Borders around the various JPanels to enhance the overall visual appeal of the design. The borders will have titles that help explain the purpose of the various panels. Figure 13.25. A design for an online order form interface. |
In good object-oriented design, objects are specialists (experts) for very narrow, clearly defined tasks. If a new task needs doing, design a new object to do it. |
13.8.2. Swing Borders
The Swing Border and BorderFactory classes can place borders around virtually any GUI element. Using borders is an effective way to make the grouping of components more apparent. Borders can have titles that enhance the GUI's ability to guide and inform the user. They can also have a wide range of styles and colors, thereby helping to improve the GUI's overall appearance.
A border occupies some space around the edge of a JComponent. For the Acme Software Titles interface, we place titled borders around four of the panels (Fig. 13.26). The border on the main panel serves to identify the company again. The one around the button panel serves to group the two control buttons. The borders around both the checkbox and the radio button menus set them apart from other elements of the display and identify the purpose of the buttons.
Attaching a titled border to a componentin this case to a JPanelis very simple. It takes one statement:
choicePanel.setBorder(BorderFactory.createTitledBorder("Titles")); The setBorder() method is defined in JComponent, is inherited by all Swing components, and takes a Border argument. In this case, we use the BorderFactory class to create a border and assign it a title. There are several versions of the static createTitledBorder() method. This version lets us specify the border's title. It uses default values for the type of border (etched), the title's position (sitting on the top line), justification (left), and the font's type and color.
As you would expect, the Border and BorderFactory classes contain methods that let you exert significant control over the border's look and feel. You can even design and create your own custom borders.
13.8.3. The BoxLayout Manager
Another type of layout to use is the BoxLayout. This can be associated with any container, and it comes as the default with the Swing Box container. We use it in this example to arrange the checkboxes and radio buttons (Fig. 13.25).
A BoxLayout is like a one-dimensional grid layout. It allows multiple components to be arranged either vertically or horizontally in a row. The layout will not wrap around, as does the FlowLayout. Unlike the GridLayout, the BoxLayout does not force all its components to be the same size. Instead, it tries to use each component's preferred width (or height) in arranging them horizontally (or vertically). (Every Swing component has a preferred size that is used by the various layout managers in determining the component's actual size in the interface.) The BoxLayout manager also tries to align its components' heights (for horizontal layouts) or widths (for vertical layouts).
Once again, to set the layout manager for a container you use the setLayout() method:
choicePanel.setLayout(new BoxLayout(choicePanel,BoxLayout.Y_AXIS)); The BoxLayout() constructor has two parameters. The first is a reference to the container being managed, and the second is a constant that determines whether horizontal (x-axis) or vertical (y-axis) alignment is used.
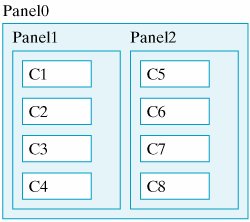
One nice feature of the BoxLayout is that it can be used in combinations to imitate the look of the very complicated GridBoxLayout. For example, Figure 13.28 shows an example with two panels (Panel1 and Panel2) arranged horizontally within an outer box (Panel0), each containing four components arranged vertically. The three panels all use the BoxLayout.
Figure 13.28. Complex layouts can be achieved by nesting containers that use the BoxLayout.
13.8.4. The ItemListener Interface
In this section, we will describe how to handle menu selections. Whenever the user makes a menu selection, or clicks a check box or radio button, an ItemEvent is generated. ItemEvents are associated with items that make up menus, including JPopupMenus, JCheckboxes, JRadioButtons, and other types of menus. Item events are handled by the ItemListener interface, which consists of a single method, the itemStateChanged() method:
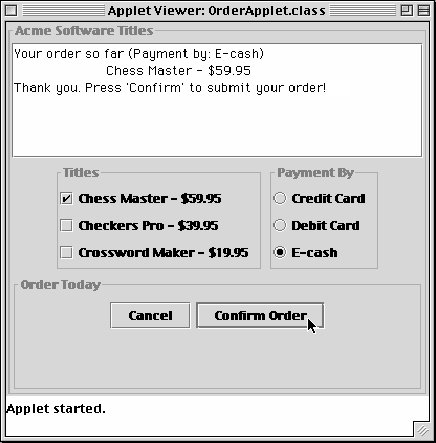
public void itemStateChanged(ItemEvent e) { display.setText("Your order so far (Payment by: "); for (int k = 0; k < options.length; k++ ) if (options[k].isSelected()) display.append(options[k].getText() + ")\n"); for (int k = 0; k < titles.length; k++ ) if (titles[k].isSelected()) display.append("\t" + titles[k].getText() + "\n"); } // itemStateChanged()
This version of the method handles item changes for both the checkbox menu and the radio buttons menu. The code uses two consecutive for loops. The first iterates through the options menu (radio buttons) to determine what payment option the user has selected. Since only one option can be selected, only one title will be appended to the display. The second loop iterates through the titles menu (checkboxes) and appends each title the user selected to the display. Thus the complete status of the user's order is displayed after every selection. The isSelected() method is used to determine whether a checkbox or radio button is selected or not.
In this example, we have no real need to identify the item that caused the event. No matter what item the user selected, we want to display the entire state of the order. However, like the ActionEvent class, the ItemEvent class contains methods that can retrieve the item that caused the event:
getItem(); // Returns a menu item within a menu The getItem() method is the ItemListener's analogue to the ActionEvent's getSource() method. It enables you to obtain the object that generated the event but returns a representation of the item that was selected or deselected.
13.8.5. The OrderApplet
The design of the OrderApplet is summarized in Figure 13.29, and its complete implementation is given in Figure 13.30. There are several important points to make about this program. First, five JPanels are used to organize the components into logical and visual groupings. This conforms to the design shown in Figure 13.25.
Figure 13.29. The OrderApplet makes extensive use of GUI components.
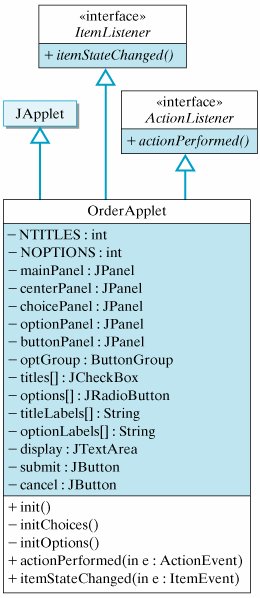
Figure 13.30. The OrderApplet class. (This item is displayed on pages 639 - 640 in the print version)
import javax.swing.*; import javax.swing.border.*; import java.awt.*; import java.awt.event.*; public class OrderApplet extends JApplet implements ItemListener, ActionListener { private final int NTITLES = 3, NOPTIONS = 3; private JPanel mainPanel = new JPanel(), centerPanel = new JPanel(), choicePanel = new JPanel(), optionPanel = new JPanel(), buttonPanel = new JPanel(); private ButtonGroup optGroup = new ButtonGroup(); private JCheckBox titles[] = new JCheckBox[NTITLES]; private JRadioButton options[] = new JRadioButton[NOPTIONS]; private String titleLabels[] = {"Chess Master - $59.95", "Checkers Pro - $39.95", "Crossword Maker - $19.95"}; private String optionLabels[] = {"Credit Card", "Debit Card", "E-cash"}; private JTextArea display = new JTextArea(7, 25); private JButton submit = new JButton("Submit Order"), cancel = new JButton("Cancel"); public void init() { mainPanel.setBorder(BorderFactory.createTitledBorder( "Acme Software Titles")); mainPanel.setLayout(new GridLayout(3, 1, 1, 1)); cancel.addActionListener(this); submit.addActionListener(this); initChoices(); initOptions(); buttonPanel.setBorder(BorderFactory.createTitledBorder("Order Today")); buttonPanel.add(cancel); buttonPanel.add(submit); centerPanel.add(choicePanel); centerPanel.add(optionPanel); mainPanel.add( display); mainPanel.add(centerPanel); mainPanel.add( buttonPanel); getContentPane().add(mainPanel); setSize(400,400); } // init() private void initChoices() { choicePanel.setBorder( BorderFactory.createTitledBorder("Titles")); choicePanel.setLayout( new BoxLayout(choicePanel, BoxLayout.Y_AXIS)); for (int k = 0; k < titles.length; k++) { titles[k] = new JCheckBox(titleLabels[k]); titles[k].addItemListener(this); choicePanel.add(titles[k]); } } // initChoices() |
Second, note the use of titled borders around the four internal panels. These reinforce that the components within the border are related by function.
The applet init() method is used to initialize the interface. This involves setting the layouts for the various containers and filling the containers with their components. Because their initializations are relatively long, the checkboxes and radio buttons are initialized in separate methods, the initChoices() and initOptions() methods, respectively.
Finally, note how the actionPerformed() method creates a mock order form in the display area. This allows the user to review the order before it is submitted. Also note that the algorithm used for submittal requires the user to confirm an order before it is actually submitted. The first time the user clicks the Submit button, the button's label is changed to "Confirm Order", and the user is prompted in the display area to click the Confirm button to submit the order. This design allows the interface to catch inadvertent button clicks.
A user interface should anticipate errors by the user. When a program involves an action that can't be undonesuch as placing an orderthe program should make sure the user really wants to take the action before carrying it out.
Effective Design: Anticipate the User
A well-designed interface should make it difficult for the user to make errors and should make it easy to recover from mistakes when they do happen. |
Self-Study Exercise
| Exercise 13.8 | What is your favorite interface horror story? How would you have remedied the problem? The interface need not be a computer interface. |
EAN: 2147483647
Pages: 275
- Article 322 Flat Cable Assemblies Type FC
- Article 386 Surface Metal Raceways
- Article 408: Switchboards and Panelboards
- Example No. D2(c) Optional Calculation for One-Family Dwelling with Heat Pump(Single-Phase, 240/120-Volt Service) (See 220.82)
- Example No. D9 Feeder Ampacity Determination for Generator Field Control