Controls and Colors
As you can see in Figure 9-2, the display of many of the buttons doesn't look quite right. The push buttons are fine, but the others are drawn with a rectangular gray background that simply shouldn't be there. This is because the buttons are designed to be displayed in dialog boxes, and in Windows 98 dialog boxes have a gray surface. Our window has a white surface because that's how we defined it in the WNDCLASS structure:
wndclass.hbrBackground = (HBRUSH) GetStockObject (WHITE_BRUSH) ;
We've been doing this because we often display text to the client area, and GDI uses the text color and background color defined in the default device context. These are always black and white. To make these buttons look a little better, we must either change the color of the client area to agree with the background color of the buttons or somehow change the button background color to be white.
The first step to solving this problem is understanding Windows' use of "system colors."
System Colors
Windows maintains 29 system colors for painting various parts of the display. You can obtain and set these colors using GetSysColor and SetSysColors. Identifiers defined in the windows header files specify the system color. Setting a system color with SetSysColors changes it only for the current Windows session.
You can change some (but not all) system colors using the Display section of the Windows Control Panel. The selected colors are stored in the Registry in Microsoft Windows NT and in the WIN.INI file in Microsoft Windows 98. The Registry and WIN.INI file use keywords for the 29 system colors (different from the GetSysColor and SetSysColors identifiers), followed by red, green, and blue values that can range from 0 to 255. The following table shows how the 29 system colors are identified applying the constants used for GetSysColor and SetSysColors and also the WIN.INI keywords. The table is arranged sequentially by the values of the COLOR_ constants, beginning with 0 and ending with 28.
| GetSysColor and SetSysColors | Registry Key or WIN.INI Identifer | Default RGB Value |
| COLOR_SCROLLBAR | Scrollbar | C0-C0-C0 |
| COLOR_BACKGROUND | Background | 00-80-80 |
| COLOR_ACTIVECAPTION | ActiveTitle | 00-00-80 |
| COLOR_INACTIVECAPTION | InactiveTitle | 80-80-80 |
| COLOR_MENU | Menu | C0-C0-C0 |
| COLOR_WINDOW | Window | FF-FF-FF |
| COLOR_WINDOWFRAME | WindowFrame | 00-00-00 |
| COLOR_MENUTEXT | MenuText | C0-C0-C0 |
| COLOR_WINDOWTEXT | WindowText | 00-00-00 |
| COLOR_CAPTIONTEXT | TitleText | FF-FF-FF |
| COLOR_ACTIVEBORDER | ActiveBorder | C0-C0-C0 |
| COLOR_INACTIVEBORDER | InactiveBorder | C0-C0-C0 |
| COLOR_APPWORKSPACE | AppWorkspace | 80-80-80 |
| COLOR_HIGHLIGHT | Highlight | 00-00-80 |
| COLOR_HIGHLIGHTTEXT | HighlightText | FF-FF-FF |
| COLOR_BTNFACE | ButtonFace | C0-C0-C0 |
| COLOR_BTNSHADOW | ButtonShadow | 80-80-80 |
| COLOR_GRAYTEXT | GrayText | 80-80-80 |
| COLOR_BTNTEXT | ButtonText | 00-00-00 |
| COLOR_INACTIVECAPTIONTEXT | InactiveTitleText | C0-C0-C0 |
| COLOR_BTNHIGHLIGHT | ButtonHighlight | FF-FF-FF |
| COLOR_3DDKSHADOW | ButtonDkShadow | 00-00-00 |
| COLOR_3DLIGHT | ButtonLight | C0-C0-C0 |
| COLOR_INFOTEXT | InfoText | 00-00-00 |
| COLOR_INFOBK | InfoWindow | FF-FF-FF |
| [no identifier; use value 25] | ButtonAlternateFace | B8-B4-B8 |
| COLOR_HOTLIGHT | HotTrackingColor | 00-00-FF |
| COLOR_GRADIENTACTIVECAPTION | GradientActiveTitle | 00-00-80 |
| COLOR_GRADIENTINACTIVECAPTION | GradientInactiveTitle | 80-80-80 |
Default values for these 29 colors are provided by the display driver, and they might be a little different on different machines.
Now for the bad news: Although many of these colors seem self-explanatory (for example, COLOR_BACKGROUND is the color of the desktop area behind all the windows), the use of system colors in recent versions of Windows has become quite chaotic. Back in the old days, Windows was visually much simpler than it is today. Indeed, prior to Windows 3.0, only the first 13 system colors shown above were defined. With the increased use of more visually complex controls using three-dimensional appearances, more system colors were needed.
The Button Colors
This problem is particularly evident for buttons, each of which requires multiple colors. COLOR_BTNFACE is used for the main surface color of the push buttons and the background color of the others. (This is also the system color used for dialog boxes and message boxes.) COLOR_BTNSHADOW is used for suggesting a shadow at the right and bottom sides of the push buttons and the insides of the checkbox squares and radio button circles. For push buttons, COLOR_BTNTEXT is used for the text color; for the others it's COLOR_WINDOWTEXT. Several other system colors are also used for various parts of the button designs.
So if we want to display buttons on the surface of our client area, one way to avoid the color clash is to yield to these system colors. To begin, you use COLOR_BTNFACE for the background of your client area when defining the window class:
wndclass.hbrBackground = (HBRUSH) (COLOR_BTNFACE + 1) ;
You can try this in the BTNLOOK program. Windows understands that when the value of hbrBackground in the WNDCLASS structure is this low in value, it actually refers to a system color rather than an actual handle. Windows requires that you add 1 when you use these identifiers and are specifying them in the hbrBackground field of the WNDCLASS structure, but doing so has no profound purpose other than to prevent the value from being NULL. If the system color happens to be changed while your program is running, the surface of your client area will be invalidated and Windows will use the new COLOR_BTNFACE value. But now we've caused another problem. When you display text using TextOut, Windows uses values defined in the device context for the text background color (which erases the background behind the text) and the text color. The default values are white (background) and black (text), regardless of either the system colors or the hbrBackground field of the window class structure. So you need to use SetTextColor and SetBkColor to change your text and text background colors to the system colors. You do this after you obtain the handle to a device context:
SetBkColor (hdc, GetSysColor (COLOR_BTNFACE)) ; SetTextColor (hdc, GetSysColor (COLOR_WINDOWTEXT)) ;
Now the client-area background, text background, and text color are all consistent with the button colors. However, if the user changes the system colors while your program is running, you'll want to change the text background color and text color. You can do this using the following code:
case WM_SYSCOLORCHANGE: InvalidateRect (hwnd, NULL, TRUE) ; break ;
The WM_CTLCOLORBTN Message
We've seen how we can adjust our client area color and text color to the background colors of the buttons. Can we adjust the colors of the buttons to the colors we prefer in our program? Well, in theory, yes, but in practice, no. What you probably don't want to do is use SetSysColors to change the appearance of the buttons. This will affect all programs currently running under Windows; it's something users would not appreciate very much.
A better approach (again, in theory) is to process the WM_CTLCOLORBTN message. This is a message that button controls send to the parent window procedure when the child window is about to paint its client area. The parent window can use this opportunity to alter the colors that the child window procedure will use for painting. (In 16-bit versions of Windows, a message named WM_CTLCOLOR was used for all controls. This has been replaced with separate messages for each type of standard control.)
When the parent window procedure receives a WM_CTLCOLORBTN message, the wParam message parameter is the handle to the button's device context and lParam is the button's window handle. When the parent window procedure gets this message, the button control has already obtained its device context. When processing a WM_CTLCOLORBTN message in your window procedure, you:
- Optionally set a text color using SetTextColor
- Optionally set a text background color using SetBkColor
- Return a brush handle to the child window
In theory, the child window uses the brush for coloring a background. It is your responsibility to destroy the brush when it is no longer needed.
Here's the problem with WM_CTLCOLORBTN: Only the push buttons and owner-draw buttons send WM_CTLCOLORBTN to their parent windows, and only owner-draw buttons respond to the parent window processing of the message using the brush for coloring the background. This is fairly useless because the parent window is responsible for drawing owner-draw buttons anyway.
Later on in this chapter, we'll examine cases in which messages similar to WM_CTLCOLORBTN but applying to other types of controls are more useful.
Owner-Draw Buttons
If you want to have total control over the visual appearance of a button but don't want to bother with keyboard and mouse logic, you can create a button with the BS_OWNERDRAW style. This is demonstrated in the OWNDRAW program shown in Figure 9-3.
Figure 9-3. The OWNDRAW program.
OWNDRAW.C /*---------------------------------------- OWNDRAW.C -- Owner-Draw Button Demo Program (c) Charles Petzold, 1996 ----------------------------------------*/ #include <windows.h> #define ID_SMALLER 1 #define ID_LARGER 2 #define BTN_WIDTH (8 * cxChar) #define BTN_HEIGHT (4 * cyChar) LRESULT CALLBACK WndProc (HWND, UINT, WPARAM, LPARAM) ; HINSTANCE hInst ; int WINAPI WinMain (HINSTANCE hInstance, HINSTANCE hPrevInstance, PSTR szCmdLine, int iCmdShow) { static TCHAR szAppName[] = TEXT ("OwnDraw") ; MSG msg ; HWND hwnd ; WNDCLASS wndclass ; hInst = hInstance ; wndclass.style = CS_HREDRAW | CS_VREDRAW ; wndclass.lpfnWndProc = WndProc ; wndclass.cbClsExtra = 0 ; wndclass.cbWndExtra = 0 ; wndclass.hInstance = hInstance ; wndclass.hIcon = LoadIcon (NULL, IDI_APPLICATION) ; wndclass.hCursor = LoadCursor (NULL, IDC_ARROW) ; wndclass.hbrBackground = (HBRUSH) GetStockObject (WHITE_BRUSH) ; wndclass.lpszMenuName = szAppName ; wndclass.lpszClassName = szAppName ; if (!RegisterClass (&wndclass)) { MessageBox (NULL, TEXT ("This program requires Windows NT!"), szAppName, MB_ICONERROR) ; return 0 ; } hwnd = CreateWindow (szAppName, TEXT ("Owner-Draw Button Demo"), WS_OVERLAPPEDWINDOW, CW_USEDEFAULT, CW_USEDEFAULT, CW_USEDEFAULT, CW_USEDEFAULT, NULL, NULL, hInstance, NULL) ; ShowWindow (hwnd, iCmdShow) ; UpdateWindow (hwnd) ; while (GetMessage (&msg, NULL, 0, 0)) { TranslateMessage (&msg) ; DispatchMessage (&msg) ; } return msg.wParam ; } void Triangle (HDC hdc, POINT pt[]) { SelectObject (hdc, GetStockObject (BLACK_BRUSH)) ; Polygon (hdc, pt, 3) ; SelectObject (hdc, GetStockObject (WHITE_BRUSH)) ; } LRESULT CALLBACK WndProc (HWND hwnd, UINT message, WPARAM wParam, LPARAM lParam) { static HWND hwndSmaller, hwndLarger ; static int cxClient, cyClient, cxChar, cyChar ; int cx, cy ; LPDRAWITEMSTRUCT pdis ; POINT pt[3] ; RECT rc ; switch (message) { case WM_CREATE : cxChar = LOWORD (GetDialogBaseUnits ()) ; cyChar = HIWORD (GetDialogBaseUnits ()) ; // Create the owner-draw pushbuttons hwndSmaller = CreateWindow (TEXT ("button"), TEXT (""), WS_CHILD | WS_VISIBLE | BS_OWNERDRAW, 0, 0, BTN_WIDTH, BTN_HEIGHT, hwnd, (HMENU) ID_SMALLER, hInst, NULL) ; hwndLarger = CreateWindow (TEXT ("button"), TEXT (""), WS_CHILD | WS_VISIBLE | BS_OWNERDRAW, 0, 0, BTN_WIDTH, BTN_HEIGHT, hwnd, (HMENU) ID_LARGER, hInst, NULL) ; return 0 ; case WM_SIZE : cxClient = LOWORD (lParam) ; cyClient = HIWORD (lParam) ; // Move the buttons to the new center MoveWindow (hwndSmaller, cxClient / 2 - 3 * BTN_WIDTH / 2, cyClient / 2 - BTN_HEIGHT / 2, BTN_WIDTH, BTN_HEIGHT, TRUE) ; MoveWindow (hwndLarger, cxClient / 2 + BTN_WIDTH / 2, cyClient / 2 - BTN_HEIGHT / 2, BTN_WIDTH, BTN_HEIGHT, TRUE) ; return 0 ; case WM_COMMAND : GetWindowRect (hwnd, &rc) ; // Make the window 10% smaller or larger switch (wParam) { case ID_SMALLER : rc.left += cxClient / 20 ; rc.right -= cxClient / 20 ; rc.top += cyClient / 20 ; rc.bottom -= cyClient / 20 ; break ; case ID_LARGER : rc.left -= cxClient / 20 ; rc.right += cxClient / 20 ; rc.top -= cyClient / 20 ; rc.bottom += cyClient / 20 ; break ; } MoveWindow (hwnd, rc.left, rc.top, rc.right - rc.left, rc.bottom - rc.top, TRUE) ; return 0 ; case WM_DRAWITEM : pdis = (LPDRAWITEMSTRUCT) lParam ; // Fill area with white and frame it black FillRect (pdis->hDC, &pdis->rcItem, (HBRUSH) GetStockObject (WHITE_BRUSH)) ; FrameRect (pdis->hDC, &pdis->rcItem, (HBRUSH) GetStockObject (BLACK_BRUSH)) ; // Draw inward and outward black triangles cx = pdis->rcItem.right - pdis->rcItem.left ; cy = pdis->rcItem.bottom - pdis->rcItem.top ; switch (pdis->CtlID) { case ID_SMALLER : pt[0].x = 3 * cx / 8 ; pt[0].y = 1 * cy / 8 ; pt[1].x = 5 * cx / 8 ; pt[1].y = 1 * cy / 8 ; pt[2].x = 4 * cx / 8 ; pt[2].y = 3 * cy / 8 ; Triangle (pdis->hDC, pt) ; pt[0].x = 7 * cx / 8 ; pt[0].y = 3 * cy / 8 ; pt[1].x = 7 * cx / 8 ; pt[1].y = 5 * cy / 8 ; pt[2].x = 5 * cx / 8 ; pt[2].y = 4 * cy / 8 ; Triangle (pdis->hDC, pt) ; pt[0].x = 5 * cx / 8 ; pt[0].y = 7 * cy / 8 ; pt[1].x = 3 * cx / 8 ; pt[1].y = 7 * cy / 8 ; pt[2].x = 4 * cx / 8 ; pt[2].y = 5 * cy / 8 ; Triangle (pdis->hDC, pt) ; pt[0].x = 1 * cx / 8 ; pt[0].y = 5 * cy / 8 ; pt[1].x = 1 * cx / 8 ; pt[1].y = 3 * cy / 8 ; pt[2].x = 3 * cx / 8 ; pt[2].y = 4 * cy / 8 ; Triangle (pdis->hDC, pt) ; break ; case ID_LARGER : pt[0].x = 5 * cx / 8 ; pt[0].y = 3 * cy / 8 ; pt[1].x = 3 * cx / 8 ; pt[1].y = 3 * cy / 8 ; pt[2].x = 4 * cx / 8 ; pt[2].y = 1 * cy / 8 ; Triangle (pdis->hDC, pt) ; pt[0].x = 5 * cx / 8 ; pt[0].y = 5 * cy / 8 ; pt[1].x = 5 * cx / 8 ; pt[1].y = 3 * cy / 8 ; pt[2].x = 7 * cx / 8 ; pt[2].y = 4 * cy / 8 ; Triangle (pdis->hDC, pt) ; pt[0].x = 3 * cx / 8 ; pt[0].y = 5 * cy / 8 ; pt[1].x = 5 * cx / 8 ; pt[1].y = 5 * cy / 8 ; pt[2].x = 4 * cx / 8 ; pt[2].y = 7 * cy / 8 ; Triangle (pdis->hDC, pt) ; pt[0].x = 3 * cx / 8 ; pt[0].y = 3 * cy / 8 ; pt[1].x = 3 * cx / 8 ; pt[1].y = 5 * cy / 8 ; pt[2].x = 1 * cx / 8 ; pt[2].y = 4 * cy / 8 ; Triangle (pdis->hDC, pt) ; break ; } // Invert the rectangle if the button is selected if (pdis->itemState & ODS_SELECTED) InvertRect (pdis->hDC, &pdis->rcItem) ; // Draw a focus rectangle if the button has the focus if (pdis->itemState & ODS_FOCUS) { pdis->rcItem.left += cx / 16 ; pdis->rcItem.top += cy / 16 ; pdis->rcItem.right -= cx / 16 ; pdis->rcItem.bottom -= cy / 16 ; DrawFocusRect (pdis->hDC, &pdis->rcItem) ; } return 0 ; case WM_DESTROY : PostQuitMessage (0) ; return 0 ; } return DefWindowProc (hwnd, message, wParam, lParam) ; } |
This program contains two buttons in the center of its client area, as shown in Figure 9-4. The button on the left has four triangles pointing to the center of the button. Clicking the button decreases the size of the window by 10 percent. The button on the right has four triangles pointing outward, and clicking this button increases the window size by 10 percent.
If you need to display only an icon or a bitmap in the button, you can use the BS_ICON or BS_BITMAP style and set the bitmap using the BM_SETIMAGE message. The BS_OWNERDRAW button style, however, allows complete freedom in drawing the button.
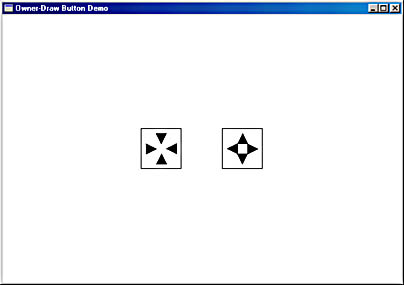
Figure 9-4. The OWNDRAW display.
During the WM_CREATE message, OWNDRAW creates two buttons with the BS_OWNERDRAW style; the buttons are given a width of eight times the system font and four times the system font height. (When using predefined bitmaps to draw buttons, it's useful to know that these dimensions create buttons that are 64 by 64 pixels on a VGA.) The buttons are not yet positioned. During the WM_SIZE message, OWNDRAW positions the buttons in the center of the client area by calling MoveWindow.
Clicking on the buttons causes them to generate WM_COMMAND messages. To process the WM_COMMAND message, OWNDRAW calls GetWindowRect to store the position and size of the entire window (not only the client area) in a RECT (rectangle) structure. This position is relative to the screen. OWNDRAW then adjusts the fields of this rectangle structure depending on whether the left or right button was clicked. Then the program repositions and resizes the window by calling MoveWindow. This generates another WM_SIZE message, and the buttons are repositioned in the center of the client area.
If this were all the program did, it would be entirely functional but the buttons would not be visible. A button created with the BS_OWNERDRAW style sends its parent window a WM_DRAWITEM message whenever the button needs to be repainted. This occurs when the button is first created, when it is pressed or released, when it gains or loses the input focus, and whenever else it needs repainting.
During the WM_DRAWITEM message, the lParam message parameter is a pointer to a structure of type DRAWITEMSTRUCT. The OWNDRAW program stores this pointer in a variable named pdis. This structure contains the information necessary for a program to draw the button. (The same structure is also used for owner-draw list boxes and menu items.) The structure fields important for working with buttons are hDC (the device context for the button), rcItem (a RECT structure providing the size of the button), CtlID (the control window ID), and itemState (which indicates whether the button is pushed or has the input focus).
OWNDRAW begins WM_DRAWITEM processing by calling FillRect to erase the surface of the button with a white brush and FrameRect to draw a black frame around the button. Then OWNDRAW draws four black-filled triangles on the button by calling Polygon. That's the normal case.
If the button is currently being pressed, a bit of the itemState field of the DRAWITEMSTRUCT will be set. You can test this bit using the ODS_SELECTED constant. If the bit is set, OWNDRAW inverts the colors of the button by calling InvertRect. If the button has the input focus, the ODS_FOCUS bit of the itemState field will be set. In this case, OWNDRAW draws a dotted rectangle just inside the periphery of the button by calling DrawFocusRect.
A word of warning when using owner-draw buttons: Windows obtains a device context for you and includes it as a field of the DRAWITEMSTRUCT structure. Leave the device context in the same state you found it. Any GDI objects selected into the device context must be unselected. Also, be careful not to draw outside the rectangle defining the boundaries of the button.
EAN: 2147483647
Pages: 112