SWAT and smb.conf
|
| < Day Day Up > |
|
SWAT is a network-based Samba configuration tool that uses a Web page interface to enable you to configure your smb.conf file. SWAT is, by far, the easiest and simplest way to configure your Samba server. SWAT provides a simple-to-use Web page interface with buttons, menus, and text boxes for entering values. A simple button bar across the top enables you to select the sections you want to configure. A button bar is even there to add passwords. To see the contents of the smb.conf file as SWAT changes it, click View. The initial screen (HOME) displays the index for Samba documentation (see Figure 37-2). One of SWAT's more helpful features is its context-sensitive help. For each parameter and option SWAT displays, you can click a Help button to display a detailed explanation of the option and examples of its use.
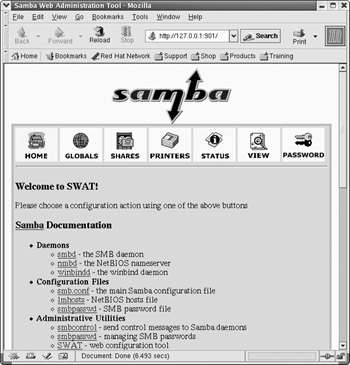
Figure 37-2: SWAT home page
Activating SWAT
SWAT is normally installed with Samba. SWAT is an xinetd service. As an xinetd service, it will be listed in the /etc/services and /etc/xinetd.d/swat files. The SWAT program uses port 901, as designated in the /etc/services file and shown here:
swat 901/tcp # Samba Web Administration Tool
As an xinetd service, SWAT will have its own xinetd file in the /etc/xinetd.d directory, /etc/xinetd.d/swat. SWAT is turned off by default, and its disable option is set to yes. To use SWAT, you will have to change the disable option to no as shown here:
# default: off # description: SWAT is the Samba Web Admin Tool. Use swat \ # to configure your Samba server. To use SWAT, \ # connect to port 901 with your favorite web browser. service swat { disable = no port = 901 socket_type = stream wait = no only_from = 127.0.0.1 user = root server = /usr/sbin/swat log_on_failure += USERID } You can do this by using either chkconfig or the Service Configuration tool to turn on the SWAT service or by manually editing the /etc/xinetd.d/swat file and changing the disable option to no. chkconfig will edit the /etc/xinetd.d/swat file for you, making this change (see Chapter 20 for more information about chkconfig). The following example shows how you would enable SWAT with the chkconfig command:
chkconfig swat on
With chkconfig, you will not have to manually restart the xinetd server. However, if you manually edit the file, you will also have to restart the server to have the change take effect. On Red Hat, you can do this simply using the xinetd script, as shown here:
service xinetd restart
Before you use SWAT, back up your current smb.conf file. SWAT overwrites the original, replacing it with a shorter and more concise version of its own. The smb.conf file, when originally installed, lists an extensive number of options with detailed explanations. This is a good learning tool, with excellent examples for creating various kinds of printer and directory sections. Simply make a backup copy:
cp /etc/samba/smb.conf /etc/samba/smb.bk
Accessing SWAT
You can start SWAT by selecting the Samba Configuration entry in the GNOME or KDE System menu. This will open your Web browser to the SWAT page using the localhost IP address, 127.0.0.1 and port 901, as shown in Figure 37-2. You can also open your browser and enter the IP address 127.0.0.1 with port 901 to access SWAT.
http://127.0.0.1:901
You can start SWAT from a remote location by entering the address of the Samba server it is running on, along with its port (901) into a Web browser. However, you will first have to enable this feature in the /etc/xinetd.d/swat file. Currently, the only_from line in this file restricts access to just localhost. To enable access from any remote system, just remove this line. If you want to provide access to certain specific hosts, you can list them after 127.0.0.1 on the only_from line. Be sure to restart SWAT after any changes. The following example enables access from both 127.0.0.1 and rabbit.mytrek.com:
only_from 127.0.0.1 rabbit.mytrek.com
The following URL entered into a Web browser on a remote system would then display the Web page interface for SWAT on the turtle.mytrek.com Samba server:
http://turtle.mytrek.com:901
You are first asked to enter a username and a password. To configure Samba, you need to enter root and the root password. (If you are connecting from a remote system, it is not advisable to enter the root password in clear text—see Chapter 28.)
SWAT Configuration Pages
The main SWAT page is displayed with a button bar, with buttons for links for HOME, GLOBAL, SHARES, PRINTERS, STATUS, VIEW, and PASSWORD (see Table 37-2). You can use STATUS to list your active SMB network connections.
| Page | Description |
|---|---|
| HOME | SWAT home page listing documentation resources. |
| GLOBALS | Configures the global section for Samba. |
| SHARES | Selects and configures directories to be shared (shares). |
| PRINTERS | Sets up access to printers. |
| STATUS | Checks the status of the Samba server, both smbd and nmbd; lists clients currently active and the actions they are performing. You can restart, stop, or start the Samba server from this page. |
| VIEW | Displays the smb.conf configuration file. |
| PASSWORD | Sets up password access for the server and users that have access. |
For the various sections, SWAT can display either a basic or advanced version. The basic version shows only those entries needed for a simple configuration, whereas the advanced version shows all the possible entries for that type of section. A button— labeled Advanced View and Basic View, respectively—is at the top of the section page for toggling between the advanced or basic versions (see Figure 37-3). Section pages for printers and shares have added buttons and a menu for selecting the particular printer or share you want to configure. The term "share," as it's used here, refers to directories you want to make available through Samba. When you click the SHARES button, you initially see only a few buttons displayed at the top of the SHARES page. You use these buttons to create new sections or to edit sections already set up for shares. For setting up a new Share section, you enter its name in the box next to the Create Share button and then click that button. The new share name appears in the drop-down menu next to the Choose Share button. Initially, this button is blank. Click it to display the list of current Share sections. Select the one you want, and then click the Choose Share button. The page then displays the entries for configuring a share. For a new share, these are either blank or default values. For example, to select the Homes section that configures the default setting for user home directories, click the drop-down menu where you find a Homes entry. Select it, and then click the Choose Share button. The entries for the Homes section are displayed. The same process works for the Printers page, where you can select either the Printers section or Create sections for particular printers.
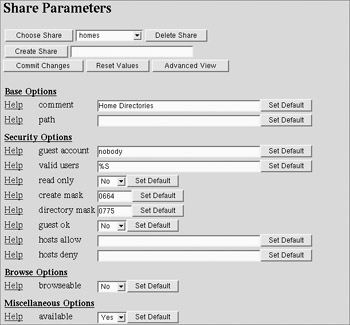
Figure 37-3: SWAT Share page showing Homes section
| Note | Samba automatically creates entries for any printer already configured for use on your system or network. It reads these from your /etc/printcap file. You will need to edit the printer entries to control access to your printers. For Samba to use a printer, it first has to be configured on your system as either a local or network printer (see redhat-config-printer in Chapter 4). Keep in mind that a network printer could be a printer connected to a Windows system. |
In Figure 37-3, notice the Help link next to each entry. Such a link displays a Web page showing the Samba documentation for smb.conf, positioned at the appropriate entry. In this figure, the Guest OK part of the documentation is displayed after the user clicks the Help link next to the Guest OK entry.
When you finish working on a section, click the Commit Changes button on its page to save your changes. Do this for each separate page you work on, including the GLOBALS page. Clicking the Commit Changes button generates a new version of the smb.conf file. To have the Samba server read these changes, you then have to restart it. You can do this by clicking the Restart smb button on the Status page.
Creating a New Share with SWAT
The basic procedures for creating a new share using SWAT include the following steps:
-
Select the Share page and, in the Create Share text box, enter the name of the new share.
-
Click the Create Share button to open a configuration page for the new share. The name of the new share will appear in the pop-up menu next to the Choose Share button.
-
Enter various options. For the Basic Options, you will have to specify the directory for the share in the Path text box. In the Comment text box, you enter the label that will appear on Windows for the share.
-
Click the Commit Changes button to save your share entry to the Samba configuration file, smb.conf. Then restart the Samba server to effect your changes (click the Restart smb button on the Status page).
You can follow a similar procedure to add a new printer, but make sure the printer is also configured on the system with the Samba server.
You can, of course, edit the /etc/samba/smb.conf file directly. This is a simple text file you can edit with any text editor. You still must restart the SMB server to have the changes take effect, which you can do manually on Red Hat with the following command:
service smb restart
A SWAT-Generated smb.conf Example
The following example shows an smb.conf file generated by SWAT for a simple configuration. This is much smaller than the comment-intensive versions originally installed with Samba. In this configuration, share-level security is implemented and password encryption is enabled. A share called myprojects is defined that has guest access and is writable. A printer share called myhp is also defined that supports guest access.
# Samba config file created using SWAT # from localhost.localdomain (127.0.0.1) # Date: 2001/09/09 01:09:07 # Global parameters [global] server string = Samba Server security = SHARE encrypt passwords = Yes ssl CA certFile = /usr/share/ssl/certs/ca-bundle.crt log file = /var/log/samba/%m.log max log size = 0 socket options = TCP_NODELAY SO_RCVBUF=8192 SO_SNDBUF=8192 dns proxy = No printing = cups [homes] comment = Home Directories path = /home writeable = Yes guest ok = Yes [printers] comment = All Printers path = /var/spool/samba guest ok = Yes printable = Yes browseable = No [myprojects] path = /myprojects writeable = Yes guest ok = Yes [myhp] path = /var/spool/samba writeable = Yes guest ok = Yes printable = Yes printer = myhp oplocks = No share modes = No
Global Section
The Global section determines configuration for the entire server, as well as specifying default entries to be used in the home and directory segments. In this section, you find entries for the workgroup name, password configuration, and directory settings. Several of the more important entries are discussed here. Figure 37-4 shows the Global Variables page on the SWAT that you can use to set global options. The Basic View of this page lists the options you would most likely need.
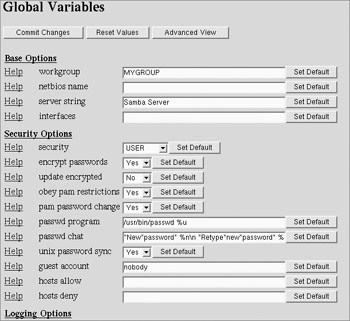
Figure 37-4: SWAT Global Variables page
Specifying the Workgroup and Server
The Workgroup entry specifies the workgroup name you want to give to your network. This is the workgroup name that appears on the Windows client's Network Neighborhood window. The default Workgroup entry in the smb.conf file is shown here:
[global] # workgroup = NT-Domain-Name or Workgroup-Name workgroup = MYGROUP
The workgroup name has to be the same for each Windows client that the Samba server supports. On a Windows client, the workgroup name is usually found on the Network Identification or General panel in the System tool located in the Control Panel window. On many clients, this is defaulted to WORKGROUP. If you want to keep this name, you would have to change the Workgroup entry in the smb.conf file accordingly. The Workgroup entry and the workgroup name on each Windows client have to be the same.
workgroup = WORKGROUP
The server string entry holds the descriptive name you want displayed for the server on the client systems. On Windows systems, this is the name displayed on the Samba server icon. The default is Samba Server, but you can change this to any name you want.
# server string is the equivalent of the NT Description field server string = Samba Server
Security Level
Samba resources are normally accessed with either share- or user-level security. On a share level, any user can access the resource without having to log into the server. On a user level, each user has to log in, using a password. Furthermore, Windows 98, ME, NT, and XP clients use encrypted passwords for the login process. You will have to enable encrypted passwords for these clients. The default for encrypted passwords is no, so you will need to change it to yes. In the smb.conf file, the security option is set to the level you want and the encrypt passwords option is set to yes to enable encryption.
security = user encrypt passwords = yes
If you want share-level security, specify share as the security option:
security = share
On the SWAT Globals page, select the security level from the Security pop-up menu, either User or Share. Then select Yes for the encrypt passwords entry.
Network Access Control
As a security measure, you can restrict access to SMB services to certain specified local networks. On the host's network, type the network addresses of the local networks for which you want to permit access. To deny access to everyone in a network except a few particular hosts, you can use the EXCEPT option after the network address with the IP addresses of those hosts. The localhost (127) is always automatically included. The next example allows access to two local networks:
hosts allow = 192.168.1. 192.168.2.
Printing
To enable printing, allow Samba to load the printer descriptions from your printcap file.
printcap name = /etc/printcap load printers = yes
To specify your printing system, you set the printing option. On Red Hat, CUPS is the print server now supported. To set the printing system to CUPS, use the following:
printing = cups
Guest User Access
You can use a guest user login to make resources available to anyone without requiring a password. A guest user login would handle any users who log in without a specific account. On Linux systems, by default Samba will use the nobody user as the guest user. Alternatively, you can set up and designate a specific user to use as the guest user. You designate the guest user with the Guest Account entry in the smb.conf file. The commented smb.conf file provided with Samba currently lists a commented entry for setting up a guest user called pcguest. You can make this the user you want to be used as the guest user. Be sure to add the guest user to the password file:
guest account = pcguest
On SWAT, you can specify a guest account entry on the GLOBALS page. By default, this is already set to the nobody user.
Passwords
As noted previously, user-level security requires that each user log into the Samba server using passwords. Samba can use either clear text or encrypted passwords, though current Windows clients support encrypted passwords. You can use the smbpasswd command to add and change Samba passwords. On SWAT, you enable password encryption on the Globals page and manage passwords on the Passwords page. In the Server Password Management section, you can add, change, remove, enable, or disable users. To add a new user, enter the username and password, then click Add New User. As the root user on the Samba server, you can add new passwords as well as enable or disable current ones. Normal users can use the Client/Server Password Management section to change their own passwords.
Homes Section
The Homes section specifies default controls for accessing a user home directory through the SMB protocols by remote users. To access the Homes section on SWAT, you simply select the SHARES page, select the Homes entry from the drop-down menu, and click Choose Share. Setting the browseable entry to no prevents the client from listing the files in a file browser. The writeable entry specifies whether users have read and write control over files in their home directories. The create mode and directory mode set default permissions for new files and directories (on SWAT, these are create mask and directory mask). The valid user entry uses the %S macro to map to the current service.
[homes] comment = Home Directories browseable = no writeable = yes valid users = %S create mode = yes directory mode = 775
Printer Section
The Printers section specifies the default controls for accessing printers. These are used for printers for which no specific sections exist. In this case, Samba uses printers defined in the server's printcap file.
In this context, setting browseable to no simply hides the Printers section from the client, not the printers. The path entry specifies the location of the spool directory Samba will use for printer files. To enable printing at all, the Printable entry must be set to yes. To allow guest users to print, set the guest ok entry to Yes. The writeable entry set to no prevents any kind of write access, other than the printer's management of spool files. On SWAT, select the PRINTER page and the Printers entry in the drop-down menu, and then select Choose Printers. A standard implementation of the Printers section is shown here:
[printers] comment = All Printers path = /var/spool/samba browseable = no guest ok = yes writeable = no printable = yes
If you can't print, be sure to check the Default Print entry. This specifies the command the server actually uses to print documents.
Shares
Sections for specific shared resources, such as directories on your system, are usually placed after the Homes and Printers sections. For a section defining a shared directory, enter a label for the system. Then, on separate lines, enter options for its pathname and the different permissions you want to set. In the path = option, specify the full pathname for the directory. The comment = option holds the label to be given the share. You can make a directory writable, public, or read-only. You can control access to the directory with the Valid Users entry. With this entry, you can list those users permitted access. For those options not set, the defaults entered in the Global, Homes, and Printers segments are used.
On SWAT, you use the SHARES page to create and edit shared directories. Select the one you want to edit from the drop-down menu and click Choose Share. The Basic View shows the commonly used entries. For entries such as Valid Users, you need to select the Advanced View. Be sure to click Commit Changes before you move on to another Share or Printer section (see Figure 37-5).
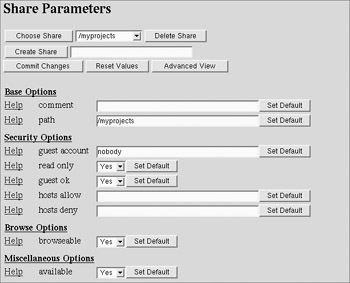
Figure 37-5: SWAT Samba share
The following example is the myprojects share generated by SWAT from the share page shown in Figure 37-5. Here the /myprojects directory is defined as a share resource that is open to any user with guest access.
[myprojects] comment = Great Project Ideas path = /myprojects writeable = yes guest ok = yes printable = yes
To limit access to certain users, you can list a set of valid users. Setting the guest ok option to no closes it off from access by others.
[mynewmusic] comment = Service path = //home/specialprojects valid users = mark guest ok = no writeable = yes printable = no
To allow complete public access, set the guest ok entry to yes, with no valid user's entry.
[newdocs] path = /home/newdocs guest ok = yes writeable = yes printable = yes
To set up a directory that can be shared by more than one user, where each user has control of the files they create, simply list the users in the Valid Users entry. Permissions for any created files are specified by the Create Mask entry (same as create mode). In this example, the permissions are set to 765, which provides read/write/execute access to owners, read/write access to members of the group, and only read/execute access to all others (the default is 744, read-only for group and other permission, see Chapter 28):
[myshare] comment = Writer's projects path = /usr/local/drafts valid users = justin chris dylan guest ok = no writeable = yes printable = no create mask = 0765
For more examples, check those in the original smb.conf file that shows a Shares section for a directory fredsdir.
Printers
Access to specific printers is defined in the Printers section of the smb.conf file. You can also configure printers in the SWAT Printers page. For a printer, you need to include the Printer and Printable entries, as well as specify the type of Printing server used. With the Printer entry, you name the printer, and by setting the Printable entry to yes, you allow it to print. You can control access to specific users with the valid users entry and by setting the Public entry to no. For public access, set the Public entry to yes. For the CUPS server used on Red Hat, set the printing option cups. On SWAT, you can create individual Printer sections on the Printers page. Default entries are already set up for you.
The following example sets up a printer accessible to guest users. This opens the printer to use by any user on the network. Users need to have write access to the printer's spool directory, located in /var/spool/samba. Keep in mind that any printer has to first be installed on your system. The following printer was already installed as myhp and has an /etc/printcap entry with that name. On Red Hat, you can use redhat-config-printer to install an LPRng printer, giving it a name and selecting its driver (see Chapters 4 and 25). You use the CUPS administrative tool to set up printers for the CUPS server (see Chapter 25). The Printing option can be inherited from general Printers share.
[myhp]
path = /var/spool/samba writeable = yes guest ok = yes printable = yes printer = myhp oplocks = no share modes = no printing = cups
As with shares, you can restrict printer use to certain users, denying it to public access. The following example sets up a printer accessible only by the users larisa and aleina (you could add other users if you want). Users need to have write access to the printer's spool directory.
[larisalaser]
path = /var/spool/samba writeable = yes valid users = larisa aleina guest ok = no printable = yes printing = cups printer = myhp oplocks = no share modes = no
Variable Substitutions
For string values assigned to parameters, you can incorporate substitution operators. This provides greater flexibility in designating values that may be context-dependent, such as usernames. For example, suppose a service needs to use a separate directory for each user who logs in. The path for such directories could be specified using the %u variable that substitutes in the name of the current user. The string path = /tmp/%u would become path = /tmp/justin for the justin user and /tmp/dylan for the dylan user. Table 37-3 lists several of the more common substitution variables.
| Variable | Description |
|---|---|
| %S | Name of the current service |
| %P | Root directory of the current service |
| %u | Username of the current service |
| %H | Home directory of the user |
| %h | Internet hostname on which Samba is running |
| %m | NetBIOS name of the client machine |
| %L | NetBIOS name of the server |
| %M | Internet name of the client machine |
| %I | IP address of the client machine |
|
| < Day Day Up > |
|
EAN: 2147483647
Pages: 328