Bouncing Off an Angle
| | ||
| | ||
| | ||
I remember when I was first becoming addicted to Flash, math, and physics. I had figured out how to bounce things off a wall, floor, and ceiling. If a barrier was dead horizontal or vertical, I knew just what to do. But it didnt take too long for me to get bored. In real situations, things are not always horizontal or vertical. Sometimes, things are angled. And I couldnt figure out how to simulate this in Flash with the ease I could do bouncing off a flat surface. I went to the various online Flash forums and asked around. I wasnt the only one. I remember one board had three separate threads going with the exact title as this section: Bouncing off an angle.
A few wise math gurus attempted answers. Something about the angle of reflection being equal to the angle of incidence. I remember it being a pretty straightforward formula that told you the angle at which a moving object would travel after hitting an angled surface. In and of itself, that was fine. But it solved only part of the problem. If you recall back to the discussion on bouncing off barriers, a few steps are involved:
-
Determine when you have passed a boundary.
-
Reset the object so it is resting directly on the boundary.
-
Reverse its velocity on the axis of the collision.
Knowing the final angle solved about half of step 3. But it didnt give me a way to discover when the collision with an angled surface had occurred, or where to position the object so it looked like it had stopped on the surface before bouncing. Nobody seemed to be able to answer all of those points. I tried everything I could think of. I drew enough diagrams to fill a warehouse and wrote enough test code to fill a hard drive. I was getting frustrated. It was so easy if the surfaces were flat. But when they were rotated , it was so complex. Perhaps youre starting to see where Im going with this, and why Im talking about this subject in this chapter.
At the time, Stuart Schoneveld of www.illogicz.com had an incredible physics engine online that handled such collisions smoothly and cleanly. I begged him for information on how he did it. Although he didnt show me any code, he gave me a general idea of what he did, in a sentence or two. It was one of those moments of revelation when the light comes shining through, and you feel like an idiot for not having seen it before.
What he told me was something like, Bouncing off an angled surface? Just rotate the system so the surface is flat, do your bounce, and rotate it all back.
Wow! That was all I needed. You need to rotate the whole system to make your angle surface like a flat floor. This means rotating the surface, rotating the coordinates of the object in question, and rotating the objects velocity vector.
Now, rotating a velocity seems a bit complex, but think about it. Youve been storing velocity in vx and vy variables . The vx and vy simply define a vector, which is angle and a magnitude, or length. If you know the angle, you can rotate it directly. But if you just know the vx and vy , you can apply the advanced coordinate rotation formula to it and get the same result, just as you did for the position of the ball.
Some diagrams should help you visualize it a little better than words ever could. In Figure 10-2, you see the angled surface, the ball, which has obviously just hit the surface, and the vector arrow representing the balls direction and speed.
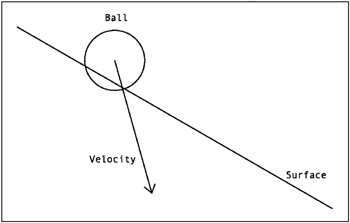
Figure 10-2: A ball hitting an angled surface
In Figure 10-3, you see that the whole thing has been rotated and the surface is not horizontal, just like the bottom barrier on the original bouncing example. Note that the velocity vector has been rotated right along with everything else.
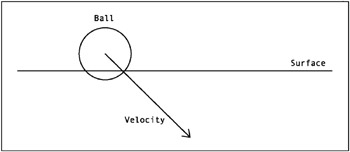
Figure 10-3: The same scene, rotated
The way the picture now looks, its pretty simple to perform a bounce, right? Adjust the position, and change the y velocity, as in Figure 10-4.
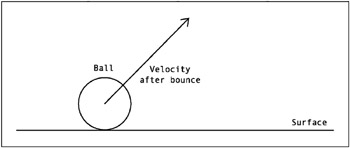
Figure 10-4: After the bounce
You now have a new position and velocity for the ball. Next , rotate everything back to the original angle, as shown in Figure 10-5.
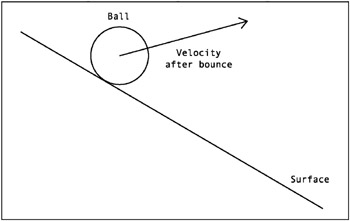
Figure 10-5: After rotating back
Voila! Youve detected the collision, adjusted the position, and changed the velocity, all on an angled surface. Assuming that the pictures make sense to you, lets move on to some code and real graphics.
Performing the rotation
First, you need something to act as an angled surface. This is more for your eyes than for any mathematical necessity. For bouncing off of flat surfaces, you can use the boundaries of the stage, which inherently have a visible position. For an angled surface, it will help to have a real line at a real angle, so you can see the ball bouncing on it.
So, go ahead and make a nice long line with the Line tool. Select it and convert it into a movie clip, making the registration point in the center. Name the movie clip symbol line and leave a copy on stage with an instance name line , as shown in Figure 10-6. After creating it, you should rotate the line movie clip a bit, say 30 degrees or so in either direction, using either the Free Transform tool or the Transform panel.
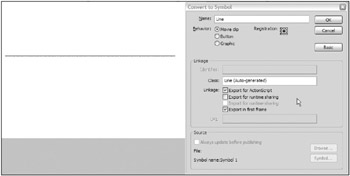
Figure 10-6: Creating a line
Youll also need a ball movie clip, which you should be able to make in your sleep now, with an instance on stage named ball (make sure the ball is above the line, so it can fall onto it).
Here is the initial code to put on frame 1 ( ch10_05.fla ):
var vx:Number = 0; var vy:Number = 0; var gravity:Number = .5; var bounce:Number = -0.7; function onEnterFrame():Void { vy += gravity; ball._x += vx; ball._y += vy; // get angle, sine and cosine var angle:Number = line._rotation * Math.PI / 180; var cosine:Number = Math.cos(angle); var sine:Number = Math.sin(angle); // get position of ball, relative to line var x:Number = ball._x - line._x; var y:Number = ball._y - line._y; // rotate line var x1:Number = cosine * x + sine * y; var y1:Number = cosine * y - sine * x; // rotate velocity var vx1:Number = cosine * vx + sine * vy; var vy1:Number = cosine * vy - sine * vx; // perform bounce with rotated values if(y1 > -ball._height / 2) { y1 = -ball._height / 2; vy1 *= bounce; } // rotate everything back x = cosine * x1 - sine * y1; y = cosine * y1 + sine * x1; vx = cosine * vx1 - sine * vy1; vy = cosine * vy1 + sine * vx1; // reset actual ball position ball._x = line._x + x; ball._y = line._y + y; } You start out by declaring variables for vx , vy , gravity , and bounce , as usual. The enterFrame handler begins with basic motion code.
You then get the angle of the line and convert it to radians. Once you have the angle, you get the sine and cosine of that angle.
Then you get the initial x, y position of the ball in relation to the line, by subtracting the line position from the ball position.
Finally, youre ready to rotate something! Now, when you look at the next couple of lines of code, you may notice something wrong.
var x1:Number = cosine * x + sine * y; var y1:Number = cosine * y - sine * x;
The plus and minus are reversed from the original formula I gave you for coordinate rotation, which is as follows :
x1 = cos(angle) * x sin(angle) * y; y1 = cos(angle) * y + sin(angle) * x;
Thats not a mistake. Think about what youre doing. Say the line is rotated 17 degrees. Using the original formula, you would wind up rotating it 17 degrees more, making it 34 degrees! Oops. You actually want to rotate it ˆ 17 degrees to put it at 0. Now, you could have calculated the sine and cosine to be Math.sin(-angle) and Math.cos(-angle) , respectively. But eventually, youll need the sine and cosine of the original angle, in order to rotate everything back.
So, rather than making two cosine and sine variables (at double the cost of calculation), you can use an alternate form of coordinate rotation to rotate everything in the opposite direction. Its as simple as reversing the plus and minus, as you just saw. If the line is at 17 degrees rotation, this will rotate everything ˆ 17 degrees, putting it at zero degrees, or flat. Then do the same to the velocity.
Note that you dont need to actually rotate the line movie clip. Again, its mostly there for your eyesto let you see where the ball is supposed to bounce. Its also a handy place to store the angle and position of the surface, since you can move and rotate it by hand.
Then you can perform the bounce. You do this using the x1 , y1 position values and the vx1 , vy1 velocity values. Realize that because y1 is in relation to the line movie clip, the bottom boundary is the line itself, which will be 0. Taking into account the size of the ball, you check to see if y1 is greater than ˆ ball._height / 2 . This check is shortcut to the following:
if(y1 > -ball._height / 2)
The rest of the bounce should be obvious.
Then you rotate everything back, using the original formula. This gives you updated values for x , y , vx , and vy . All you need to do at that point is reset the actual position of the ball movie clip by adding x and y to line._x and line._y .
Take some time to test this example. Try different rotations of the line, and different positions of both the line and ball. Make sure it all works fine.
Optimizing the code
Youve already seen some examples of changing code a bit to make it more optimized. This usually involves doing things once instead of multiple times, or not doing them at all, unless youre really sure they need to be done.
I wrote the code in the previous example for clarity only. So, there is a lot happening on every frame that doesnt need to be. Most of that code needs to execute only when the ball has actually hit the line. Most of the time, you just need the basic motion code, and the bare minimum of calculation to check if the ball has hit the line. In other words, all you need is the data that goes into the if statement:
if(y1 > -ball._height / 2)
So, you do need the y1 variable. And in order to get that, you need x and y , and sine and cosine . But if the ball hasnt hit the line, you dont need x1 , or vx1 and vy1 . So, those can go inside the if statement.
Also, if theres no hit, theres no need to rotate anything back or reset the ball position. So, all the stuff after the if statement can go inside the if statement as well. You wind up with this optimized version ( ch10_06.fla ):
var vx:Number = 0; var vy:Number = 0; var gravity:Number = .5; var bounce:Number = -0.7; onEnterFrame = function() { vy += gravity; ball._x += vx; ball._y += vy; // get angle, sine and cosine var angle:Number = line._rotation * Math.PI / 180; var cosine:Number = Math.cos(angle); var sine:Number = Math.sin(angle); // get position of ball, relative to line var x:Number = ball._x - line._x; var y:Number = ball._y - line._y; // rotate line var y1:Number = cosine * y - sine * x; if(y1 > -ball._height / 2) { // rotate line var x1:Number = cosine * x + sine * y; // rotate velocity var vx1:Number = cosine * vx + sine * vy; var vy1:Number = cosine * vy - sine * vx; // perform bounce with rotated values y1 = -ball._height / 2; vy1 *= bounce; // rotate everything back x = cosine * x1 - sine * y1; y = cosine * y1 + sine * x1; vx = cosine * vx1 - sine * vy1; vy = cosine * vy1 + sine * vx1; // reset actual ball position ball._x = line._x + x; ball._y = line._y + y; } } All the stuff in bold has been moved from outside the if statement to inside the statement, so it will happen only if a hit actually occurs, rather than every single frame. Can you imagine how many CPU cycles you just saved? Its pretty important to think about things like this, especially as your movies get more and more complex.
Making it dynamic
You can now start to make the action a little more dynamic. Lets adjust the angle of the line in real time, just to see how robust this thing is. You can do this with a single line of code, as the very first line inside the onEnterFrame function:
line._rotation = (Stage.width / 2 - _xmouse) * .1;
Now you can move your mouse back and forth, and the line will tilt one way or the other. The ball should constantly adjust itself accordingly .
Fixing the falling off the edge problem
What youre probably noticing now is that the ball will continue to roll along the angle of the line, even if it has gone past the edge of it. This may look a bit strange . But remember that the ball is not actually interacting with the line movie clip at all. Its all done mathematically. But the results are so exact, its easy to forget that nothing is actually hitting anything. And since the ball doesnt know anything about the line movie clip, it doesnt know where it starts or ends. But you can tell it where the line isusing either a simple hit test or a more precise bounds check. Lets look at both methods , so you can decide which to use.
Hit testing
The easiest way to find the lines location is to wrap everything but the basic motion code inside an if statement with a hit test, as follows:
function onEnterFrame ():Void { vy += gravity; ball._x += vx; ball._y += vy; if(ball.hitTest(line)) { // all the rest of the stuff that was in this function } } While that is pretty simple, and might suffice for many implementations , theres another way to do it thats a little more exact, and which I prefer. Naturally, that means its a little more complex and processor- intensive .
Bounds checking
I personally think that the getBounds method is one of the most underappreciated functions in ActionScript. I thought about mentioning it in Chapter 9, as it fits in nicely with collision detection, but I had enough to cover there, and one of the best uses Ive found for it is exactly what Im going to describe next. So I saved it for this chapter.
If you recall the discussion on hitTest , then you may also remember what a bounding box is. In case your memory is like mine, Ill recap. The bounding box is the rectangle described by the visible graphic elements of a movie clip instance on stage. If you took any movie clip on stage and drew a rectangle around it so that the top edge touched the very top part of the movie clip, the bottom edge touched the bottom part of the clip, and the same with the left and right edges, youd have the bounding box. Or you could simply select a movie clip that is on stage and see this rectangle outlined in blue.
This bounding box is used in two out of three of the possible ways of calling the hitTest function. In that case, the location of the bounding box is handled behind the scenes, and you get a true or a false in response to the function.
The getBounds function gives you direct access to the numerical values of the position and size of that box. Heres the basic signature of the function:
bounds = mc.getBounds(targetCoordinateSpace)
As you can see, its called as a method of any movie clip, and it returns an object that contains data about the bounding box. Ill get to that in a moment. First, lets look at that single parameter, targetCoordinateSpace . Whats that all about?
You use the targetCoordinateSpace parameter to specify from which viewpoint this bounding box will be described. In most cases, this will be the timeline or movie clip where that mc is located. For example, if youre writing your code directly on the main timeline, you could say mc.getBounds(this) , meaning, Give me the bounding box for this movie clip, in terms of the stages coordinates. On the other hand, if you were creating or attaching a movie clip inside another movie clip, you might want the bounding box in terms of the exterior movie clips registration point, as that might be different from the 0, 0 point of the stage. In that case, you could do something like this:
holder.mc.getBounds(holder)
This means you want the bounding box for the movie clip named mc , which is inside the movie clip holder , and you want it described in terms of holder s coordinate space.
Naturally, the targetCoordinateSpace needs to be a movie clip, or an instance of some class that extends the MovieClip class. And the stage, _root , and _level0 and above are movie clips in essence, so they all count.
Now, on to what the getBounds function returns. I said earlier that it returns an object that contains data about the bounding box. It returns a generic object (of type Object) , which Ill call bounds . This bounds object contains four properties: xMin , xMax , yMin , and yMax .
Lets try it out. Put any movie clip on stage and name it mc , and then put the following code on the timeline:
var bounds:Object = mc.getBounds(this); trace("xMax: " + bounds.xMax); trace("xMin: " + bounds.xMin); trace("yMax: " + bounds.yMax); trace("yMin: " + bounds.yMin); For an interesting experiment, change the first line to read as follows:
var bounds:Object = mc.getBounds( mc );
Now, youre getting the movie clips bounds from its own viewpoint; in other words, in relationship to its own registration point. If its registration point is in its center, the xMin and yMin values should be negative and exactly equal to ˆ xMax and ˆ yMax . If the registration point is in the upper-left corner, xMin and yMin should be 0, and xMax and yMax should be equal to the height and width of the clip. Its also worth mentioning that if you call getBounds without a parameter, youll get the same result, as the object you are checking the bounds of will be used as the target coordinate space.
Just about now, youre probably starting to forget why Im talking about bounds in the first place, so lets get back on track. We were trying to figure out when the ball has fallen off of the edge of the line, remember? So, you can call getBounds on the line, and find its xMin and xMax . If the balls x position is less than the bounds xMin , or if it is greater than the bounds xMax , it has gone over the edge. Its far more complex to describe than it is to just show, so heres the code:
function onEnterFrame ():Void { vy += gravity; ball._x += vx; ball._y += vy; var bounds:Object = line.getBounds(this); if(ball._x > bounds.xMin && ball._x < bounds.xMax) { // all the rest of the stuff that was in this function } } You can see these changes implemented in the file ch10_07.fla .
Fixing the under the line problem
In either method hitTest or bounds checkingyoure first finding out if the ball is in the vicinity of the line, and then doing coordinate rotation to get the adjusted positions and velocities. At that point, you check if the y1 rotated y position of the ball is past the line, and if so, perform a bounce. But what if the ball passes under the line? Say the line is up in the middle of the stage, and the ball is bouncing around on the floor. If either the hitTest or the bounds check comes back true , Flash will think the ball has just bounced on the line, and will transport the ball from below the line to above it.
The way Ive come up with to solve this is to compare vy1 with y1 , and bounce only if vy1 is greater. How did I come up with that? Take a look at the diagram in Figure 10-7.
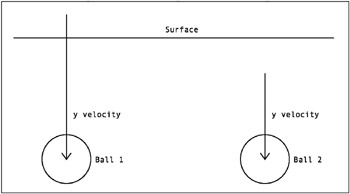
Figure 10-7: Did it go through, or just pass under?
With the ball on the left, the y velocity is greater than the y position in relation to the line. This means that just before it moved, it had to be above the line. With the ball on the right, the velocity is less than the relative y position. In other words, its below the line on this frame, and it was below the line on the last frame. So its just moving underneath the frame. The only time you want to do a bounce is when the ball goes from above the line to below it. Now, lets look at how to fix the code to do that. Heres a section of the code out of the enterFrame handler:
... // rotate line var y1:Number = cosine * y - sine * x; if(y1 > -ball._height / 2) { // rotate line var x1:Number = cosine * x + sine * y; // rotate velocity var vx1:Number = cosine * vx + sine * vy; var vy1:Number = cosine * vy - sine * vx; ... You just need to add that y1 < vy1 into your if statement:
if(y1 > -ball._height / 2 && y1 < vy1)
But in order to do that, you need to calculate vy1 beforehand. So that comes out of the if statement, and the snippet becomes corrected to this:
. . . // rotate line var y1:Number = cosine * y - sine * x; var vy1:Number = cosine * vy - sine * vx; if(y1 > -ball._height / 2 && y1 < vy1) { // rotate line var x1:Number = cosine * x + sine * y; // rotate velocity var vx1:Number = cosine * vx + sine * vy; . . . So, you need to do a little extra calculation on each frame, with the payoff of greater accuracy and realism that familiar trade-off. You can decide if its necessary. Say you have a setup where its just not possible for the ball to go under a line. You dont need to worry about this, and you can move the vy1 calculation back to the if statement and remove the extra check.
OK, were bouncing, were dynamic, weve got edges! Lets move on to the final, large-scale example of the chapter.
Bouncing off multiple angles
So far, youve just been dealing with a single line, or angled surface. Dealing with multiple surfaces is not really all that complicated. You just make a bunch of surfaces and loop through them. You can abstract the angle bouncing code into its own function and just call that from within the loop.
Also, in all the examples in this chapter up to now, Ive tried to keep things as simple as possible, giving you only the minimum amount of code necessary to demonstrate the principle at hand. However, the next example is a complete program, using all the techniques youve seen in prior chapters (with some comments to jar your memory).
The library setup for this example is similar to the last few examples, with the same line and ball movie clips, except I made the lines a bit smaller so there would be room for more of them. Ive placed five lines and one ball on stage. The ball instance is named ball , and the lines are named line0 through line4 . I then positioned everything in a nice layout, as shown in Figure 10-8.
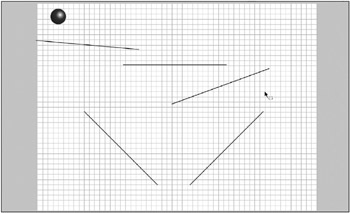
Figure 10-8: Maybe a pinball machine?
Heres the code ( ch10_08.fla ):
var vx:Number = 0; var vy:Number = 0; var gravity:Number = .5; var bounce:Number = -0.7; var left:Number = 0; var right:Number = Stage.width; var top:Number = 0; var bottom:Number = Stage.height; var dragging:Boolean = false; var oldX:Number; var oldY:Number; function onEnterFrame ():Void { if(dragging) { // keep track of velocity while dragging vx = ball._x - oldX; vy = ball._y - oldY; oldX = ball._x; oldY = ball._y; } else { // otherwise normal motion code vy += gravity; ball._x += vx; ball._y += vy; for(var i:Number = 0;i<5;i++) { // moved the line checking stuff to its own method // and passed in a reference to each line checkLine(this["line" + i]); } // basic boundary bouncing code if(ball._x + ball._width / 2 > right) { ball._x = right - ball._width / 2; vx *= bounce; } else if(ball._x - ball._width / 2 < left) { ball._x = left + ball._width / 2; vx *= bounce; } if(ball._y + ball._height / 2 > bottom) { ball._y = bottom - ball._height / 2; vy *= bounce; } else if(ball._y - ball._height / 2< top) { ball._y = top + ball._height / 2; vy *= bounce; } } } function checkLine(line:MovieClip) { // nothing new here! var bounds:Object = line.getBounds(this); if(ball._x > bounds.xMin && ball._x < bounds.xMax) { // get angle, sine and cosine var angle:Number = line._rotation * Math.PI / 180; var cosine:Number = Math.cos(angle); var sine:Number = Math.sin(angle); // get position of ball, relative to line var x:Number = ball._x - line._x; var y:Number = ball._y - line._y; // rotate line var y1:Number = cosine * y - sine * x; var vy1:Number = cosine * vy - sine * vx; if(y1 > -ball._height / 2 && y1 < vy1) { // rotate line var x1:Number = cosine * x + sine * y; // rotate velocity var vx1:Number = cosine * vx + sine * vy; // perform bounce with rotated values y1 = -ball._height / 2; vy1 *= bounce; // rotate everything back x = cosine * x1 - sine * y1; y = cosine * y1 + sine * x1; vx = cosine * vx1 - sine * vy1; vy = cosine * vy1 + sine * vx1; // reset actual ball position ball._x = line._x + x; ball._y = line._y + y; } } } // basic drag and drop functionality ball.onPress = function() { oldX = this._x; oldY = this._y; dragging = true; this.startDrag(); } ball.onRelease = ball.onRelease = function() { dragging = false; this.stopDrag(); } Yes, its a lot of code, but as Ive become fond of saying, its all stuff you should recognize by now. Complex programs are not necessarily composed of complex pieces, but they are frequently built from a lot of familiar pieces, put together just right.
There is a bit of optimization you can try here if you are interested. Say you have many surfaces to check, and you are looping through them and checking each one. In many systems, once you have found a surface that the ball is hitting, and handled that reaction, you dont need to continue checking all the other surfaces. So you could just break out of the for loop at that point. To do such a thing, you might want to have the checkLine function return true or false based on whether or not it has hit a line. Then your for loop in the onEnterFrame function could look like this:
for(var i:Number = 0;i<5;i++) { // moved the line checking stuff to its own method // and passed in a reference to each line if(checkLine(this["line" + i])) { break; } } In some cases though, particularly in a dense area of lines, you might want to check all of the lines on every frame. So, Ill leave it to you to decide if such an optimization is appropriate.
| | ||
| | ||
| | ||
EAN: 2147483647
Pages: 137