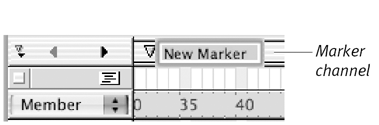
Setting Markers


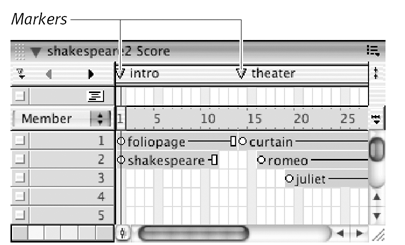
One way to manage a movie composed of many frames is to use markers to label important sections of the Score ( Figure 3.87 ).

Figure 3.87. You can place markers in the Score to label sections of your movie.

graphics/03fig87.gif

To create a marker:

  1. In the Score, click a frame in the marker channel where you want to insert a new marker ( Figure 3.88 ).

    Figure 3.88. Click in the marker channel to insert a new marker.

    graphics/03fig88.gif

  2. Type a name for the marker.

  3. Press Enter (Windows) or Return (Mac).

graphics/tick.gif Tip

  • Because marker names are often used by Lingo scripts to control the playback of a movie, it's a good idea to get into the habit of naming your markers in a Lingo-compatible style. Don't include spaces in your marker names , and don't begin them with uppercase letters . (For example, use "scene2" instead of "Scene 2.")


To reposition a marker:

  • Drag the marker left or right to a new frame.

To delete a marker:

  • Drag the marker out of the marker channel.

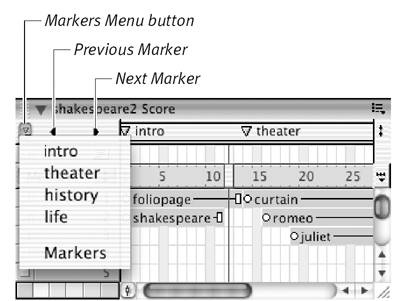
To navigate through a Score by markers:

  1. Click the Previous Marker button to jump back to the marker before the current frame ( Figure 3.89 ).

    Figure 3.89. To move to a marked position in the Score, use the Previous Marker or Next Marker buttons , or choose a marker name from the Markers pop-up menu.

    graphics/03fig89.jpg

  2. Click the Next Marker button to jump forward to the marker after the current frame.

  3. Jump directly to a specific marker by opening the Markers pop-up menu and selecting the name of the marker.

    Director includes a Markers window that allows you to add descriptive comments to markersscene descriptions or any other notes that might help someone understand the purpose of the marked frames.

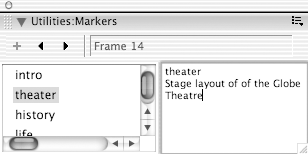
To annotate markers in the Markers window:

  1. With the Score open , choose Window > Markers to display the Markers window.

  2. In the left pane of the window, click the name of the marker that you want to annotate.

    Director immediately moves the playhead to the frame that contains the selected marker; it also copies the name of the marker in the right pane of the window ( Figure 3.90 ).

    Figure 3.90. Select a marker in the left pane of the Markers window; then type an explanatory note in the right pane.

    graphics/03fig90.gif

  3. Click the right pane of the Markers window.

    You'll see a flashing cursor to the right of the repeated marker name.

  4. Press Ctrl + Enter (Windows) or Return (Mac) to start the comments on a new line.

    Don't put your comments on the same line as the marker name. If you do, they'll become appended to the marker name and will be visible in the marker channel in the Score.

  5. Type the comments.

  6. To make your comments "stick," click another marker name in the left pane, or close the Markers window.


Macromedia Director MX for Windows and Macintosh. Visual QuickStart Guide
ISBN: 1847193439
EAN: N/A
Year: 2003
Pages: 139

flylib.com © 2008-2017.
If you may any questions please contact us: flylib@qtcs.net