Entering and Editing Text
| This section reviews fundamental Word editing skills and brings you up to speed even if you are new to word processing. In this section, you learn how to do the following:
Entering TextThe blank editing area is where you type text to create a new document. Of course, Word supports more than just text because you can add graphics and even Web page elements to a Word document. The best way to become familiar with Word, however, is to start with straight text. Two pointers appear in Word: the mouse's pointing arrow and the insertion point, which is the flashing vertical bar (also called the text cursor ) that shows where the next character will appear. As you type, remember these basic editing hints:
Insert mode is Word's default editing mode. When you are using Insert mode, new text you type appears at the text pointer, pushing existing characters to the right (and down the page if needed). When in Overtype mode , new text replaces existing text. The Word status bar shows the current insertion mode. If the letters OVR are visible, Word is in Overtype mode. If OVR is grayed out, Word is in Insert mode. You can switch between the two modes by pressing the Insert key. Navigating Word DocumentsWhen you first type a document, you might enter the rough draft all at once and edit the text later, or you might be the kind of writer who edits as you go. No matter how you write, you need to be able to move the insertion point around a Word document quickly, locating just the text you want. Often, you navigate through a Word document using these general practices:
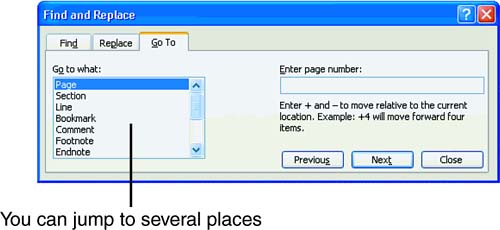
To quickly navigate many pages in a document, press Ctrl+G (the shortcut for Edit, Go To) to display Figure 2.3's Find and Replace dialog box and enter a page number to jump to that page. The Find and Replace dialog box is great for jumping not only to specific page numbers , but also to specific text that you want to read or edit. You will learn more about the Find and Replace dialog box as well as how the task pane helps you search for text. Figure 2.3. You can quickly jump to any place in your document.
Selecting TextEarlier in this hour , you learned how to insert and delete individual characters; you will now learn how to select entire sections of text you can move or delete. When you highlight ( select ) text, you can perform tasks on that selection. For example, you can select two sentences and underline them for emphasis. You can select text using your keyboard or mouse. Table 2.1 shows the mouse-selection operations. Table 2.1. Word Makes Easy Work of Text Selection
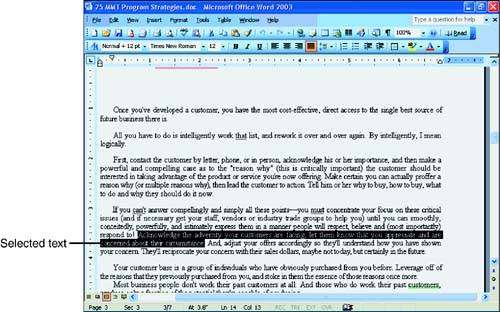
Figure 2.4. Select a block of text to edit. If you want to select different sections of text at the same time, press Ctrl before you select each section of text. By using Ctrl, you can select a sentence at the top of your document and one at the bottom at the same time and then apply a special format to both sentences at once. Hour 3, "Formatting with Word 2003," explains how to format text you select. To select text with your keyboard, move the insertion point to the beginning of the selection, press the Shift key, and move the insertion point to the final selection character. Release the Shift key when you're finished selecting the text.
Deleting TextPress Delete to erase a single character to the right of the insertion point. Any characters to the right of the deleted character shift left to close the gap. You can also press Delete to delete all your selected text. Furthermore, you can press Backspace to erase text characters to the left of the insertion point.
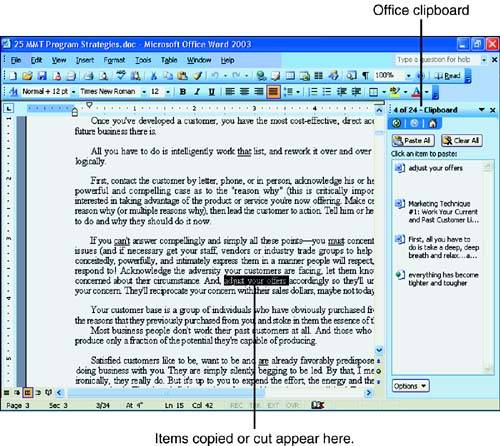
Copying, Cutting, and PastingAfter you select text, you can copy or cut (move) that text to a different location. One of the most beneficial features that propelled word processors into the spotlight in the 1980s was their capability to copy and move text. In the medieval days (before 1980), people had to use scissors and glue to cut and paste. Now, your hands stay clean. Windows utilizes the clipboard concept to hold text that you want to cut, copy, or move, and Office takes the concept of the clipboard further with the Office Clipboard . The Office Clipboard is where text resides during a copy, cut, or paste operation. It shows itself in Office as a task pane. Select View, Task Pane, and if one of the non-clipboard task panes appears, click the arrow toward the top of the task pane and select Clipboard to display the Office Clipboard contents. The Office Clipboard can hold 24 selected items (text, graphics, hyperlinks , or any other kind of Office data), and a special Clipboard task pane automatically appears as you select text (see Figure 2.5). If you don't want to see the task pane when you use the Office Clipboard, click the task pane's Options button and select Collect Without Showing Office Clipboard. You can always redisplay the task pane by selecting from the View menu. Figure 2.5. The Clipboard task pane displays items you've cut or copied . To copy text or other document elements such as graphics from one place to another, first select the item. Next, copy the selected text to the Office Clipboard by selecting Edit, Copy. (You can also press Ctrl+C or click the Copy button.) Then, paste the Office Clipboard contents in their new location by selecting Edit, Paste. (Alternatively, you can press Ctrl+V or click the Paste button.) You can paste the same text again and again wherever you want it to appear. If you've copied several items to the Office Clipboard (by performing a copy operation more than once during the current editing session), click where the pasted item is to appear in your document and then click the item in the Office Clipboard task pane. When you paste an item into your document, a small Paste Options button (similar to the one on the Paste toolbar button) appears under the pasted text. You can ignore the button by continuing with your typing and the icon goes away. But if you click on the Paste button's drop-down list arrow, Word displays several formatting options that control the way your text pastes into the document. When you cut text from your document (select Edit, Cut; click the Cut toolbar button; or press Ctrl+X), Word erases the text from your document and sends it to the Office Clipboard so you can paste the Office Clipboard contents elsewhere. In effect, cutting and pasting moves the text. As with copying text, you don't have to paste the most recent item you've copied to the Clipboard if you've copied multiple items. Simply click the item you want to paste in the Office Clipboard task pane. You can paste the same item into several different locations.
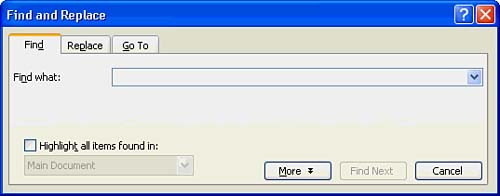
To Do: Find and Modify TextUse Word to locate text for you. When searching through extremely long documents, Word's search capabilities come in handy. Suppose that you are writing a political letter, for example, and you want to correct a congressional district 's seat name . Let Word find all occurrences of the word district by following these steps:
If you click the Find and Replace dialog box's option labeled Highlight All Items Found in, and then click Find All, Word immediately highlights all occurrences of the text. This option is useful when you want to see where all instances of the text occur without locating each individual one using the Find and Replace method.
To Do: Find and Replace TextAs you probably can guess from the name of the Find and Replace dialog box, Word not only finds but can also replace text. Suppose that you wrote a lengthy business proposal to an associate whom you thought was named Paul McDonald. Luckily, before you sent the proposal over your corporate network (using Outlook), you realized that Paul's last name is spelled Mac Donald. Use Word to change all instances of McDonald to MacDonald by following these steps:
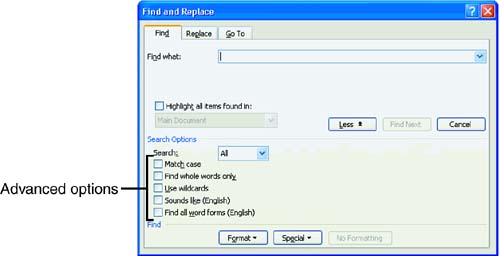
Advanced Find and ReplaceThe Find and Replace dialog box contains more buttons. If you want more control over how Word searches for and replaces text, click the More button on either the Find or Replace tab. The dialog box expands to show more options, as Figure 2.7 shows. Figure 2.7. Advanced options enable you to control your find-and-replace operations.
Table 2.2 describes each of the advanced find-and-replace options. Table 2.2. The Advanced Find and Replace Dialog Box Options
AutoCorrecting and AutoFormattingWord is smart. Often, Word fixes problems without you ever being aware of them, thanks to Word's AutoCorrect feature. As you type, Word analyzes the errors and makes corrections or suggested improvements along the way. If you select Tools, AutoCorrect and select Replace Text As You Type and Automatically Use Suggestions from the Spelling Checker options, Word makes spelling corrections as you type. The Office Assistant is always there to guide you, but AutoCorrect is integral to Word as well as to many of the other Office 2003 products. If AutoCorrect recognizes a typing mistake, it immediately corrects the mistake. Following are just a few of the mistakes AutoCorrect recognizes and corrects as you type:
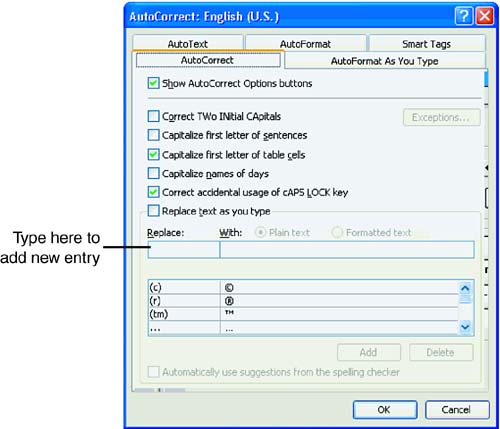
If AutoCorrect corrects something that you don't want corrected, press Ctrl+Z (Alt+Backspace also works) and AutoCorrect reverses its action. If you type an entry in the AutoCorrect list that you do not want corrected in the future, such as QBasic that Word incorrectly changes to Qbasic , press Backspace as soon as Word first corrects the word. A small bar appears beneath the correction. When you rest your mouse pointer over the bar for a moment, the AutoCorrect option buttons appear so that you can control the way the correction works. The initial AutoCorrection word list and AutoCorrect options are preset. However, you can add your own frequently misspelled (or mistyped ) words to the list. You will most certainly want to add your initials to the AutoCorrect table, for example, so that you need only type your initials when you want to enter your full name in a document. To Do: Use the AutoCorrect FeatureTo add your own AutoCorrect entries to the list, perform these steps:
After you enter a new AutoCorrect entry, you can begin using the AutoCorrect feature immediately. In addition to AutoCorrect entries, Word also automatically formats special character combinations within your document as you type. For example, Word converts common typed fractions, such as 1/2, to their single character equivalents. You can control exactly which AutoFormat features Word uses by selecting Tools, AutoCorrect Options and then clicking the AutoFormat as You Type tab. |
EAN: 2147483647
Pages: 272