Hack 15. Dynamically Generate a New Selection List Using Server Data
| Create a list of choices on a web page that automatically branches into a new selection list without the entire page being refreshed. Sometimes a choice in a user interface naturally leads to a subsequent set of choices. An example is a support page for computer hardware, where one select list has a choice for hardware platform, such as Apple or HP, which generates (when the user makes a choice) a second list of related operating systems, and so on. Ajax can shine in these situations where the user interface can automatically be customized for the browser user, as well as where the content for the select list must come from a server. You could set up this page using only dynamic HTML, with JavaScript creating the new select list. However, the choices for the new list would have to be hardcoded into the JavaScript. Ultimately, this content for new lists will change, creating an awkward situation in which developers have to constantly add persistent lists to an existing JavaScript file. Without being able to store these values in a sensible location such as a database or other persistent store, this application model becomes unwieldy. This hack displays two radio buttons on a web page, offering users the choice of displaying either European countries or South American countries. Either choice results in the display of a new selection list with different content. Figure 2-6 shows the web page for the hack. Figure 2-6. Dynamically generate a list widget by selecting a radio button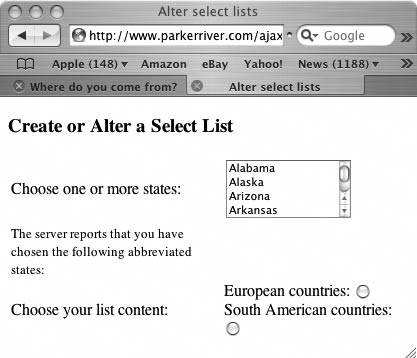 Here is the HTML code underlying the web page. I removed most of the long select list above the radio buttons because that code appears in the previous hack: <!DOCTYPE html PUBLIC "-//W3C//DTD XHTML 1.0 Strict//EN" "http://www.w3.org/TR/2000/REC-xhtml1-20000126/DTD/xhtml1-strict.dtd"> <html xmlns="http://www.w3.org/1999/xhtml" xml:lang="en" lang="en"> <head> <meta http-equiv="content-type" content="text/html; charset=utf-8" /> <script type="text/javascript" src="/books/4/254/1/html/2/js/hacks_2_4.js"></script> <link rel="stylesheet" type="text/css" href="/css/hacks.css" /> <title>Alter select lists</title> </head> <body> <h3>Create or Alter a Select List</h3> <form action="javascript:void%200" > <table border="0"> <tr><td>Choose one or more states: </td> <td><select name="_state" multiple="multiple" size="4"> <option value="al">Alabama</option> <!more options... --> </select></td></tr> <tr><td><span > The server reports that you have chosen the following abbreviated The purpose of this code is to create a new select list whenever the browser user clicks on a radio button. With radio buttons on a web page, only one can be selected at a time. If you select a certain button, the other one(s) are automatically deselected. Central to this hack is each radio button's onclick event handler. This is an attribute of an HTML element that points to a JavaScript function. The function's code executes each time the user clicks on a radio button. In other words, if a button is deselected and the user clicks it, the code calls the function named generateList( ). The code appears in the file that the web page imports, hacks_2_4.js. Here is the code that controls the response to the user's radio-button clicks: //input field's event handlers window.onload=function( ){ var eur = document.getElementById("euro"); if(eur != null){ eur.onclick=function( ){generateList(this); };} var southa = document.getElementById("southam"); if(southa != null){ southa.onclick=function( ){generateList(this); };} }Each onclick event handler points to a function that simply calls generateList( ). You will notice that the this keyword is used as a parameter. That holds a reference to each radio button that is clicked, so that the function's code can grab the button's value and send the value to a server component. Presto, New ListsThe generateList( ) function is defined in a file named hacks_2_4.js. The HTML code for the web page imports this file using a script element. Here are the highlights of this file, with the emphasis on the functions used to generate a new list: var formObj = null; var formObjTyp = ""; var request=null; function generateList(obj){ if (obj == null ) { return; } if(obj.checked) { formObj=obj; formObjTyp =formObj.tagName.toLowerCase( ); var url = "http://www.parkerriver.com/s/selectl?countryType="+ encodeURIComponent(obj.value); httpRequest("GET",url,true); } } //event handler for XMLHttpRequest function handleResponse( ){ try{ if(request.readyState == 4){ if(request.status == 200){ if(formObjTyp.length > 0 && formObjTyp == "input") { if (resp != null){ //return value is an array var objt = eval(resp); //create a new select element var sel = document.createElement("select"); sel.setAttribute("name","countries"); //give the select element some options based //on a list of countries from the server createOptions(sel,objt); //the div element within which the select appears var newsel = document.getElementById("newsel"); reset(newsel); newsel.appendChild(sel); } } else if(formObjTyp.length > 0 && formObjTyp == "select"){ //code edited out here for the sake of brevity... } } else { //request.status is 503 if the application isn't available; //500 if the application has a bug alert("A problem occurred with communicating between "+ "the XMLHttpRequest object and the server program."); } }//end outer if } catch (err) { alert("It does not appear that the server is available"+ " for this application. Please"+ " try again very soon. \\nError: "+err.message); } } function createOptions(sel,_options) { //_options is an array of strings that represent the values of //a select list, as in each option of the list. //sel is the select object if(_options == null || _options.length==0) { return;} var opt = null; for(var i = 0; i < _options.length; i++) { opt = document.createElement("option"); opt.appendChild(document.createTextNode(_options[i])); sel.appendChild(opt); } } //remove any existing children from an Element object function reset(elObject){ if(elObject != null && elObject.hasChildNodes( )){ for(var i = 0; i < elObject.childNodes.length; i++){ elObject.removeChild(elObject.firstChild); } } } /* Initialize a request object; code omitted, see Hack #1 or #2. */When the user clicks on a radio button, the control either indicates a selected state or, if it is already selected, or deselects the button. The onclick event handler does not differentiate between checked or unchecked radio buttons; it is designed simply to react when the button has been clicked. Just to make sure the radio button is selected (even though the button is designed to be selected based on a click event), the code first checks whether the object was in a checked state before it begins creating a new select list: function generateList(obj){ if (obj == null ) { return; } if(obj.checked) { formObj=obj; formObjTyp =formObj.tagName.toLowerCase( ); var url = "http://www.parkerriver.com/s/selectl?countryType="+ encodeURIComponent(obj.value); httpRequest("GET",url,true); } }Querying the ServerThe code queries a server with the value of the checked radio button. Recall that the new select list contains choices (the words the user sees, such as "United Kingdom") that are stored on the server side. To determine which set of values to acquire from the serverthe European or South American countriesyou include in the request URL a parameter named countryType. The value for this parameter derives from the radio button's value attribute, as in: <input type="radio" name="countryType" value="southam" /> The code sends this information to the server using the request object and the httpRequest( ) function. "Use the Request Object to POST Data to the Server" [Hack #2] and "Submit Text Field or textarea Values to the Server Without a Browser Refresh" [Hack #12] (among others) describe this function, which wraps the initialization of the request object and the calling of its methods. The URL the request object uses to connect with the server might look like http://www.parkerriver.com/s/selectl?countryType=euro. The code then receives the response and builds the new select list. It pulls the values out of the response using the familiar handleResponse( ) function, which shows up in most of the other hacks. Here are the key lines of JavaScript for this hack: if(request.readyState == 4){ if(request.status == 200){ if (resp != null){ //return value is a JSON array var objt = eval(resp); //create a new select element var sel = document.createElement("select"); sel.setAttribute("name","countries"); //give the select element some options based //on a list of countries from the server createOptions(sel,objt); //the div element within which the select appears var newsel = document.getElementById("newsel"); reset(newsel); newsel.appendChild(sel);The server's return value looks like ["Spain","Germany","Austria"]. The code takes the string return value and converts it to an array with eval( ), as discussed in "Receive Data in JSON Format" [Hack #7] . The JavaScript then uses the DOM API to create a new select element. It's a good idea to give the newly generated HTML element a name and a value, in case your application calls for submitting these values to a server component: var sel = document.createElement("select"); sel.setAttribute("name","countries");Using the array of values returned by the server, the createOptions( ) function populates the select element with a new option element pointing at each array member. The end result is a new select element built from scratch that looks like this: <select name="countries"> <option>United Kingdom</option> ... </select> Here is the code for the createOptions( ) function: function createOptions(sel,_options) { //_options is an array of strings that represent the values of //a select list, as in each option of the list. //sel is the select object if(_options == null || _options.length==0) { return;} var opt = null; for(var i = 0; i < _options.length; i++) { opt = document.createElement("option"); opt.appendChild(document.createTextNode(_options[i])); sel.appendChild(opt); } }The _options variable contains all the country names. The code uses the DOM API to create each new option element, call the element's appendChild( ) method to add the country name to the option, and finally call the select element's appendChild( ) method to add the option to the select list. The Final StepWe have to figure out which block-level element in the HTML will hold the new select element, rather than just throwing the select element somewhere within the body tag, willy-nilly. A div element with the id newsel serves this purpose: <div ></div> The div element appears beneath the radio buttons on the page, but since it initially does not contain any visible HTML elements, the user will not be aware of it. The code uses another popular DOM method, getElementById( ), to get a reference to this div, and then appends the select element to it as a node: var newsel = document.getElementById("newsel"); reset(newsel); newsel.appendChild(sel);To prevent users from continuously clicking the radio buttons and generating a million new lists, another method named reset( ) first checks the div for any existing child nodes, which would represent a previously created select element. The function deletes any existing nodes before the code adds a new select list inside the div: function reset(elObject){ if(elObject != null && elObject.hasChildNodes( )){ for(var i = 0; i < elObject.childNodes.length; i++){ elObject.removeChild(elObject.firstChild); } } }Figure 2-7 shows the web page after the user has clicked one of the radio buttons. The choice of South American countries has generated a new select list beginning with Brazil. Figure 2-7. Choose a radio button to create a new list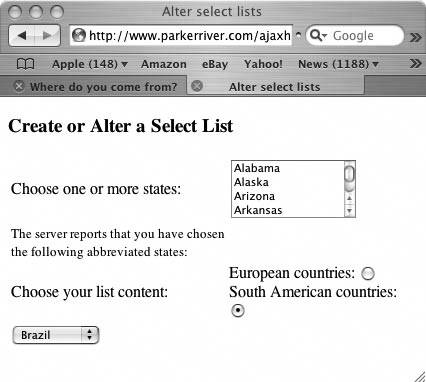 |
EAN: 2147483647
Pages: 138