17.3. ASP.NET Application Security
| < Day Day Up > |
| Web-based applications must address many of the same security issues that are faced by applications situated on a local network. The most important of these and the subject of this section is client authentication. By this, we mean the capability to identify the user attempting to access a Web resource. Unlike traditional static Web sites that permit anonymous user access, an application that wants to tailor its content for the user, or restrict access based on authorization rights, must first authenticate the user. ASP.NET offers three forms of client authentication:
The most flexible and least proprietary of these techniques is Forms Authentication. It represents the natural evolution from a do-it-yourself approach that requires creating a login screen, writing code to match user credentials against a database or file, and building a cookie to maintain client data during a session. ASP.NET offers substitutes for each of these tasks, which can be easily plugged into a developer's custom solution. The remainder of this section examines this form of authentication. Forms AuthenticationThe general framework for implementing Forms Authentication is based on a mixture of configuration files, authentication modules, ASP.NET security classes, and the script (C# code) to work with the methods and properties of these classes. Figure 17-4 illustrates how it works. Figure 17-4. Forms Authentication steps that occur when a page is first requested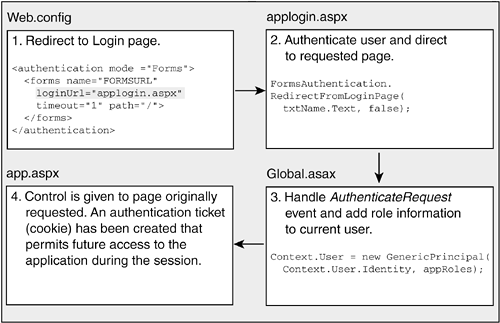 A web.config file defines a login page to which a user's browser is redirected when it first attempts to access a Web resource. This login page accepts the client's credentials usually name and password and determines if they are valid. If so, the user is authenticated and ASP.NET methods are used to create a FormsAuthenticationTicket that contains the user's security information. The ticket is encrypted and stored as a cookie. The cookie may be configured to expire at the end of the session, or remain on the client's machine so that the user can be automatically identified in future sessions. An optional step in this process is to add authorization information about a client to the ticket. For example, users may be assigned to groups that define their access rights. The code to add this role information can be placed in the global.asax file to handle the application's AuthenticateRequest event. After these steps are complete and the user is authenticated, control passes to the Web page originally requested. Subsequent session authentication uses information in the authentication cookie and avoids these steps. Security Settings in web.config for Forms AuthenticationThe web.config file plays an important role in supporting authentication and authorization in ASP.NET security. Listing 17-5 presents many of its elements and optional attribute values that are used to select and implement a security method. The first thing to note is the mode attribute in the <authentication> element, which specifies the type of authentication being used. Contained in the <authentication> section is a <forms> tag or <passport> tag (not shown) that corresponds to the type of authentication chosen. The <forms> tag, which is used in a later example, contains several key attributes. The loginurl specifies the login page that a user is directed to when she has not been authenticated. The timeout attribute specifies how long a user may wait between requests before the authentication ticket expires. Thus, if the value is set to 5 minutes and the user has not requested a page in that interval, she is forced to log in again at her next request. The protection attribute specifies how, or if, ticket authentication information is processed before it is written to a cookie. You'll normally set this to All. The <forms> element may contain a <credentials> element that can be used as a mini-database to list each user and his password. The advantage of placing them here, as we see in a later example, is that .NET authentication classes provide methods to automatically perform authentication against these names. To add a measure of security for storing the passwords, the passwordFormat attribute is provided to specify how the passwords are encrypted. Web.config may also contain an <authorization> section that explicitly allows or denies access to users based on their name or role (think of role as a group the user belongs to). The <allow> and <deny> tags are processed in the order they occur in the file. When the tag's policy can be applied to the user, processing stops. If no allow or deny policy matches the user, the user is authorized to access the resource. Listing 17-5. Authentication and Authorization Configuration Sections<Configuration> <system.web> <authentication mode="{Windows|Forms|Passport|None}"> <forms name="Cookiename" loginurl="path to login file" timeout="minutes" protection="{None|All|Encryption|Validation}" path="Cookiepath" > <credentials passwordFormat="Clear|MDS|SHA1}"> <user name="User Name" password="password" /> </credentials> </forms> </authentication> <authorization> <allow users="comma-separated list" roles="roles list" /> <deny users="comma-separated list" roles="roles list /> </authorization> ... </system.web> ... </configuration> An Example of Forms AuthenticationWe'll now create a simple Web page that can only be accessed by users who provide a valid name and password. The example is then extended to demonstrate how client role information can be incorporated in the authorization process. As you work through the example, the most important things to observe are
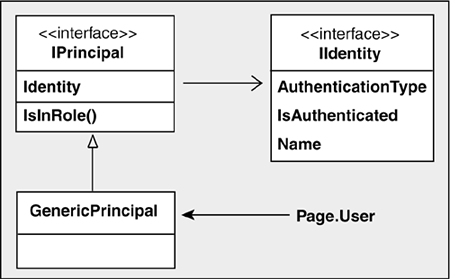
Using web.config for Authentication and AuthorizationThe configuration file segment in this example is used for both user authentication and authorization. The <credentials> element contains the names and passwords of three users who may access the system. The <authorization> element contains rules that deny login access to all anonymous users as well as one individual user. Only users Joanna and Ruth are permitted to access the Web page. <system.web> <authentication mode="Forms"> <forms name="AppCookie" loginUrl="applogin.aspx" protection="All" timeout="10" path="/" > <credentials passwordFormat="Clear"> <user name="joanna" password="chicago" /> <user name="ruth" password="raleigh" /> <user name="kim" password="newyork" /> </credentials> </forms> </authentication> <authorization> <deny users="?,kim" /> </authorization> The same authorization rights can be granted by a combination of allow/deny rules: <allow users="joanna,ruth" /> <deny users="*" /> This denies access to all users (the asterisk (*) wildcard selects all users) except for those that are explicitly allowed. When both <allow> and <deny> are present, the order in which they are placed can be important. In this example, placing the <deny> rule first would deny access to all users, and the <allow> rule would be ignored. The Login Screen Using the FormsAuthentication ClassThe web.config file used in this example redirects the initial request for a Web page to applogin.aspx, which accepts login credentials and performs user authentication. The login part is easy two text boxes are used to accept a user name and password. The technique for authenticating the user is more interesting. Traditionally, login screens validate a user-supplied name and password against a database or file containing valid users. You are still free to do this in ASP.NET, but there are other options. These include storing names and passwords in the web.config file, or using the ASP.NET Membership class and its preconfigured database to manage user credentials. For demonstration purposes, this example uses web.config as the data store. Keep in mind that this is not the recommended approach if there are more than a few users, or multiple servers are used, which would require synchronizing the configuration file across machines. As Listing 17-6 illustrates, the FormsAuthentication class plays the key role in authenticating a user and creating the authentication ticket that identifies the user. This important class provides static properties and methods that are used to manipulate and manage authentication information. Two of its methods are used here: Authenticate accepts a name and password, which it attempts to validate against the data in web.config; RedirectFromLoginPage redirects the user to the page originally requested, and creates an authentication cookie for the user. The second parameter to this method indicates whether the cookie should persist on the user's machine beyond the lifetime of the session. Listing 17-6. Login Screen Using ASP.NET Authentication <%@ Page Language="C#" %> <html> <head> <title>login</title> <script runat="Server"> void verify_Form(object sender, System.EventArgs e) { // Code to verify user against a database goes here... // or use .NET to verify user using web.config info. // Name and password are compared against web.config content if( FormsAuthentication.Authenticate( txtName.Text,txtPW.Text)) { // Redirect to original form and // create authentication ticket bool persistCookie=false; FormsAuthentication.RedirectFromLoginPage(txtName.Text, persistCookie); } else { errmsg.Text="Cannot log in user."; } } </script> </head> <body > <form id=Form1 method=post runat="server"> <asp:Panel style="Z-INDEX: 101; LEFT: 20px; POSITION: absolute; TOP: 64px" BackColor = "#efefe4" Height="120px" Width="278px" runat="server" > <TABLE> <TR> <TD><asp:Label Runat="server" text="User ID:"></asp:Label></TD> <TD><asp:TextBox Runat="server"> </asp:TextBox></TD></TR> <TR> <TD><asp:Label Runat="server" text="Password:"></asp:Label></TD> <TD><asp:TextBox TextMode="Password" Runat="server"> </asp:TextBox></TD></TR> <TR> <TD colspan=2 align=center> <asp:Button Text="Submit" Font-Bold="true" OnClick="verify_Form" Runat="server" /></TD></TR> <TR> <TD colspan=2 align=center> <asp:Label id=errmsg runat="server" /></TD> </TR> </TABLE> </asp:Panel> </FORM> </body> </html> Adding Role-Based Authorization with global.asaxAuthentication is often only the first step in permitting a user to access Web resources; the second step is authorization the process of determining what resources the user is authorized to access. If all users have full access, this step can be ignored. However, if a user's access rights, or role, are determined by membership in a group, this group must be identified and associated with the user. After a user is created in ASP.NET, information about that user is available through the Page.User property. This property returns a principal object, so named because it implements the IPrincipal interface. This interface has two important members (see Figure 17-5) that the principal object implements: Identity, which can be used to get the name of the user, and the IsInRole method that is used to check a user's group membership. Figure 17-5. User information is encapsulated in a GenericPrincipal object
The IsInRole method is passed a role name and returns a bool value indicating whether the user is in that role. It is the developer's task to assign the roles to the authenticated user object so that this method will have an internal list to check against. Looking at Figure 17-5, you would expect this list to be part of the GenericPrincipal object and you would be right. The constructor for this class accepts as one of its parameters a string array of roles to be associated with the user. To assign these roles, the application can take advantage of the AuthenticateRequest event that occurs when the identity of a user is established. A handler for this event is placed in the global.asax file. Listing 17-7 shows how code in the event handler assigns roles to the current user. It determines the user roles in this case, calling GeTRoles and places them in a string array. This array, along with the current Identity, is passed to the GenericPrincipal constructor to create a new object that updates the value of the User property. Listing 17-7. Using global.asax to Add Role Information for a User <%! file:global.asax %> <%@ Import Namespace="System.Security" %> <%@ Import Namespace="System.Security.Principal" %> <%@ Application %> <script language = "C#" runat=server> protected void Application_AuthenticateRequest( object src, EventArgs e) { if (Request.IsAuthenticated) { string currUser= Context.User.Identity.Name; string roles= GetRoles(currUser); string[] appRoles = roles.Split(new char[]{'|'}); // Create GenericPrincipal class and add roles to it // GenericPrincipal(IIdentity identity, string[] roles) Context.User = new GenericPrincipal( Context.User.Identity, appRoles); } } private string GetRoles( string username ) { // Code here would query database for user's role(s). // Return role as delimited string that can split into array. return "Administrator|Operator"; } Viewing Authentication InformationAfter the authentication steps are complete, an application may want to log information or make decisions based on information about the user. The User property exposes all of the members shown in Figure 17-5. Further authentication details, such as when the authentication cookie expires or when it was issued, can be obtained from properties exposed by the authentication ticket. As shown in Listing 17-8, an instance of the cookie is created and then converted to a FormsAuthenticationTicket object by using the Decrypt method of the FormsAuthentication class. The properties of this object are then displayed. Listing 17-8. Displaying Authentication Details // Display authentication details Response.Write("Client: "+ User.Identity.Name+"<br>"); if(User.IsInRole("Operator")) Response.Write( "Role: Operator<br>"); string cookieName = FormsAuthentication.FormsCookieName; HttpCookie authCookie = Context.Request.Cookies[cookieName]; if(authCookie !=null) { // Create ticket from cookie and display properties FormsAuthenticationTicket authTicket = null; authTicket = FormsAuthentication.Decrypt(authCookie.Value); Response.Write("Issued: "+authTicket.IssueDate+"<br>"); Response.Write("Expiration: "+authTicket.Expiration+"<br>"); Response.Write("Persistent: "+authTicket.IsPersistent); } |
| < Day Day Up > |