| Although you can format individual cells to make them look the way you want, many Calc users take advantage of Calc's AutoFormat feature to apply formatting to an entire spreadsheet. If you enter straight text, numbers , or formulas while building your sheets, without regard to the formatting as you go, when you finish with the data, you can apply one of several AutoFormats that Calc offers. Many times, you will have to do nothing more because AutoFormat works so well to make your spreadsheets look good. Before You Begin  41 Enter Simple Data into a Spreadsheet 41 Enter Simple Data into a Spreadsheet
See Also  59 Format Cells 59 Format Cells 61 Set Up Calc Page Formatting
Calc offers several AutoFormat styles from which you can choose. The AutoFormat feature analyzes your spreadsheets looking for data that is probably heading information. With only a few mouse clicks, your entire spreadsheet changes its appearance. TIP  | Calc also offers AutoFormat for charts so your charts can take on one of several predesigned looks (see 67 Add a Chart to a Spreadsheet ). |
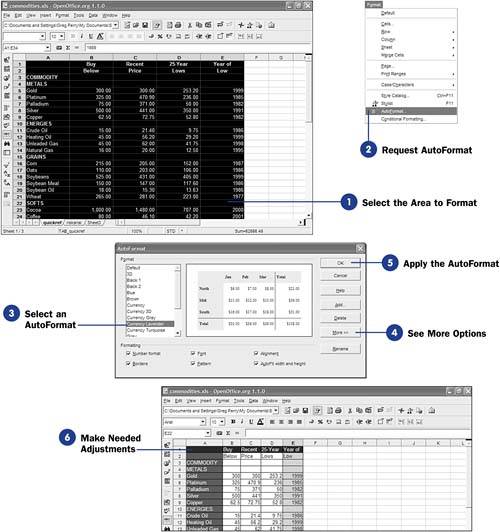 -
Select the Area to Format AutoFormat works best after you have created an entire spreadsheet to format. Create your spreadsheet, but for now don't worry about formatting it to look any certain way. Once you create your spreadsheet, select the area you want to format. NOTES  | You'll often select your entire sheet, with Ctrl+A , to format with AutoFormat. The AutoFormat dialog box's preview image does not contain a preview of your data. To really see what your spreadsheet looks like with the current AutoFormat applied, you'll have to click OK to see the actual results of your selected AutoFormat. You can always select another AutoFormat or click Undo to get rid of an AutoFormat you dislike. | -
Request AutoFormat
Once you've selected the area you want to format, select AutoFormat from the Format menu. The Main toolbar also has an AutoFormat button that you can click to request AutoFormat.
-
Select an AutoFormat
The AutoFormat dialog box scrolls to show numerous formats from which you can choose. As you click each sample AutoFormat, Calc displays a preview of it to give you an idea of what your spreadsheet will look like if you were to go with that AutoFormat option.
-
See More Options Click the AutoFormat dialog box's More button to see additional formatting options. You can limit whether AutoFormat applies a number format, font format, alignment format, borders, grid pattern, or AutoFit by selecting from those six options, which appear at the bottom of the AutoFormat dialog box. KEY TERM  | AutoFit ” The capability of AutoFormat to keep the original widths and heights of the cells it formats. | -
Apply the AutoFormat
Click OK to apply the AutoFormat to your spreadsheet.
-
Make Needed Adjustments
Keep in mind that AutoFormat does a lot of formatting, and often you'll be completely satisfied with the format you choose. Other times, you'll want to make some minor adjustments. For example, if your heading takes more than one row, AutoFormat may not have realized that when formatting your sheet. Therefore, you'll have to manually apply cell formatting to that extra row (see 59 Format Cells ).
|