45 Edit Cell Data Before You Begin  41 Enter Simple Data into a Spreadsheet 41 Enter Simple Data into a Spreadsheet
See Also  48 About Calc Ranges 48 About Calc Ranges
Entering numeric data is error-prone at its best; the faster you edit cell values accurately, the faster you compose accurate sheets. If you have already moved to another cell when you recognize that you have entered an error, you can quickly correct the mistake as follows : -
Move the cell pointer to the cell you need to correct. (Click the cell to move the pointer there.) -
Press F2 , which is the standard Windows editing shortcut key. You know Calc is ready for your edit when you see the insertion point appear in the cell. You can also click and edit the Input line to change the cell's contents. TIP  | If you want to reverse an edit, click the Undo button. To reverse an undo, select Edit, Restore . | -
Use the arrow keys to move the insertion point to the mistake. -
Press the Insert key to change from Overtype mode to Insert mode, or vice versa. As with Writer, Overtype mode enables you to write over existing characters, whereas Insert mode shifts all existing characters to the right as you type the correction. TIP | | If you want to delete multiple rows or multiple columns , select cells from each column or row you want to delete before displaying the Delete Contents dialog box. | -
Press Enter to anchor the correction in place. Inserting cells, as opposed to inserting data inside a cell, requires that the existing sheet cells move to the right and down to make room for the new cell. Perhaps you created a sheet of employee salaries and failed to include the employees who work at another division. You can easily make room for those missing entries by inserting new cells. You can insert both new rows and new columns in your sheets. Use the Delete Contents dialog box not only to delete cells but also to delete entire rows and columns. 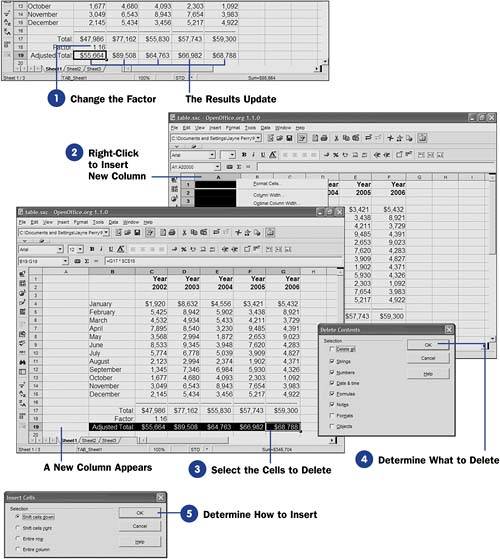 Deleting rows and columns differs from deleting specific contents inside cells. When you want to erase a cell's specific contents, the other cells to the right and below that cell don't shift to fill in the empty space. To erase a cell's contents, click the cell to move the cell pointer there and press F2 to edit the cell's contents. Press Backspace to erase the cell. Even quicker, you can press Ctrl+X or select Edit, Cut to remove the contents and send them to the Clipboard, where you can paste them elsewhere or ignore them. TIP | | You can just as easily insert more than one column. For example, if you want to insert three new columns, select three column names that are to follow the new columns before selecting the Insert Columns option. Calc inserts three columns. |
-
Change the Factor
To change the factor, you click cell B18 and press F2 to enter editing mode. You'll see the insertion point at the end of the cell's contents. Press Backspace once to erase the 3 and then type 6 . Press Enter . You have just changed the factor from 1.13 to 1.16 .
-
Right-Click to Insert New Column
To insert a column before another, click a column name that is to follow the new column. Then right-click your mouse and a menu appears. Select Insert Columns (even if you want to insert only one column). Calc moves the sheet's contents to the right by one column.
-
Select the Cells to Delete
To delete the contents of one or more cells, click to select the cell or drag your mouse to select multiple cells. Press the Delete key to delete the contents.
-
Determine What to Delete
Calc opens the Delete Contents dialog box. You can select what from the cell you want to delete. Usually, you'll immediately press Enter or click OK to delete the data from the cells you selected. Doing this maintains any formatting in the cells you deleted.
You can remove the formatting as well by clicking Formats in the Delete Contents dialog box before clicking OK . Or, you can remove only the formatting but keep all the data. The options you select before performing the deletion determine exactly what you want to delete.
-
Determine How to Insert To insert a cell before another, you must first consider the implications of what you're doing. Other cells reside in the sheet. If, for example, you wanted to insert a cell before the final Adjusted Total value, how is Calc supposed to handle the value that's in the cell? Should Calc delete it, move it to the right, or move it down? TIP | | If you were to insert four quarter values after each year in this sample sheet, you would want to shift the entire columns to the right as you insert the quarterly data to retain all the year information appropriately. | If other data were to appear to the right of a cell you try to insert, you must tell Calc how to handle the insertion. When you click to select a cell (or drag to select a range of cells) and select Insert, Cells , the Insert Cells dialog box appears. From the dialog box, you tell Calc whether you want the cells to the right of the newly inserted cell to shift down or to the right, or if you want the entire row or the entire column moved so that all the data in the affected row or column moves. |