| If you don't have any graphic images to insert into your documents, you can draw your own! Writer supports a drawing toolbar that supplies you with the following drawing tools: -
Line drawing -
Rectangle drawing -
Ellipse drawing -
Polygon drawing -
Curve drawing KEY TERMS  | Ellipse ” A round shape such as a circle or an oval. Polygon ” A multisided shape. Arc ” Half an ellipse, such as a half-moon. Callout ” A caption that points to an item to describe that item. |
-
Freeform drawing -
Arc drawing -
Ellipse pie -
Circle segment -
Text drawing -
Animated text -
Callout drawing Before You Begin  27 Insert Graphics in a Document 27 Insert Graphics in a Document
See Also  29 Add a Chart or Spreadsheet to a Document 29 Add a Chart or Spreadsheet to a Document
Using one of the drawing tools usually requires only that you select the tool you want to use, click your mouse where you want the shape to begin, and then click your mouse where you want the shape to end. -
Open the Draw Functions Toolbar To add a drawing to your Writer document, you must display the Draw Functions toolbar. Long-click the Draw Functions button on the Main toolbar to display the Draw Functions toolbar. On the Draw Functions toolbar appear 12 items available to you, plus the pointer when you want to select from a drawing instead of drawing a new element.  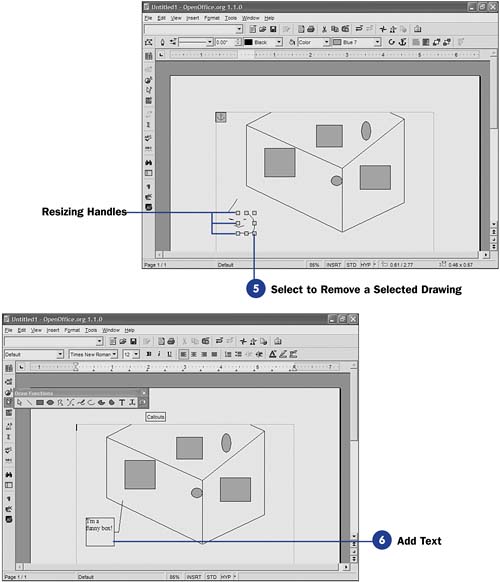 -
Draw Shapes Click one of the Draw Functions toolbar's buttons , such as the Line button, to draw a shape (in this case, a line) in your document. The first thing that occurs is Writer hides the Draw Functions toolbar and changes the button that was the Draw Functions toolbar button to the Line button. The authors of Writer knew that you are more likely to draw multiple lines than to pick a different shape to draw next . Once you draw your first line, you therefore can easily add a second line by clicking the Line button on the Main toolbar instead of first displaying the entire Draw Functions toolbar again. TIP  | A right-click menu is always available when you right-click over a shape to adjust various attributes, such as the line thickness , fill color , size , and location. | To draw any of the Draw Toolbar shapes, click where you want the shape to begin. For example, if you've selected the Line shape, click once on your document to anchor the line's starting point. Drag your mouse in the direction you want the shape to go, and when you release your mouse, the shape will appear in your document. The shape will have resizing handles around it. You may click any handle to resize the shape. For example, you can extend or shorten a line by dragging one of its resizing handles in or out. You can also move a shape to a different location by moving the mouse pointer over the shape until it changes to show four arrows pointing in the compass directions. Drag the shape to where you want it to go. -
Click Again to Draw Again
If you want to draw the same shape, click the shape's button on the Main toolbar and continue drawing. If you ever draw a shape that you don't want, click to highlight that shape's resizing handles and press the Delete key to remove the shape.
-
Use a Freeform Line Pick a different shape, such as the Freeform shape. To draw a different shape, long-click over the shape currently showing on the Main toolbar until the Draw Functions toolbar appears. Click to select a different shape, such as the Freeform drawing tool. Unlike the line, ellipses, and other shapes, you can drag the Freeform drawing shape to any position, and a line will follow your movement, drawing as you drag your mouse. NOTE  | No negative critique of the author's extremely poor drawing talent will be tolerated! | -
Select to Remove a Selected Drawing
Writer keeps track of each line and every other shape you add to a drawing. Therefore, you can click to select any piece of the drawing that you drew and resize or remove that part of your drawing. In complicated drawings, determining exactly what is selected can be tricky, so study the resizing handles closely to determine if you've selected the proper shape to remove before you press the Delete key. Fortunately, you can always undo any piece of the drawing that you delete to get it right back.
-
Add Text
Callouts are often useful to add to some drawings. You can use a callout as a text balloon showing that someone on your drawing is speaking. For more traditional technical and business drawings, callouts are useful for labeling items on a drawing. To add a callout, select the Callout drawing tool, add the callout, and resize and move the callout so it hovers exactly where you want it to land on your drawing. Click inside the callout and type whatever text you wish to use for the callout. All the usual formatting tools work on the callout's text, such as italics and boldface. If the callout is too large for the text you type, resize the callout box.
The Callout tool isn't the only way to add text to your drawing. Click the Text tool to draw a text box where you can type text inside the box. The primary difference between a text box and a callout is that a callout has a line pointing to another item the text refers to. If you want to get really fancy, you can add animated text to your drawing by selecting the Text Animation tool from the Draw Functions toolbar. When you add animated text to a text box, the text might scroll across the text box area as a marquee does. Right-click animated text that you place and select Text ; then click the Text Animation tab to change the way the text animates.
|