| You will often need to make format changes to your entire document. Perhaps you want to change the printed margins on the page. You may want to add a background color or even put a border around the document. Before You Begin  5 Edit Text 5 Edit Text 12 Apply Character Formatting 13 Apply Paragraph Formatting
The Page dialog box contains all of Writer's options that enable you to modify your document's format. Any changes you make to the current page applies to all pages in your document. See Also  15 Create a Multicolumn Newsletter 15 Create a Multicolumn Newsletter
If you want to start a new section, as you might do if you wanted to format several pages within a document differently from surrounding pages, select Insert, Section and click Insert to make Writer begin a new section. Any page formatting that you apply to the section stays in that section. 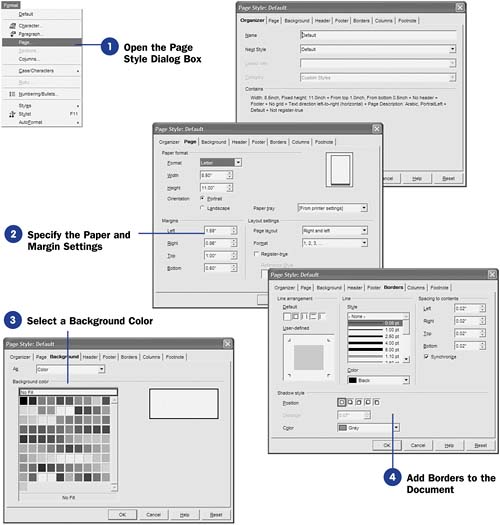 -
Open the Page Style Dialog Box Select Page from the Format menu to open the Page Style dialog box. TIP  | If your document contains multiple sections, page formatting changes apply only to the current section unless you first select your entire document, with Ctrl+A , before modifying the page format. | The Page Style dialog box contains several categories you can use to modify the pages in your document. Click each tab across the top of the dialog box to select different options. The Organizer page determines the default style currently used and enables you to select a different style. See 16 About Styles and Templates for help with understanding and using styles. The Page tab enables you to format your paper statistics, such as selecting a page length as well as margin settings. The Background page enables you to place a background color on the page. TIP | | As with character formats, don't overuse background colors. You should use a colored stationary in your printer for best effect if you want to print on a colored background. | The Header, Footer , and Footnote pages provide you the ability to place a header, footer, and footnotes on the pages of your documents. For example, you might want to place a company logo on the page header of your first page, and you'd do so inside a header. 33 About Headers and Footers explains how to use headers and footers. 35 Add a Footnote or Endnote explains how to add footnotes and endnotes to your document. NOTE  | You cannot undo many of the changes you make from the Page Style dialog box. If you apply a change and want to undo it, you'll have to display the Page Style dialog box again and change the incorrect setting back. | Use the Columns page to turn your document into a multicolumned document, as you might do for a newsletter. 15 Create a Multicolumn Newsletter explains how to work with multiple columns. -
Specify the Paper and Margin Settings Click the Page tab to show the page options. When you change the type of paper you use in your printer, such as going from letter size to legal, you'll need to select the proper option, such as Legal , from the Format list. If you use a nonstandard paper size, one that is not letter, legal, or one of the other options in the Format list, you can click to adjust the Width and Height settings to the unique settings of your paper. TIP | | The Format list contains common envelope sizes for when you want to print addresses and return addresses from your printer. | You also may want to change the orientation of your printed page from portrait to landscape . In addition, you can give your margins more or less room by adjusting the Left, Right, Top , and Bottom measurements. If you have multiple paper trays in your printer, such as an envelope feeder, you may want to select a different tray from the Paper tray option. Finally, the Layout settings area enables you to control how the pages print in relation to one another; for example, if you plan to bind your output into a booklet, you may want the left and right margins to be mirrored to leave more room in the middle for the binding or hole punching . KEY TERMS  | Portrait ” Printed down the narrow edge, as you might do for a letter. Landscape ” Printed across the long edge, as you might do for a wide report. | -
Select a Background Color
Click the Background tab to add a background color to your page. Although you may want to use colored paper for extensive coloring, you might want to lightly highlight a report page that appears inside your document with a highlighted background color.
-
Add Borders to the Document
Click the Borders tab to display the border options. As with paragraph borders (see 13 Apply Paragraph Formatting ), you can specify which edges you want to use as a border (the sides, top and bottom, or all four sides) and the line thickness of the border (from the Line Style list). If you want to add an additional effect to your border, you can adjust the position and color of shading. Shading a border softens the border's look.
|