| The faster you can move around a document, the faster you'll get your work done. If most documents consumed less than a screen of real estate, the ability to move around the document wouldn't be needed. Most documents, however, require far more than a single screen of room. Being able to navigate from place to place becomes second nature quickly because it's a skill needed before you can edit seriously. Before You Begin  2 Create a New Document 2 Create a New Document 3 Open an Existing Document
See Also  7 Find and Replace Text 7 Find and Replace Text 5 Edit Text
One of the ways Writer and the other OpenOffice.org programs help you move from place to place is with the Navigation floating toolbar. In this task, you'll get a chance to use the Navigation toolbar and its cousin, the Navigator (which is a window but it's easy to confuse the Navigation toolbar and the Navigator window), to move from one graphic image in a document to the next with the click of your mouse. The true power of the Navigator really shows when your document is many pages long; the Navigator enables you to move from any element, such as a picture or footnote, to another element, no matter how far apart those elements might be in the document. NOTE  | Writer supports a wealth of additional keyboard shortcuts. Table 2.2 lists only the ones found to be among the most popular or useful for moving around a document. Table 2.2. Keyboard Navigation Shortcuts | Keyboard Shortcut | Description | | F5 | Toggles the Navigator toolbar on or off | | Shift+Enter | Moves the text cursor to the next line but does not start a new paragraph or insert a paragraph mark | | Ctrl+left arrow | Moves the text cursor to the beginning of the word | | Ctrl+Shift+left arrow | Moves the text cursor to the left, word by word and extends the selection left | | Ctrl+right arrow | Moves the text cursor to the end of the word | | Ctrl+Shift+right arrow | Moves the text cursor to the right, word by word and extends the selection right | | Up arrow | Moves the text cursor up one line at a time | | Down arrow | Moves the text cursor down one line at a time | | Home | Goes to the beginning of the current line | | End | Goes to the end of the current line | | Ctrl+Home | Moves the text cursor to the beginning of the document | | Ctrl+End | Moves text cursor to the end of the document | | PageUp | Moves up one screen at a time | | PageDown | Moves down one screen at a time | | Ctrl+Delete | Deletes text to the end of the current word | | Ctrl+Backspace | Deletes text to the beginning of the current word | | Ctrl+Shift+Delete | Deletes text to the end of the current sentence | | Ctrl+Shift+Backspace | Deletes text to the beginning of the current sentence |
|
Table 2.2 lists several keystroke shortcuts that help you get from place to place quickly in Writer. The rest of this task shows you other ways available, such as the scrollbars and the Navigation toolbar, that get you where you want to go. 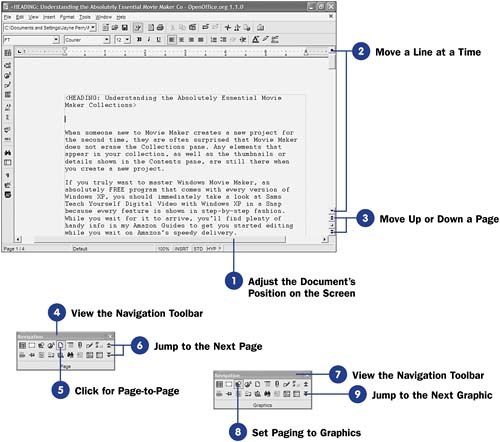  -
Adjust the Document's Position on the Screen When editing your document, drag either the vertical or the horizontal scrollbar to position a different part of your document on the screen. NOTES | | Dragging the vertical scrollbar up and down the screen is much faster than paging through a very long document. The Previous Page and Next Page scrollbar buttons may take on another function (such as paging to the next graphic or header or footer) if you've used the Navigation toolbar this session. | -
Move a Line at a Time
Click any scrollbar arrow to move one line up or down (or about five characters left or right if you click the horizontal scrollbar). You can hold down your mouse button to scroll rapidly up or down the screen.
-
Move Up or Down a Page
Click the Writer's Previous Page or Next Page button on the scrollbar to move up or down one page at a time. You can hold down your mouse button to scroll rapidly up or down the screen one page at a time.
-
View the Navigation Toolbar
Click the Navigation button on the vertical scrollbar to display the Navigation floating toolbar. With the Navigation toolbar, you can page through your document and move between different elements easily.
-
Click for Page-to-Page
Click the Navigation toolbar's Page button to set the vertical scrolling to move from page to page. If you've never used the Navigation toolbar before, the Page button will already be selected.
-
Jump to the Next Page
Click the vertical scrollbar's Next Page button to jump to the next page in the document.
At this point you may be wondering what good the Navigation toolbar did. After all, you clicked the Next Page button in the scrollbar in step 3 without having to display the Navigation toolbar first. That's because when you first use Writer, the Navigation toolbar mode is set to the Page button. The Navigation toolbar does not have to remain set to Page , however, as the next two steps show.
-
View the Navigation Toolbar
Click the scroll bar's Navigation button once again to display the Navigation toolbar once again.
-
Set Paging to Graphics
Click the Navigation toolbar's Graphics button to set the paging to graphics instead of a page of text.
-
Jump to the Next Graphic Click the Next Graphic button that now appears on your vertical scrollbar to jump to the next graphic image in your document. Notice the floating ToolTip that describes the scrollbar has changed from Next Page to Next Graphic . That's because you just selected a graphic image when you used the Navigation toolbar in the previous step. As long as your document has a graphic image somewhere below your current position, Writer jumps to that image. If no graphic image appears in the document, Writer remains where it is. TIP  | Remember, if you can't see your scrollbars and you want to, or if you can see them and you'd rather hide them, you can decide which scrollbar (either one, both, or neither ) you want to see from the Text Documents Options View page (see 1 Set Writer Options ). | -
Jump to the Previous Graphic
Click the Previous Graphic button to move back to the previous graphic image you viewed ( assuming your document has multiple graphic images).
-
Open the Navigator
Press F5 to open the Navigator floating window. The Navigator window differs from the Navigation floating toolbar, although their similar names never cease to confuse users. The Navigation toolbar is more directly linked to your vertical scrollbar, as the previous steps showed. The Navigator window provides a high-level look at your document's various elements (or possible elements, such as a header that you may not have yet added).
-
View the Document Elements
Scroll through the Navigator options to see various Writer- related elements that can appear in your document. If your document has multiple elements, such as the two graphic images found by Navigator here, Navigator shows both images so you can quickly jump to either one.
-
Jump to Either Graphic
Double-click either entry, Graphic1 or Graphic2 , in the Navigator to see either graphic image. When you click one, Writer scrolls directly to that item.
-
Close the Navigator
When you're finished using the Navigator to look for something, press Esc to hide the Navigator window or click the Close button.
|