| If you've placed shapes on the drawing area already, you're probably already familiar with the Object toolbar's style, width, color , and fill options. ( 110 Draw from Scratch describes the use of the Object toolbar in detail.) Instead of relying solely on the Object toolbar, you can use a more complete dialog box, called the Area dialog box, that enables you to control every aspect of a shape's fill. Before You Begin  111 Place Shapes on the Drawing Area 111 Place Shapes on the Drawing Area 114 Create a New Shape
See Also  116 About Manipulating Objects 116 About Manipulating Objects
You can choose the colors, gradients, and hatching patterns, and you can even select graphic images to fill up the space inside your shapes. One timesaving feature of the Area dialog box is its capability to save new fill combinations that you define so that you don't have to select the same options again when you want to reuse a fill pattern of some kind. NOTE  | Until you familiarize yourself with all the gradient patterns, keep the Automatic option selected so that Draw uses its default gradient increment. These default values are best suited for the gradients, and you can change the increment once you've determined that the default increment doesn't work for your particular needs. |
-
Draw an Object to Fill
Draw a shape in your drawing area that you can fill.
-
Request Fill of Area
With the shape selected, select Format, Area to display the Area dialog box. The first page of the dialog box, Area , basically provides the same fill tools as the Object toolbar does. You can elect to use no fill, a color fill, a gradient fill, a hatching pattern fill, or a bitmap fill (from a graphic image stored on your disk). As you select the respective Fill section options, the Area page changes to reflect the options you've selected. For example, if you click the Gradient option, the Area page offers a long list of gradient patterns you can choose from and enables you to determine how dramatically the gradient moves, in incremental pixels, from one color to another.
-
Specify a Shadow
Click to select the Shadow page of the Area dialog box. Here, you can apply a shadowing effect to your selected object (including 3D text you've placed on the drawing). The Position option enables you to determine where the shadow will fall; for example, if you click the lower-right corner, the shadow will drop from the lower-right corner of your selected shape when you click OK to apply the shadow.
-
Select a Transparency If you elected to add a color fill to the shape, perhaps on the Area page, you can determine how much of the underlying objects show through the filled area. The No transparency option makes the selected object's fill overwrite anything below it. If you choose the Transparency option, you can determine, in percentage terms, how much any objects underneath the fill area show through. If you choose the Gradient option, you determine how the color or other fill transitions from one edge or corner of the shape to the opposite edge or corner. 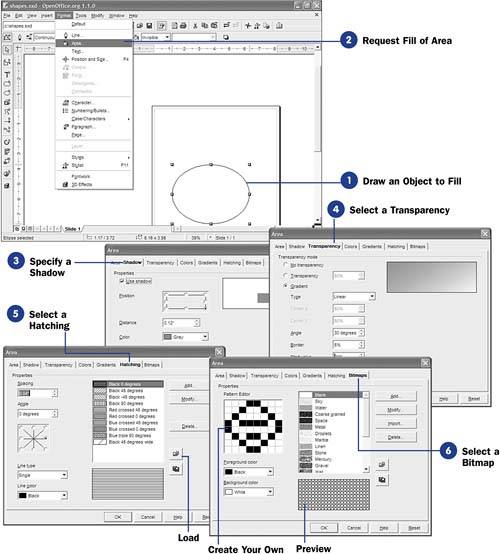 Click the Colors tab to display the Colors page of the Area dialog box. Here, you can choose a color or even generate your own color by combining RGB values . Click the Save button if you generate a color that you might want to reuse in the future. To reuse a saved color, click the Load button and select the color you wish to use. NOTE | | The Transparency page applies only to colors you've chosen to fill with. Use the Gradients page to select and control an actual gradient pattern that the shape is to take. | If you click the Gradients tab, you are able to specify exact attributes of the gradient you want to fill with. As mentioned earlier in this task, keeping all default gradient values is recommended until you familiarize yourself with their effects. On the Gradients page, you can determine the gradient's central location, the angle of the gradient as it moves from one color to another, how much of a border the gradient will have, and the extent of the gradient's "from" and "to" colors. As with the Colors page, you can save a specialized gradient that you generate for later use. KEY TERM  | RGB values ” The red, green , and blue elements of a color. All colors are composed of different combinations of the primary colors, red, green, and blue. The numbers you enter in the three RGB values determine how much of each primary color you want to include in your colored fill. | -
Select a Hatching
Click to select the Hatching page. Here, you can select from the available hatching patterns to fill your shape. In addition, you can determine the spacing between hatch marks with the Spacing option. You can specify the angle used for the hatching grid lines, the direction of the hatch rotation, and the type and color of lines to use inside the hatching pattern. You can save a specialized gradient that you generate for later use. To reuse a saved hatching pattern, click the Load button and select the hatching pattern you wish to use.
-
Select a Bitmap
Click the Bitmaps tab to display the Bitmaps page of the Area dialog box. Here, you can select from several bitmapped images to fill your shape. The Bitmaps page even enables you to create your own bitmap pattern. If you select Blank instead of another bitmap pattern, the Pattern Editor activates. Click the boxes in the Pattern Editor to fill them in. As you do, the preview area updates to show you what your pattern will look like as a fill. The Foreground color option determines the color of the selected boxes (as you click to select them), and the Background color option determines the pattern's background. Be sure to save your pattern by clicking the Save button if you want to reuse the same bitmap pattern in the future.
|