Working with Tables
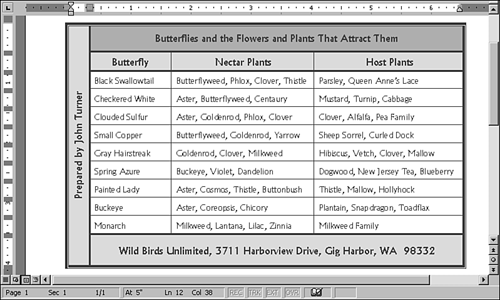
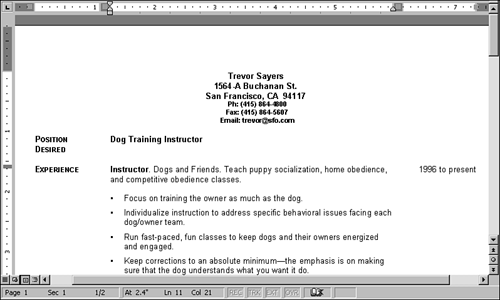
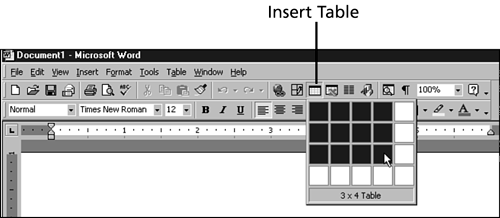
| Word's table feature gives you a wonderfully flexible way of aligning text in a grid of rows and columns . You enter text into the individual boxes in the grid, which are referred to as cells . You can create a table that looks table-ish, like the one shown in Figure 8.14. Figure 8.14. This table doesn't disguise its true nature. But you can also create tables that are "invisible" by hiding the gridlines between cells. The rsum shown in Figure 8.15 is actually typed in a table, but the gridlines have been hidden so that it's not obvious. Figure 8.15. Tables don't have to look like they belong in a scientific paper. Creating a TableWord gives you two methods for creating tables. With the standard method, you tell Word to create a table with a particular number of rows and columns, and then revise it from there. With the second method, you "draw" the table with your mouse. The first method is a little faster, but the second is better for creating a more complex table such as the one shown earlier in Figure 8.5. Using the Standard MethodTo create a table using the standard method, you can either use the Insert Table button on the Standard toolbar or choose Insert, Table; the end result is the same. In these steps, you use the Insert Table toolbar button because it's a little more efficient. Follow these steps to insert a table with the standard method:
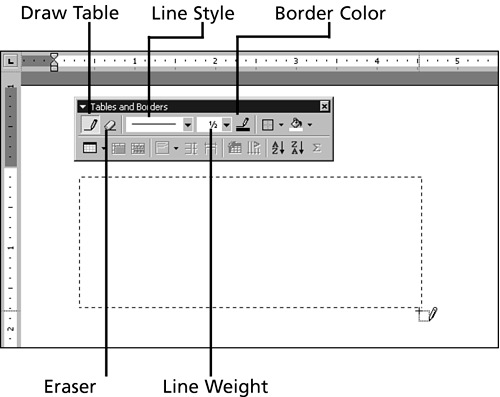
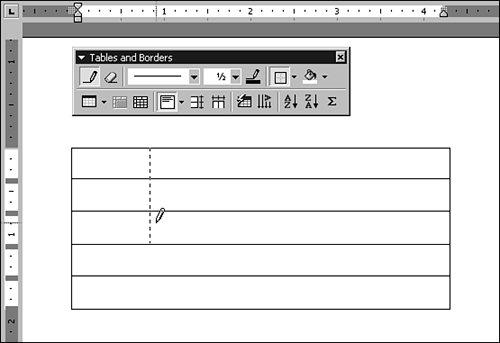
A table appears in your document. Drawing a TableTo draw a table, you use the Draw Table button on the Tables and Borders toolbar. (This tool is available in Print Layout view; it isn't in Normal view.) Although you can start by drawing a single cell and then add on, it's usually more straightforward to draw the outline of a table and then fill in the rows and columns. This method of creating a table is extremely flexible; if you can envision a design for your table, you can almost certainly create it. To draw a table, follow these steps:
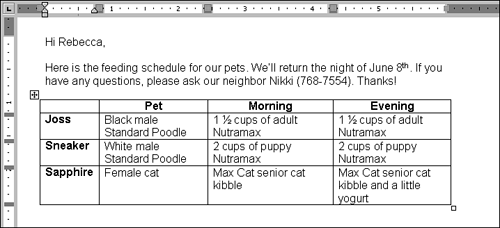
Typing, Navigating, and Selecting in a TableTyping, navigating, and selecting in a table works much like you might expect, with a few twists . Typing Text in a TableWhen you type text in a cell, if the entry is too wide to fit in the cell, Word automatically wraps the text to the next line and increases the row height. In Figure 8.19, the text was allowed to wrap within cells, and the row height adjusted accordingly . Figure 8.19. Unlike in a spreadsheet program, Word wraps text in cells automatically. Pressing Enter in a cell ends the paragraph and adds a blank line to that row. (If you accidentally press Enter, press Backspace to remove the blank line.)
Navigating in a TableNavigating in a table with the mouse is just a matter of clicking in the cell you want to move to. To navigate with the keyboard, refer to Table 8.1. Table 8.1. Keyboard Techniques for Moving the Insertion Point in a Table
Selecting Parts of a TableSelecting is a big deal in a table. In many cases, you have to select the part of the table that you want to affect before issuing a command. For this reason, it's worth taking a few moments to practice the various selection techniques outlined in Table 8.2. Before you do, check to make sure the Draw Table and Eraser buttons in the Tables and Borders toolbar are turned off. Table 8.2. Selection Shortcuts In A Table
Changing the Structure of a TableAs you enter text in a table, you will almost certainly need to change its structure. Here you learn the most common adjustments that you'll need to make. As you experiment with these techniques, keep in mind that Word does not prevent you from making a table too wide to fit on the page. If you're adding columns and increasing column widths, check periodically to make sure that table isn't running off the page. (You have to check in Print Layout view or Print PreviewNormal view won't do the trick.)
Adding and Deleting Rows and ColumnsIf you want to add a row at the end of the table, click anywhere in the lower-right cell in the table, and press the Tab key. To add a row in the middle of the table, select the row below the location of the new one, and click the Insert Rows button on the Standard toolbar. (The Insert Table button turns into Insert Rows when a row is selected.) If you want to add two or more rows, select that number of rows before clicking the Insert Rows button. To insert a column, select the column to the right of where the new one will go, and click the Insert Columns button on the Standard toolbar. (The Insert Table button turns into Insert Columns when a column is selected.) Again, you can add two or more columns at once by selecting that number before clicking the Insert Columns button. If you want to delete a row or column, select it first, and then choose Table, Delete, Rows or Table, Delete, Columns (or right-click the selected row or column and choose Delete Rows or Delete Columns). Merging and Splitting CellsWhen you merge cells, they become one larger cell. You might, for example, merge all the cells in the top row of a table to create a large cell in which to type a centered title. You can merge cells that are horizontally or vertically adjacent to one another. To merge cells, first select them, and then click the Merge Cells button in the Tables and Borders toolbar.
You can also split a cell into two cells. To do so, click in the cell and then click the Split Cells toolbar button.
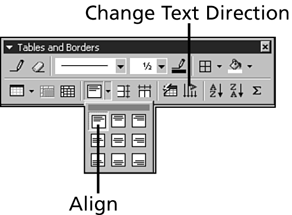
Formatting a TableFormatting a table can take far longer than creating it in the first place. Try not to overdo it. If your table is plastered with wild colors, fancy lines, and flamboyant fonts, the text it contains will be almost impossible to read. Also, be careful to select the exact cells that you want to format before issuing a command, and remember that you can always use Undo if you make a change that you don't like. At the risk of stating the obvious, you can apply all the regular font and paragraph formatting in a table. Select the part of the table that you want to affect, and then use the familiar options in the Formatting toolbar, Font and Paragraph dialog boxes, and so on. The next four sections describe formatting that's specific to tables. Changing the Appearance of Lines and Adding ShadingTo change the appearance of the lines in your table, choose the desired options in the Line Style, Line Weight, and Border Color lists in the Tables and Borders toolbar. (If you want to hide the lines, choose No Border in the Line Style list.) Then turn on the Draw Table tool, if necessary, and draw over the lines you want to affect. To apply shading, select the desired part of the table, display the Shading Color list in the Tables and Borders toolbar, and click the desired color. Resizing Columns, Rows, and the Entire TableTo adjust a column's width, drag its right border. To adjust a row's height, drag its bottom border. (When you point to any line in a table, the mouse pointer changes to a double-headed arrow to remind you that you can drag to resize.) If you want to make multiple rows the same height, or multiple columns the same width, select the rows or columns, and then click the Distribute Rows Evenly or Distribute Columns Evenly button on the Tables and Borders toolbar. To proportionally resize the entire table, make sure the Draw Table and Eraser tools are turned off, and point to the small square just outside the lower-right corner. Then drag diagonally up and to the left to shrink the table, or down and to the right to enlarge it. If you don't see this square, make sure the Draw Table and Eraser tools are turned off, and rest the mouse pointer inside the table. Adjusting the Position of the Table on the PageTo move your table around on the page, drag the four-headed arrow icon located just outside the upper-left corner of the table. Aligning Text and Changing Its DirectionTo change the vertical/horizontal alignment of text in your table, select the cells whose alignment you want to change, display the Align list, and click the desired option. To change the direction of text from the default left-to-right to either bottom-to-top or top-to-bottom, select the cell and then click the Change Text Direction button one or more times (see Figure 8.20). Figure 8.20. Use the Align and Change Text Direction tools to play with the appearance of text in a table. Sorting Rows in a TableThe fastest way to sort rows in a table is to use the Tables and Borders toolbar. Click in the column that you want to sort by, and click the Sort Ascending or Sort Descending button. Word assumes that you want to sort all rows but the first. If you want to include the first row, click in the column to sort by, choose Table, Sort , mark the No Header Row option button, and click OK.
|
EAN: 2147483647
Pages: 474
