Select a Web Template
| Before you can create a page in FrontPage, you must create a Web that will contain that page. Because all Webs start from a template, you must choose one to start a project. The following templates can be used to start a Web:
When choosing a template, you must also choose the location where the Web will be saved. Webs can be saved to disk or to a World Wide Web server. If you save a Web to disk, you must save it again on a World Wide Web server to make it publicly available. This is also called publishing a Web, because it's analogous to publishing things such as books. A Web must be made available on a Web server before the outside world can visit it. Before you can save a Web to a Web server, you must have a username and password for that server. To save a Web to disk, specify a folder where the Web should be stored. This folder should only be used to store files related to your Web. If it doesn't already exist, FrontPage will create it.
After a template and location have been selected for a new Web, FrontPage creates all pages contained in the Web, and any subfolders that are needed. Each of the built-in templates includes private and images subfolders . The images subfolder holds any graphics files that are part of the Web. The private subfolder, which initially contains no files, can be used as a place for files that should be hidden from visitors to your Web. If you create a Web that collects information such as a visitor's name and mailing address, the private subfolder is a good place to keep it away from prying eyes.
If the template contains any pages, the main page of the Web will be named index.htm .
Customize a TemplateAfter a new Web has been created from a template, you can begin making changes to customize the Web. If you're creating a home page for yourself or someone you're exceptionally familiar with, the Personal Web template is a good starting point. This five-page template includes the following elements:
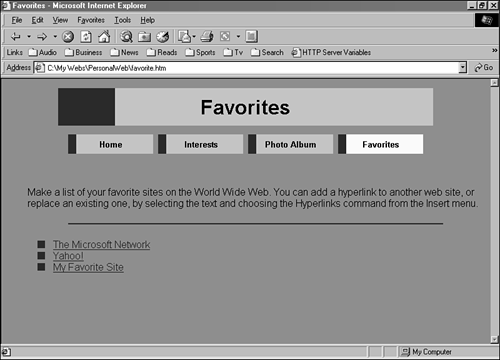
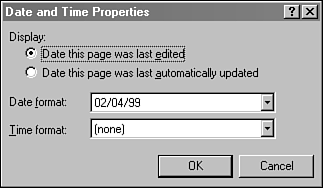
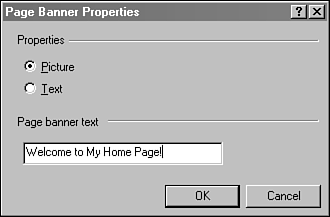
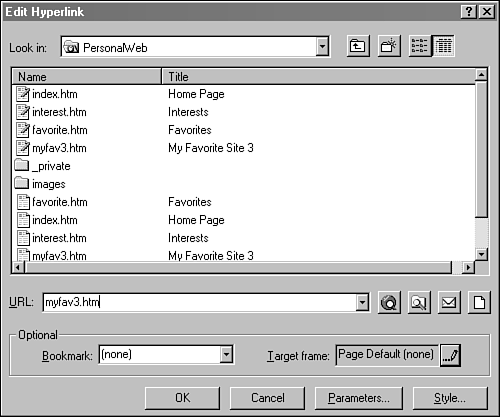
A navigation bar provides links to each of these pages, as shown in Figure 33.2. Figure 33.2. The hyperlinks page from the Personal Web. By loading each of these pages in the Page view, you can edit several different things: text, hyperlinks, navigation bars, timestamps, and page banners. Edit text by placing your cursor anywhere within the text and using your keyboard. You also can employ features common to most word processors: text highlighting, cut-and-paste, and the Formatting toolbar. Some things on a page look like text but are actually something else, such as hyperlinks or timestamps. As you move the cursor over different parts of a page, the cursor changes depending on what it's placed on. FrontPage also may display a ToolTip ”a small box of informative text ”that describes how you can modify that part of the page. Navigation bars, timestamps, and page banners are all components ”special page elements that add functionality to a FrontPage Web. The main page of this Web, index.htm , contains a timestamp component immediately after the text This page last updated on and before the period at the end of the sentence . The timestamp displays the date that the page was last edited, and changes automatically each time changes are made to the page. The timestamp component makes it easy to tell visitors how current the information on a page is. You don't have to enter the date using text and change it manually during each page update. Placing the cursor above a timestamp causes the cursor to change to a hand-and-page icon. Double-click the timestamp and a dialog box will open enabling you to edit how it is presented. This dialog box is shown in Figure 33.3. Figure 33.3. Editing a timestamp component. Each FrontPage component is edited using a dialog box like the one shown in Figure 33.3. The timestamp component can be modified to display a date, a time, or both. You also can choose the format that the time and date are displayed in. After making the change, press the F5 function key, also called the Refresh button. The Refresh button works like the one on a Web browser, which causes a Web page to be completely redrawn. The Refresh button on FrontPage should be pressed after any components on a page are changed. Another component that you can modify is the page banner, a heading atop a page that can serve as its title. Each page in the personal Web template has a banner at the top. By default, the banner is graphical ”text appears over a simple graphic file. To change a banner, double-click it to bring up the Page Banner Properties dialog box, as shown in Figure 33.4. Figure 33.4. Editing a page banner component. You can change the text of a banner and determine whether it should be displayed as a picture or text. Any changes to a page's banner will be made to that page's icon in the Navigation view, changing the text of navigation bars that link to the page. A page banner serves as a title for that page. The Personal Web also includes several different hyperlinks. Some of these are part of the navigation bar, a FrontPage component that uses the Navigation view to determine which links should be displayed. Other hyperlinks can be edited directly. The favorite.htm page of the Personal template contains three of these hyperlinks. One leads to Yahoo!, another to the Microsoft Network, and a third to something called My Favorite Site. Each hyperlink consists of two things:
Hyperlinks can be associated with any element of a Web page, including text, graphics, or a combination of both. The Web address is also called a URL , an acronym that stands for Uniform Resource Locator . The URL can link to anything on the World Wide Web, such as pages, graphics, and other files. It also can link to something within the current Web. Text that is being used as a hyperlink can be changed with the keyboard like any other text on a page. Changing a hyperlink's URL is different than editing a component. Right-click the hyperlink and select the Hyperlink Properties pull-down menu command. The Edit Hyperlink dialog box will open, as shown in Figure 33.5. Figure 33.5. Editing a hyperlink's URL. The Edit Hyperlink dialog box looks like the one that appears whenever you're opening a file in Windows. If you're linking to another page or file in the current Web, you can select it using this dialog box. If the link is to an address on the World Wide Web such as http://www.fp2k.com/24 , enter this in the dialog's URL field. After changing the URL, you can test it in a Web browser by clicking Preview in Browser on the Standard toolbar. If the URL links to an address on the World Wide Web, you need to connect to the Internet before trying it out. |
EAN: 2147483647
Pages: 474