Creating and Working with Macros


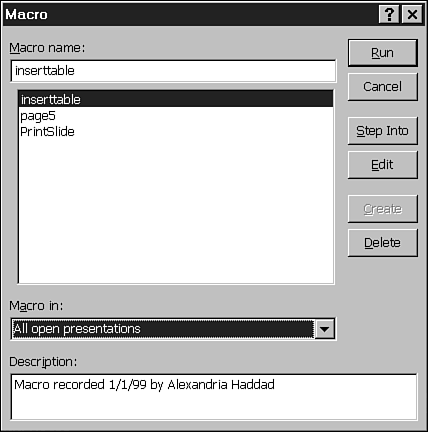
The Macro dialog box is a centralized location for managing your presentation macros. You can view, run, edit, step into, create, or delete macros. To view all the macros in your presentation, open the Macro dialog box by choosing Tools, Macro, Macros from the menu. Or, you can open the Macro dialog box quickly, shown in Figure 31.1, by pressing Alt+F8 while you're in any presentation view (Slide, Outline, Slide Sorter, or Notes Page).

Figure 31.1. The Macro dialog box shows the macros that are available to use in a presentation.

graphics/31fig01.gif

If you have opened a blank presentation without selecting any special templates, the Macro dialog box doesn't list any macros. PowerPoint has three methods you can use to add macros to a presentation file:

  • You can record a macro that contains keystrokes, mouse movements, and menu commands.

  • You can open a presentation from a macro template.

  • You can directly code or copy VB macro subroutines.

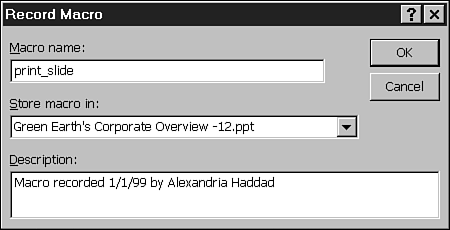
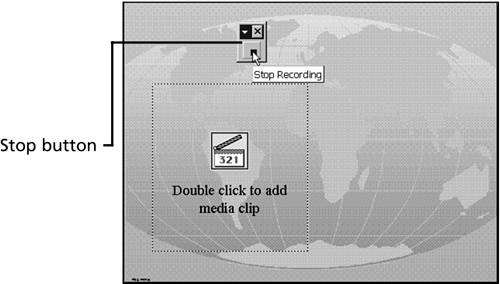
Copying existing macros from sample code files is a quick way to become familiar with the power and flexibility of the Visual Basic for Applications language. The section "Finding More Macro Information," later in this chapter, will teach you the steps for finding a wealth of sample code available from the Microsoft Web site.

Creating Macros

The easiest way to create a macro is to record the keystrokes as you replicate the task you want to automate.

To record a new macro, follow these steps:

  1. Choose Tools, Macro, Record New Macro from the menu to open the Record Macro dialog box. (See Figure 31.2.)

    Figure 31.2. Enter a name for your macro in the Record Macro dialog box.

    graphics/31fig02.gif

  2. Enter a name in the Store macro in field should indicate which presentation file will contain the macro. You can select the current presentation or select All Open Presentations from the drop-down list to apply the macro to presentations that are currently open.

  3. Click OK to start recording.

  4. Execute the keystrokes or commands.

  5. Click the Stop Recording button when you are finished. (See Figure 31.3.)

    Figure 31.3. The Macro toolbar is displayed while you record a macro.

    graphics/31fig03.jpg

graphics/alarmclock_icon.gif

Because PowerPoint doesn't actually record keystrokes in a macro, some actions cannot be used. For example, you can't modify the Tools, Options dialog box using a macro. When you are recording a macro, PowerPoint analyzes your mouse and keyboard actions and converts them into the appropriate VBA text command. If there is no corresponding VBA command for the operation, the macro will not work as intended.


Running a Macro

After you have created a macro, you can run it at any time. Running a macro means executing the programming commands within the macro. There are two ways to run a macro: You can use the menu, or add a button to a toolbar that represents the macro.

To run the macro from the menu, use the following steps:

  1. Select Tools, Macro, Macros from the menu.

  2. Click the macro name you want to run.

  3. Click the Run button.

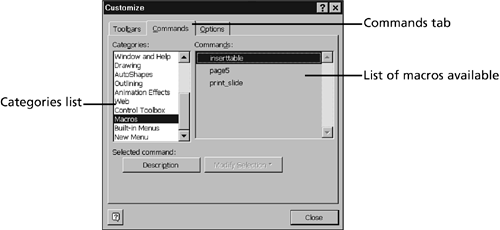
To quickly access and run a PowerPoint macro with a single click, you may want to attach it to a button on either a built-in or custom toolbar. You can then run the macro by clicking the toolbar button.

To add a macro button to a toolbar, use the following steps:

  1. Select View, Toolbars to display the toolbar you want to add the macro button to, if it is not already displayed.

  2. Choose Tools, Customize to open the Customize dialog box.

  3. Click the Commands tab and select Macros from the Categories list, as shown in Figure 31.4.

    Figure 31.4. Use the Customize dialog box to assign a macro to a toolbar button.

    graphics/31fig04.gif

  4. Click and drag the macro name onto the appropriate toolbar. A large I-beam will display where the button will appear.

  5. Click the Close button.

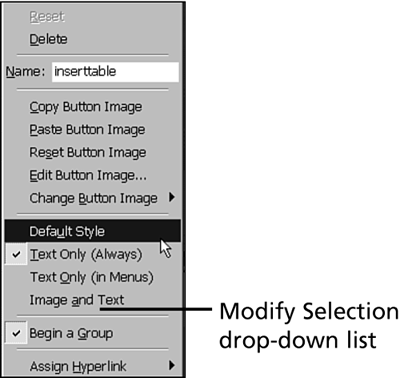
After you have added a macro button to a toolbar, you may want to customize the button's display attributes so that it is a small icon instead of the macro name.

To add a macro button to a toolbar, use the following steps:

  1. Select Tools, Customize from the menu to open the Customize dialog box, if it is not already open.

  2. Click once on the macro button you want to customize to select it.

  3. Click the Modify Selection button to open the drop-down list shown in Figure 31.5.

    Figure 31.5. The Modify Selection drop-down list offers many choices.

    graphics/31fig05.gif

  4. Select Default Style from the menu. This will change the button to a blank button.

  5. Click the Modify Selection button again, select Change Button Image, and click a button image from the choices available.

  6. Click the Close button when finished.

To remove a macro button from a toolbar (but not delete the macro), use the following steps:

  1. Select Tools, Customize from the menu.

  2. Drag the button off the toolbar into the presentation window to remove the button from the toolbar.

Deleting Macros

In PowerPoint, you can also remove unused macros. If you frequently use pre-existing macro templates, you might want to delete the unused macros to conserve memory resources.

Here's how to delete a macro:

  1. Choose Tools, Macro, Macros from the menu.

  2. Select the macro you want to delete.

  3. Click the Delete button.

  4. Click the Yes button to verify that you do want to delete the macro.

The macro is then deleted from the presentation file.

Using Pre-existing Template Macros

Macros can be stored in presentation template files and " copied " into your existing presentation. To use template macros in a presentation, you need to create the presentation from the pre-existing template.

Follow these steps to embed template macros in your presentation:

  1. Choose File, New from the menu.

  2. Select the template containing the macros you want to use.

  3. Click OK.

If you have already built slides that you want to include in the new presentation, add them to the newly created presentation by choosing Insert, Slides from Files from the menu.

graphics/alarmclock_icon.gif

When you apply a template to an existing presentation, the macros in the template are not added to the presentation.


Sams Teach Yourself Office Productivity All in One
Sams Teach Yourself Office Productivity All in One (Sams Teach Yourself All in One)
ISBN: 0672325349
EAN: 2147483647
Year: 2003
Pages: 474
Authors: Greg Perry

flylib.com © 2008-2017.
If you may any questions please contact us: flylib@qtcs.net