| With slides of information, clip art, and pictures, PowerPoint presentations are effective by themselves . However they can be even more attention- grabbing with sound effects added to the presentation. These sound effects can come from many sources, including a prerecorded sound file, a music track from a CD, or a custom narration for your presentation. To use sound files effectively, you must have the proper hardware installed on your computer and the computer that will be used to give the presentation: a sound card, speakers , and a microphone to record narration. If you will be playing a music CD, your computer will also need a CD-ROM drive. Most new computers and many laptop computers have everything you need built-in, so they should be able to play sound effects.  | PowerPoint recognizes different types of sound files. The more popular of these are WAV, which are more like real recordings of actual sounds, and MID, which are MIDI ( musical instrument digital interface ) music files. Depending on your computer's sound card, these files can sound like either an organ or a full-size orchestra. |
Inserting Sound Files from the Clip Gallery PowerPoint's Clip Gallery might also include a few sound clips that you can include in your presentation. You maneuver through the Clip Gallery the same way you browse for clip art.  | If you find that there are no sound files in the Clip Gallery, never fearthe next few sections cover how to find files on your computer. You can also download some really fantastic sounds from the Web at Microsoft's Clip Gallery Live site. You may need to come back to this section. |
To browse the Clip Gallery, use the following steps: -
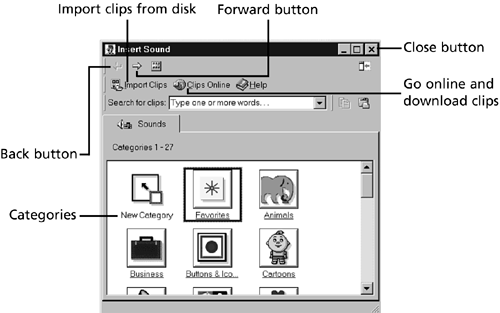
Select Insert, Movies and Sounds, Sound from Gallery from the menu. This opens the Insert Sound dialog box, as shown in Figure 29.1. Figure 29.1. You can insert sounds by using the Insert Sound dialog box.  -
Click a Category button (such as Downloaded) to display a list of the sound clips available for that category. -
Use the Back and Forward navigation buttons , as shown, to help in the viewing of the gallery categories. -
When you are done browsing, you can insert a sound clip, import a sound clip into the gallery, go to the Web to download sound clip(s), or close the gallery. These options are discussed in detail in the following sections. When you find a sound clip that you want to play in your presentation, inserting it into your presentation is as easy as inserting a clip art image. To insert a sound clip from the Clip Gallery, use the following steps:  | Skip steps 13 if you have already been browsing the Clip Gallery. |
-
Select Insert, Movies and Sounds, Sound from Gallery from the menu to open the Insert Sounds dialog box of the Clip Gallery. -
Click a Category button to display a list of the sound clips available for that category. -
Use the Back and Forward navigation buttons, as shown, to help in the viewing of the gallery categories. -
Click the sound clip you want to insert and the Pop-up menu will display. -
Click the Insert Clip button. -
Close the Insert Sound dialog box by clicking on the Close button in the upper-right corner. -
PowerPoint will ask whether you want the sound to play automatically in the slide show. This means that when this particular slide displays, the sound will automatically play. If this is what you want, click Yes. Otherwise, the sound will play only if you click the sound icon that is inserted onto your slide. After the sound clip has been inserted into a slide, you will see a small speaker icon that represents the sound. You can double-click the icon to play the sound anytime you desire . You can also move or resize the icon just as you would a clip art image, if desired. Inserting Other Sound Files PowerPoint also enables you to insert Sound Files that are not in the Clip Gallery, but that you might have on disk or downloaded (see the later section on downloading clips from Microsoft). You probably have many sound files that are available on your computer of which you are unaware. Many of these may have been installed with other software. If you do not know whether you have other sounds, or if you do not know the correct location, PowerPoint comes to your aid once again. To insert sound files you might have on disk, use the following steps: -
Select Insert, Movies and Sounds, Sound from File from the menu to open the Insert Sound dialog box. -
Specify the correct folder location in the Look In box. -
Click the file you want to insert to select it. -
Click the OK button to insert the file into your presentation slide. -
PowerPoint will ask whether you want the sound to play automatically in the slide show. This means that when this particular slide displays, the sound will automatically play. If this is what you want, click Yes. Otherwise, the sound will play only if you click the sound icon. Playing a CD Track You can also play music or other sound track from a CD. This does require that you have a CD-ROM drive and a sound card in your computer. Most computers sold now, including many laptop and notebook computers, have these components built in. To insert an audio track (an icon will be inserted that you can click so the track can be played from the CD), use the following steps: -
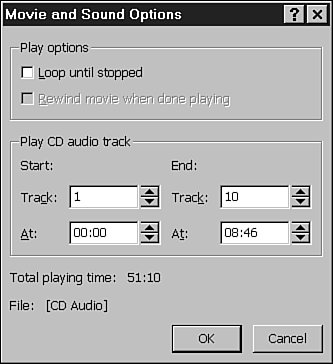
Select Insert, Movies and Sounds, Play CD Audio Track from the menu to open the Movie and Sound Options dialog box, as shown in Figure 29.2. Figure 29.2. Use the Movie and Sound Options dialog box to insert a song from a music CD  -
Enter the track number you want to start with and the start time. -
Enter the track number you want to end with and the end time. The total playing time will be displayed. -
Click the OK button when finished. -
PowerPoint will ask whether you want the sound to play automatically in the slide show. This means that when this particular slide displays, the sound will automatically play. If this is what you want, click Yes. Otherwise, the sound will play only if you click the sound icon.  | To determine the start and end times of a certain portion of a CD music track, use the Windows CD Player program. Click the Start button and then choose Programs, Accessories, Multimedia, CD Player. The CD Player shows you the running time of a music track. Under the View menu, make sure Track Time Elapsed is checked so you can time the track from beginning to end. |
Recording Narration To record narration for your PowerPoint presentation, you need a sound card with a microphone plugged in. You should also have a script prepared for whatever you want to say. The sound quality of your narration is directly linked to the quality of your microphone and the amount of ambient noise. Ambient noise can be minimized by closing the door or windows to the room you're in, turning off the radio or TV, waiting for that noisy jet airplane to pass overhead, and so forth. An inexpensive microphone will probably do for the occasional narrative. However, you might want to consider purchasing a good-quality microphone if you plan on creating many high-quality , professional presentations. We do not suggest using built-in microphones as the quality can be extremely poor. To record narration for a single slide, use the following steps: -
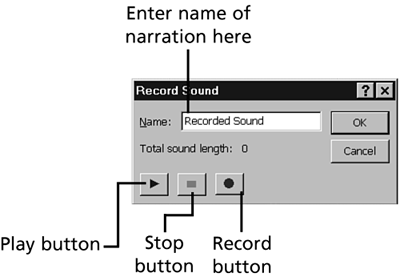
Choose Insert, Movies and Sound, Record Sound from the menu to open the Record Sound dialog box. (See Figure 29.3.) Figure 29.3. PowerPoint enables you to record a narration for your presentation.  -
Enter the name of your narration in the Name field. -
To start recording your narration, click the Record button and start talking into the microphone. -
When you have finished your narration, click the Stop button. To check your recording, you can play it by clicking the Play button. -
When you're finished recording, click the OK button. As with other sounds, a speaker icon will appear in the middle of your slide. If you want to play the narration, double-click the speaker icon. Another option available to you is to record your narration while viewing the slides for your presentation. To record a narration for the entire show, use the following steps: -
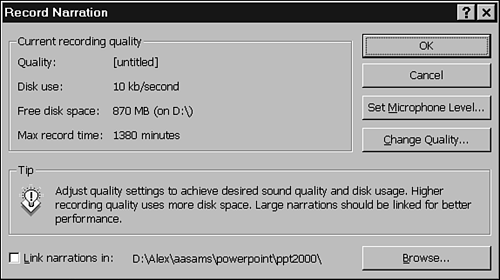
Select Slide Show, Record Narration from the menu to open the Record Narration dialog box shown in Figure 29.4. Figure 29.4. Record your narration while you view the slides for your presentation.  -
Click the Change Quality button to set the recording's sound quality in the Sound Selection dialog box. This enables you to have higher-quality recordings, such as CD quality. After you have set the sound quality, click the OK button. -
Click the OK button to start the narration. -
Click the First Slide button to start the narration at the first slide. -
Record your narration, clicking the mouse to advance to each new slide. -
When you are finished, you're asked whether you want the save the new timings (because of your added narration) and review them in Slide Sorter View. Click Yes. You may want to preview your presentation again to see how the narration sounds and then rerecord if necessary.  |


