Before You Begin  33 Watch a Clip 33 Watch a Clip 37 Zoom a Timeline Clip
See Also  45 Nudge a Clip to Adjust Its Start Time 45 Nudge a Clip to Adjust Its Start Time
Trim, trim, and then trim some more if you want your video to retain the audience's attention. The subject is often not enough to keep people's interest; you, the director, are in charge of keeping the video's pace and changing scenes and camera angles as much as possible to keep the camera from sitting too long on the same subject. The term trim is slightly misleading in Movie Maker vernacular. When you trim a clip, you trim the start time or the ending time (or both). Movie Maker will not play any part of the clip that you've trimmed off. Yet, the clip still retains its original content and length. If you later move or clear a trim point, the video and audio in the trimmed portions will reappear. KEY TERM  | Trim ” To shorten a portion of a clip by positioning a trim point so that Movie Maker starts playing or stops playing the clip at that point. |
The primary reason you trim a clip is to adjust its start or ending time. Therefore, trimming shortens the playback of that clip. The first trim point is called the start trim point ; if you want to shorten where the clip ends, you'll set an end trim point . NOTE  | You cannot lengthen an untrimmed clip unless you combine the clip with another one. |
After you've trimmed a clip, you can easily change the start or end trim point, or clear the trim points altogether. You can trim clips only on the timeline; therefore, you must display the timeline before you can trim any clip. The clip you want to trim must reside on the timeline. The Audio track is automatically trimmed as you trim the Video track. You can trim clips on the Transition, Audio/Music , and Title Overlay tracks, as well as clips on the Video track. 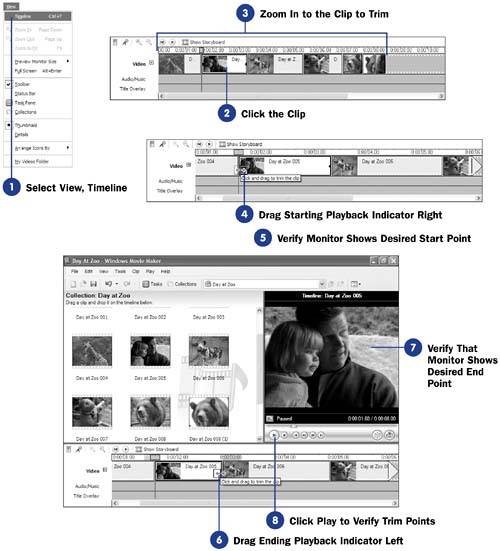 - Select View, Timeline
Choose View, Timeline from the main menu or click the Show Timeline button. If the timeline is already displayed, you do not have to perform this step.
KEY TERMS | | Start trim point ” Deter mines where the clip begins playback. End trim point ” Deter mines where the clip stops playback. | - Click the Clip
You must select a clip on the timeline before you can adjust its trim points.
NOTE | | You can trim only one selected clip at a time; you cannot trim multiple clips that you select as a group . | - Zoom In to the Clip to Trim
It helps to increase the timeline's clip width so that you can more easily adjust the trim points. Press PageDown to zoom in to the timeline.
- Drag Starting Playback Indicator Right
Position the mouse pointer over the starting playback indicator (the left edge of the clip). The mouse pointer changes to a red, double-headed arrow, indicating that you can adjust the trim point by clicking and dragging with your mouse. Drag the starting playback indicator to the right to move the starting point of the clip further "into" the clip.
KEY TERMS | | Starting playback indicator ” A selected clip's left edge on the timeline. Ending playback indicator ” A selected clip's right edge on the timeline. | - Verify That Monitor Shows Desired Start Point
Sometimes it's difficult to drag the trim points to the exact frame where you want the clip to start or stop playing. Therefore, after you get close to the desired frame, you can click Next Frame or Previous Frame until the Monitor displays the frame where you want to place a trim point. Then select Clip, Set Start Trim Point to set the start trim point.
- Drag Ending Playback Indicator Left
If you want to trim where the clip ends, adjust its end trim point. Position the mouse pointer over the ending playback indicator (the right edge of the clip). The mouse pointer changes to a red, double-headed arrow. Drag the ending playback indicator to the left to move the end point of the clip further "into" the clip.
- Verify That Monitor Shows Desired End Point
Use the Monitor's Next Frame and Previous Frame buttons to display the frame where you want to place the trim point and choose Clip, Set End Trim Point . You want to verify that the monitor shows your desired end point for the clip. After you've positioned the end trim point, the clip on the timeline adjusts to its new length set by the trim points. If you drag to change the trim points later (or remove them altogether by selecting Clip, Clear Trim Points ), the timeline clip's width changes once again to reflect the clip's playback length relative to surrounding clips on the timeline.
- Click Play to Verify Trim Points
Click the Play button; the Monitor plays the selected clip only from the starting trim point to the ending trim point. By clicking Play to watch the playback, you can verify that your trim points are accurate.
|