Before You Begin  81 Preview Your Final Movie 81 Preview Your Final Movie
See Also  85 Start the Save Movie Wizard 85 Start the Save Movie Wizard
When you want to save your movie to your computer, Movie Maker asks for the target filename and location for the saved file. The saved movie file is a complete movie and you have no need to keep source files around if you truly do not need them. Remember, however, that you cannot easily edit the movie without the project file's source clips, sounds, and transitions. Saving your movie to your computer gives you the most flexibility. You can save the file in one of the higher quality formats and later transfer one of those formats to a CD, DVD, or another computer on your network. 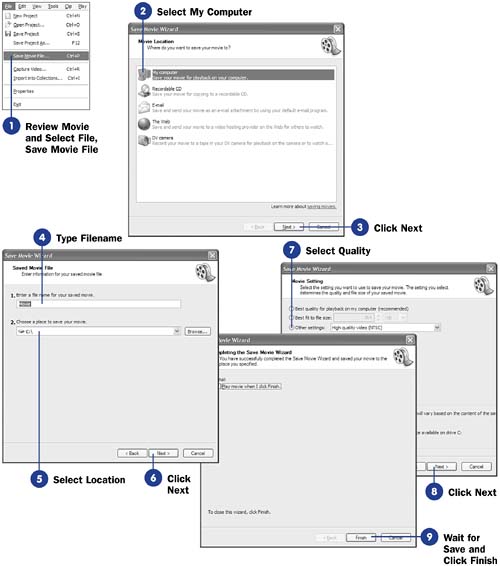 - Review Movie and Select File, Save Movie File
NOTE  | Movie Maker's saved movie files can be quite large. Unless you have plenty of storage space, you might not want to keep a copy of all movies you make on your computer. Consider getting an external backup drive, such as an external FireWire hard drive, on which to place all your saved movies. The movies then won't consume disk space you need for your computer's operating system, application programs, and data. | Click the Monitor pane's Play button to watch your movie. Make sure the movie is final and ready to be produced. If the movie is final, select Save Movie File from the File menu. You will be presented with several destinations for your movie.
- Select My Computer
Click My Computer at the top of the dialog box to send your movie to a file on your computer.
- Click Next
Click the Next button to enter a filename and location for your saved movie.
- Type Filename
TIP  | If you routinely display the Task pane (using View, Task Pane ), you can skip right to step 5 by clicking the Task pane option labeled Save to my computer . | Type a filename for your movie's destination file.
- Select Location
Select a location where you want the saved movie file to appear.
- Click Next
Click the Next button to continue saving the movie.
- Select Quality
Movie Maker automatically selects the option labeled Best quality for playback on my computer , but you can override the default by clicking Show more choices . If you select Best fit to file size , you can enter the maximum disk space you want the movie to consume, and Movie Maker determines the best quality that will fit within the limited disk space you enter. If you select Other settings , Movie Maker lets you scroll through a drop-down list to choose from the entire variety of quality settings available.
TIP | | As you select different quality settings, the Save Movie Wizard dialog box updates the file statistics in the lower left-hand corner to tell you the file type, bit rate, display size, aspect ratio, and frames per second that matches your selected quality ( see 83 About Output Formats ). | - Click Next
After selecting the best quality choice, click the Next button to begin the save.
- Wait for Save and Click Finish
Movie Maker updates the Save Movie Wizard with the saved file's process. Depending on your selected quality and your movie's length, the saving could take only a few seconds or several minutes. When the save completes, you can click Finish to return to Movie Maker. If you want to see your movie play before you return to Movie Maker, select the option labeled Play movie when I click Finish .
|