Add Colors and Textures, the Walk Command, and the Jamagic Picture Editor
Add Colors and Textures, the Walk Command, and the Jamagic Picture Editor
Let s make some changes to our project. First, we will make a texture using the Jamagic picture editor, and we will then add the texture to our triangle.
Using the Jamagic Picture Editor
Get into the Jamagic picture editor by right-clicking Picture, which should be directly under Source, and selecting New Picture. A small window that looks like Figure 3.7 will pop up.
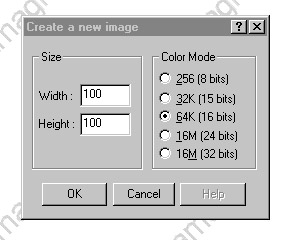
Figure 3.7: Starting the Jamagic picture editor.
You can select the size of the new image you will be making, but for now, stay with the default value of 100 100.
The Color Mode section allows you to select the quality of the picture s color . The higher the bits the greater the number of colors possible. You may be wondering why you shouldn t just use as high a quality as possible. If you did, you would be burdening the computer s memory, and you want to do this as little as possible. If the computer has to keep track of a large number of differently colored pixels (the dots that make up the screen image), it could slow down your program, making it run too slowly to be any fun to use. The computer has a tremendous number of calculations to perform every second and lots of things to keep track of, so you want to minimize its load. On the other hand, even brilliantly programmed code with great action will be terribly downgraded by bad-looking graphics. The trick is to find the right balance between looks and performance.
Which bits selection to use? Well, it depends on your graphics. Most of the time, 8 bits will not be enough, and you will need to go higher. The default setting is 12 bits, and we will stay with this.
When you are finished selecting your size and your color mode, select OK, and you will be taken to the Jamagic picture editor, which is shown in Figure 3.8.
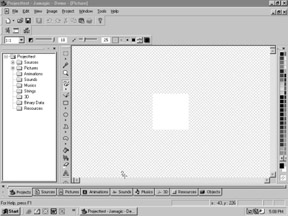
Figure 3.8: The Jamagic picture editor.
The small white square in the middle of the screen is our picture. We will be drawing in it. Look at the sides of the editor screen. You will see the various ways in which you can draw on the image: with spray paint, bucket-fill, text, line draw, and various shapes . At the right of the screen you can see the color selection chart.
Let s make a quick picture using the picture editor. Use the Bucket-Fill tool to paint the entire image a yellow color. To do so, click the yellow color from the color selection chart using your mouse and pointer. After you have selected the color, click the Bucket-Fill tool, and then click anywhere inside the image, which should cause it to turn a uniform yellow color.
Next , let s write three messages on the image: one at the top, one in the middle, and one at the bottom. First select green for the top message, then select the Text tool (by clicking the letter A that appears on the vertical menu at the side of the screen), then type in anything that fills in the box. Select another color for the middle and type a message in the center of the image, and repeat the process for the bottom.
Just for fun, let s spray paint a few swaths with the spray paint tool. Like the other tools, first select the color from the color menu on the right part of the screen, and then pick the Spray Paint tool and spray away. Figure 3.9 shows the result.
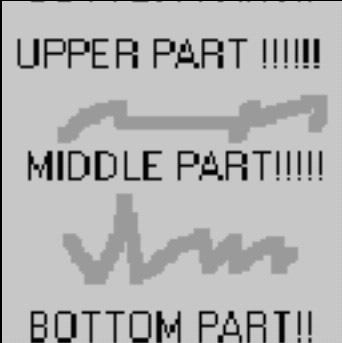
Figure 3.9: The image painted with the Jamagic picture editor.
In another chapter we will go into greater detail about using the picture editor.
Now go to the upper left and click File and then select Save. The image we have just drawn has now been stored in the computer, ready for your use. Now double-click Pictures. You will see our image listed as Picture, which is the name the picture editor will automatically give any picture we make. Let s change the name to something we ll recognize when we see it. Right click Picture and select Rename, then type the new name in the highlighted area shown as shown in Figure 3.10. Here we have called the new picture Firstpic .
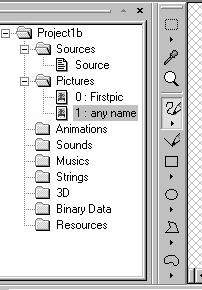
Figure 3.10: Renaming the picture.
Now that we have drawn the picture, we can apply it (texture it) to our triangle. We did not need to draw an image using the Jamagic editor. We could have used any of a number of tools like Jasc Paint Shop Pro , Adobe Illustrator , or even Microsoft Paint to do this. Generally, software made specifically for drawing will be more powerful and versatile than that included with Jamagic . This is not meant to disparage Jamagic in any way; the Jamagic editor is very good, but Jamagic s main goal is to be a game-programming tool, not a picture editor.
Also, we could have used a digital photograph or images downloaded from the Web. Jamagic can accept images in BMP and JPEG formats.
Adding the Texture to Our Triangle
To add this texture, we will need to add some code to our previous program. Double-click Sources, and then single-click Source to get back into our program. We are now in the Jamagic source editor again.
As before, we will first list parts of the code and then explain them in detail. Later, the entire code will be listed. Please concentrate on understanding the code for now; type it in later.
We need to add u, v coordinates to the three points of the triangle shown in Figure 3.5
We would like point 1 to correspond to the lower-left corner of our image (the u, v coordinates would be 0, 0); point 3 would then correspond to the middle top of the image (with the u, v coordinates of 0.5, 1), and point 2 would correspond to the lower-right portion of our image (with u, v coordinates of 1, 0). We need to add the u, v coordinates that go with each point by modifying the Point3D statements in our code. Here we are simply adding the u, v coordinates of each point at the end of each line:
opoint1 = New Point3D(opolygon,300,300,0,0,0); opoint2 = New Point3D(opolygon,300,300,0,1,0); opoint3 = New Point3D(opolygon,0,1000,0,0.5,1);
Now we know with what part of the picture each point of our triangle is associated.
We also need to add the lines described in the following pages to our previous program.
otexture = New Texture(oworld,"Firstpic");
This line tells the computer that a new texture, named otexture (which could have been given any name), will be added to our world, oworld . The texture will be the image we just made ” Firstpic .
omaterial = New Material(oworld,otexture);
This line instructs Jamagic to make a new material that will be stretched over our object; we are calling that material omaterial . The fitting of a texture over an object is called mapping .
omaterial.SetMapped(ON);
Here we tell Jamagic to prepare omaterial to be mapped on to a surface.
opolygon.ReplaceMaterial(omaterial);
This line finishes the texturing/mapping process by applying the texture in omaterial onto opolygon , using the u, v mapping coordinates from the Point3D statements.
Below we present the entire code. Simply modify your previous program as necessary. Note that the changes include four new lines at the end of the program and a modification of the Point3D lines. Comment lines have been added to help you see which lines to change and which lines to add.
//Project1 by your name here // This is my first project. // We will begin very simply, and then add more and more. // 7 June 2002 oworld = New World(); ocamera = New Camera(oworld); opolygon = New Object(oworld); //Next we've commented out the previous code. //opoint1 = New Point3D(opolygon,300,300,0); //opoint2 = New Point3D(opolygon,300,300,0); //opoint3 = New Point3D(opolygon,0,1000,0); //New code opoint1 = New Point3D(opolygon,300,300,0,0,0); opoint2 = New Point3D(opolygon,300,300,0,1,0); opoint3 = New Point3D(opolygon,0,1000,0,0.5,1); opolygon.AddPolygon(opoint2,opoint3,opoint1); otexture = New Texture(oworld,"Firstpic"); omaterial = New Material(oworld,otexture); //omaterial.SetMapped(ON); opolygon.ReplaceMaterial(omaterial); //Old stuff opolygon.SetPosition(0,0,0); ocamera.SetPosition(0,100,9000); ocamera.Walk(); While(1) { } When you run the program, you should get an image like the one in Figure 3.11. You can see that the texture we drew has been mapped onto our triangle. Notice that the program did exactly as we told it: the lower-left corner of the image, with the u, v coordinates (0, 0), has been mapped to the lower-left corner of the triangle. The mid-upper portion of the image (0.5, 1) has been mapped to the same part of the triangle, as has the lower part of the image (1, 0). We will experiment further with mapping in the next sections!
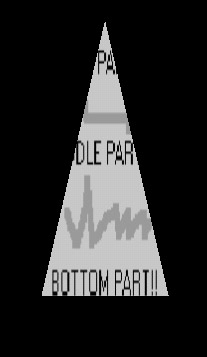
Figure 3.11: Image mapped on triangle.
Moving Our Object with the Walk Command
Now let s make it so that we can move our triangle around with the Walk command. Comment out the line that says ocamera.Walk() by putting the two forward slashes before it, and type in the following line instead:
opolygon.Walk();
Before you run your program, we should point out something that s a little unusual about Jamagic . When working with other programming languages like C, C++, Visual Basic, or QBasic, you must save every program after making modifications to it, even if you run the modified program. Jamagic, on the other hand, automatically saves your program after you run it once. We mention this because many people used to other languages will experiment with a program, try the changes they ve made by running the program, and if the results are terrible, decide not to save their work and just stick with the original code. You can t do this with Jamagic because you will lose your original code the first time you test your program.
If you wish to improve a program you ve spent a lot of time on and are afraid you might make it worse with your improvements, then the best thing is to make a new program and cut-and-paste your old program into the new source code. You could then work on the new version and still have the old version intact. After you are sure you don t want the old version, you can delete the file using your Windows Explorer. You should not keep programs you do not need; delete them, otherwise your hard drive (where your computer permanently stores information) will quickly fill up.
Another way to experiment without ruining good code is to comment out (with //) the lines you want to change, and type in the new lines underneath them. This way you will always have available what you started out with, and you can remove the comment slashes to get back your original code.
OK, run the program by clicking the red running figure, and experiment with the arrow keys. You will notice some unusual things! Please spend a few minutes observing what happens before reading on.
You probably noticed that the triangle moves in a different way with the Walk command than the camera did. When you use the right or left arrow keys, the triangle rotates about a center vertical axis; the camera moves left or right. When you use the up arrow key, the triangle moves in the direction it s facing and away from the direction it faces when you use the down key.
But you might have been alarmed to have seen the triangle disappear if you kept rotating it, only to have it come back into view as you continued the rotation. Please go back to your program if you did not notice this. What is going on? You might remember from Chapter 2 that every surface has a visible and an invisible surface, as specified by the winding order. When you rotate the triangle, you are eventually reaching its invisible surface, which is, of course, not visible.
Now try typing in the following line after the Walk command (you could type this line anywhere in your program after the line that tells the program to make the new world oworld ):
oworld.setbackfacesculling(OFF);
Now run the program and see what happens. You can see the back face of your object. With the setbackfacesculling(OFF) command, you are telling the computer to show all back views of objects in our 3D world named oworld .
You may have also noticed that sometimes Jamagic tries to help you along by writing what it thinks you are trying to type in a small window. This makes it easier for you to spell statements that have to be exactly right!
Let s now experiment with the Walk command a bit. By leaving the space between the parentheses blank, we are telling Jamagic to use default values (or preset values) to move the object. But what if you want to move at a different speed? Jamagic gives you tremendous flexibility in choosing speed by allowing you type in numbers in the parentheses. Take a look at the statement below, which shows you how you can modify the Walk command:
anyname.Walk(player, walk speed, strafe speed, rotation rate, run speed factor);// should all fit on one line
| Tip | Before we explain this command, it s important to know that all commands in Ja-magic are written on one line. Unfortunately, books are limited in width, so we cannot present the entire Jamagic command without jumping to the next line. Whenever this happens in this book, the author has added a comment (//) to the code that warns you to enter the entire command on one line. |
In this command, the anyname refers to any 3D object in your 3D world. In our case, it s opolygon. player applies when there is more than one player using your game. A numeral 1 would refer to the first player, 2 to the second, and so on. We will be using only one player in all of our games , so we ll just leave this blank.
walk speed refers to how quickly the object moves in the direction it s facing (up and down arrow keys). The larger the number, the faster the speed. We will use a value of 1000, but you can experiment with this when you are making a game until you get a speed that looks and feels right to you.
strafe speed refers to how quickly the object moves from side-to-side while facing in the same direction (in other words, the object moves sideways without rotating about its own axis). strafe speed is not activated with the type of 3D object we are using, so it can either be left blank or have any number put in it.
rotation rate is the speed at which the object will rotate ”pretty obvious! You can experiment with this value until you get the speed you like, or if you like mathematics, you can figure out exactly how fast the rotation will be. The rotation is given in radians per second, so a value of 1 for the rotation rate will result in 1 radian per second, which is about 57.1 degrees per second, or about 1/6 of a full revolution every second. Chapter 4 gives more details on this.
The run speed factor refers to running objects. This tells the computer how many times faster running is than walking. For example, a value of 2 means that running is twice as fast as walking. This feature does not apply to our type of object, so it can be left blank, or you can put any number in it.
Now modify your Walk command to read as follows :
opolygon.Walk(,1000, ,1,);
You can see we left out the factors that did not apply by leaving the space between the commas empty. Try your program now and see what happens. We will wait for you here.
You can see that the triangle now moves faster, both in rotation and in forward/backward motion. If you are feeling really energetic , you might want to time how long it takes to make one revolution. We specified a rotation speed of 1 radian per second, so it should take about 6 seconds for a full revolution. The final code is presented below:
//Project1 by your name here // This is my first project. // We will begin very simply, and then add more and more. // 7 June 2002 oworld = New World(); ocamera = New Camera(oworld); opolygon = New Object(oworld); //Next we've commented out the previous code. //opoint1 = New Point3D(opolygon,300,300,0); //opoint2 = New Point3D(opolygon,300,300,0); //opoint3 = New Point3D(opolygon,0,1000,0); //New code opoint1 = New Point3D(opolygon,300,300,0,0,0); opoint2 = New Point3D(opolygon,300,300,0,1,0); opoint3 = New Point3D(opolygon,0,1000,0,0.5,1); opolygon.AddPolygon(opoint2,opoint3,opoint1); otexture = New Texture(oworld,"Firstpic"); omaterial = New Material(oworld,otexture); //omaterial.SetMapped(ON); opolygon.ReplaceMaterial(omaterial); opolygon.SetPosition(0,0,0); ocamera.SetPosition(0,100,9000); opolygon.Walk(,1000, ,1); oworld.SetBackFacesCulling(OFF); While(1) { } EAN: 2147483647
Pages: 105