Demo 2.2 Hello Internet Client
| [ LiB ] |
This demo is the counterpart to Demo 2.1. It actually sends the data to the server, so the server can print it.
The demo is located on the CD in the directory /Demos/Chapter02/Demo02-HelloInternetClient/, in the file Demo02.cpp. As usual, this is a regular console app, and you can compile it using the instructions found in Appendix A (found on the CD).
The demo starts off with Code Blocks 2.1 and 2.2, which have been printed earlier, so there is no need to show them again here. This code introduces a new block, Code Block 2.4, which basically creates a socket for connection. The code looks like this:
#include <iostream> #include <string.h> using namespace std; int main() { // BEGIN CODE BLOCK 2.4 - Creat a connecting data socket int err; char message[128] = "Hello Internet!"; char ip[16] = ""; unsigned long ipaddr; // start the socket library StartSocketLib; This example uses the err variable again and three new variables as well. The message string contains the message to be sent, the ip string that contains the IP address of the server in string form, and the ipaddr variable that holds the IP address in network byte order.
After the library is started, the program asks the user for an IP address for connection:
cout << "Enter the IP address to connect to: "; cin >> ip; // convert the IP address. ipaddr = inet_addr( ip ); if( ipaddr == -1 ) { cout << "Error: invalid IP address" << endl; return 0; } If the program doesn't work, it converts the string IP address into binary form and returns an error. As with the Demo 2.1 listing, I will remove the error blocks from now on, to show you the "beef" of the code.
This next block of code creates a socket, fills out another sockaddr_in structure (oy!), and then attempts to connect the socket:
// create a socket int sock = socket( AF_INET, SOCK_STREAM, IPPROTO_TCP ); // create a sockaddr_in for connection, on port 4000 struct sockaddr_in socketaddress; socklen_t sa_size = sizeof( struct sockaddr_in ); socketaddress.sin_family = AF_INET; socketaddress.sin_port = htons( 4000 ); socketaddress.sin_addr.s_addr = ipaddr; memset( &(socketaddress.sin_zero), 0, 8 ); // connect the socket err = connect( sock, (struct sockaddr*)&socketaddress, sa_size ); // END CODE BLOCK 2.4 - creating a connecting data socket
Note that Code Block 2.4 ended in the previous code section. By this point, the socket should be connected and ready to send data, so that's what we do next:
cout << "sending message: " << message << "..." << endl; // send data err = send( sock, message, strlen( message ) + 1, 0 );
This sends the message through the socket. Pretty simple, eh? Finally, the socket is shut down, and the connection is closed:
shutdown( sock, 2 ); CloseSocket( sock ); CloseSocketLib; }
Now that this is finished, you can fire up the server in a console window, fire up Demo 2.2, and watch the results. If you have a friend who is willing to help you test it over the Internet, you can send him either the server or the client and ask him to run it, while you run the other part. Figure 2.10 shows a screenshot of the two programs running at the same time.
Figure 2.10. Demos 2.1 and 2.2 are running simultaneously .
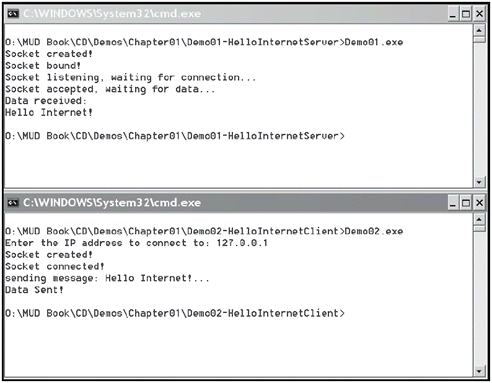
From the demo, you can see that I ran both demos on one computer and used the standard 127.0.0.1 "loopback" address to connect to my own computer.
So, as you can see, sending and receiving data is pretty easy.
| [ LiB ] |
EAN: 2147483647
Pages: 147