Section 71. Using Adjustment Layers in Photoshop
#71. Using Adjustment Layers in PhotoshopAdjustment layers in Photoshop allow you to make color and tonal adjustments to an image without permanently changing the underlying pixels. This nondestructive method of editing means you can try different modifications to an image at any time by editing the adjustment layer. For example, instead of applying the Levels command to your file and hoping it prints out acceptably once it's saved and placed in InDesign, you can add a Levels adjustment layer that provides the flexibility to go back later and change the Levels settings if necessary. Adjustment layers also reduce the loss of image data since you're not applying multiple adjustments directly to the image over time.
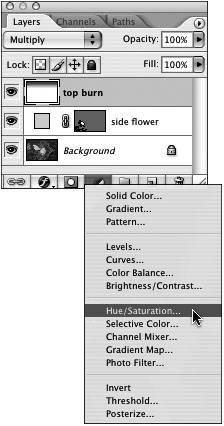
Creating adjustment layers is easy, and they increase your file size no more than any other layer. So it's hard to come up with a good reason for not taking advantage of them. To quickly create an adjustment layer, click the New Fill or Adjustment Layer button Figure 71a. The adjustment layer pop-up menu located in the Layers palette gives you quick access to creating an adjustment layer. The adjustments are applied and then represented as a layer in the Layers palette (Figure 71b). Since it's a layer, you can do almost everything you can do to image layers: toggle visibility, reorder the layer in the stacking order, apply a mask, and so on. Figure 71b. Once an adjustment layer is applied, it appears in the Layers palette. Each adjustment command is represented by a different thumbnail icon. Here's where it gets interesting. To edit an adjustment layer, simply double-click the adjustment layer's thumbnail in the Layers palette. The adjustment's dialog opens again, allowing you to tweak any settings and reapply them. You can edit an adjustment layer at any time, even after you've saved and reopened the document. Note You can apply and edit adjustment layers only in Photoshop, although you can view them in ImageReady if the document's color mode happens to be in RGB. |

EAN: 2147483647
Pages: 143