Section 21. Making Color Range Selections
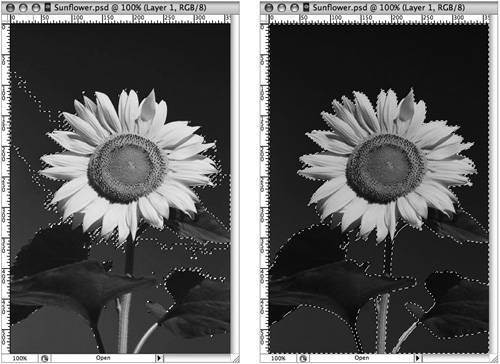
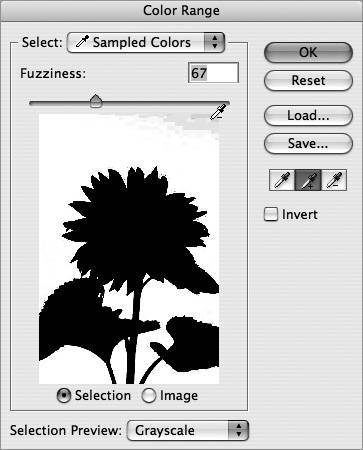

#21. Making Color Range Selections

Efficiently selecting certain pixels to work with while excluding others is essential when working in Photoshop. Fortunately, a number of tools and commands are available to help with this task. One technique you can use to quickly isolate parts of an image is to select them through their similar color range. This works well when you have a consistently colored object set against a differently colored background.

Reselecting Your Last Selection

If you find that you need the last selection you made but have since dismissed it, use the handy Reselect command: Select > Reselect. This command loads the very last selection you made no matter how many other actions you've performed since (aside from closing the document).


Here are two of the more popular ways to make a selection based on a range of colors:

  • Magic Wand tool: Clicking in an area that contains relatively similar colors with this tool will immediately select the entire area without having to trace the outside. Experiment with the tool's tolerance and the other settings in the options palette if you're not getting the desired results (Figure 21a). A low tolerance value selects colors very similar to one another, whereas a higher value selects a broader range of colors.

    Figure 21a. If the Magic Wand tool is selecting too little or too much, adjust the tolerance setting in the options bar appropriately. The image on the left shows a selection made with a tolerance of 12, whereas the image on the right has a value of 65.

  • Color Range command: This powerful command makes it possible to build up a complex selection based on a sampled color range. Follow these steps to use this command:


    1.

    Sample the predominate color you want to create your selection from using the Eyedropper tool and then choose Select > Color Range.

    2.

    In the Color Range dialog (Figure 21b) you can adjust the amount of similar colors used in the selection by using the Fuzziness slider.

    Figure 21b. The Color Range dialog offers an interactive yet sophisticated approach to selecting specific colors in a range.

    3.

    Add or remove colors from the range by using the Add and Subtract from Sample Eyedropper tools and clicking on colors in the image window or preview area.

    4.

    If you want to preview the selection in the image window, choose from the options in the Selection Preview menu.

    5.

    When you're satisfied with the color range selection, click OK to create your selection.

The Color Replacement Brush

Sometimes you may want to replace the color of an object with another color. The Color Replacement brush, which is tucked under the Brush tool, is just the tool for this. First sample the color you want to end up with using the Eyedropper tool. Then select the Color Replacement brush and start painting over the color you want to replace. In its default sampling behavior, the center of the brush is continuously sampling the color to replace. So be sure to keep the brush within the object's boundaries; otherwise, you'll end up replacing the color outside of the object as well.


Once you've made your color-based selection, you can clean it up by using the Smooth command. To smooth a selection, choose Select > Modify > Smooth. Enter a value in the Sample Radius and click OK. This will select any nearby stray pixels, resulting in an overall smoother selection.


Adobe Creative Suite 2 How-Tos(c) 100 Essential Techniques
Adobe Creative Suite 2 How-Tos: 100 Essential Techniques
ISBN: 0321356748
EAN: 2147483647
Year: 2005
Pages: 143

flylib.com © 2008-2017.
If you may any questions please contact us: flylib@qtcs.net