Server.Transfer vs. Response.Redirect
If you read a lot of industry magazines and ASP.NET code samples, you may find that, although the majority uses Response.Redirect to send the user to another page, some seem to prefer the rather mysterious -sounding Server.Transfer . So, what s the difference?
Well, Response.Redirect simply sends a message down to the browser telling it to move to another page. So, you may run code like Response.Redirect("WebForm2.aspx") or Response.Redirect("http://www.karlmoore.com/") to send the user to another page.
Server.Transfer is similar in that it sends the user to another page with a statement such as Server.Transfer("WebForm2.aspx") . However, the statement has a number of distinct advantages and disadvantages.
Firstly, transferring to another page using Server.Transfer conserves server resources. Instead of telling the browser to redirect, it simply changes the focus on the Web server and transfers the request. This means you don t get quite as many HTTP requests coming through, which therefore eases the pressure on your Web server and makes your applications run faster.
But watch out: because the transfer process can work on only those sites running on the server, you can t use Server.Transfer to send the user to an external site. Only Response.Redirect can do that.
Secondly, Server.Transfer maintains the original URL in the browser. This can really help streamline data entry techniques, although it may make for confusion when debugging.
That s not all: the Server.Transfer method also has a second parameter ” preserveForm . If you set this to True , using a statement such as Server.Transfer("WebForm2.aspx", True) , the existing query string and any form variables will still be available to the page you are transferring to.
For example, if your WebForm1.aspx has a TextBox control called TextBox1 and you transferred to WebForm2.aspx with the preserveForm parameter set to True , you d be able to retrieve the value of the original page TextBox control by referencing Request.Form("TextBox1") .
This technique is great for wizard-style input forms split over multiple pages. But there s another thing you ll want to watch out for when using the preserveForm parameter. ASP.NET has a bug whereby, in certain situations, an error will occur when attempting to transfer the form and query string values. You ll find this documented at http://support.microsoft.com/default.aspx?id=kb;en-us;Q316920.
The unofficial solution is to set the enableViewStateMac property to True on the page you ll be transferring to, then set it back to False . This records that you want a definitive False value for this property and resolves the bug.
So, in brief: Response.Redirect simply tells the browser to visit another page. Server.Transfer helps reduce server requests, keeps the URL the same and, with a little bug-bashing, allows you to transfer the query string and form variables.
| TOP TIP | Don t confuse Server.Transfer with Server.Execute , which executes the page and returns the results. It was useful in the past, but, with ASP.NET, it s been replaced with fresher methods of development. Ignore it. |
Using .IsClientConnected for Long Processes
If you re performing a long process or calculation behind a Web page, it s a good idea to periodically check whether your client is still connected. You may want to do this at set intervals in your code, or just before sending your results down to the browser.
You can do this through the innovatively titled property, Response.IsClientConnected . It ll return a True if the client is still connected to the server. If it isn t, you ll want to run a Response.End and exit your code.
Preventing Client Caching, with Meta Tags
If you re dealing with time-sensitive information in your ASP.NET Web pages, you probably don t want browsers caching your pages away somewhere. You want the content to expire immediately, so the only way users can view the information again is to revisit and obtain the latest data from your site.
You can control caching in the client browser through the use of meta tags. They have nothing to do with ASP.NET and are handled purely on the client side, but I ve included this tip as this exact question is regularly raised at even the most high profile .NET development groups.
So, here s how you do it. Just add the following meta tag to your HTML, within the < head > tags, to expire your content immediately:
<META HTTP-EQUIV="Expires" CONTENT="0">
You can also attempt to tell the browser to not bother caching this page at all, with the following meta tag:
<meta http-equiv="pragma" content="no-cache">
Either works: just tap them out and you re finished.
Uploading Files Larger Than 4MB
By default, the size limit for ASP.NET uploads is set at 4MB. Although this is large enough for most sites, if you re dealing in particularly hefty uploads, there s a little-known technique for upping the cap.
Simply open machine.config in the <Windows>\Microsoft.NET\Framework\ <currentversion>\Config folder and locate the following setting:
<httpRuntime maxRequestLength=4096>
Now, simply alter the maxRequestLength value to a figure of your choice. To allow uploads of up to 8MB, for example, change the value from 4096 to 8192 .
What to Do When Session_End Doesn t Work
It s one of the most common complaints on the newsgroups: Hey! My Session End event doesn t fire. The code I want to run when the Session finishes just never runs. And then you get the whiz kid that replies with It s a bug. You can t rely on it on that End event. Use another method.
Important note: the whiz kid is wrong.
If the code you ve entered in your Global.asax file to run when the Session End event fires doesn t appear to be kicking in, one of the following three things could be at fault:
-
You re not using InProc. The mode attribute of the < sessionState > element in your application Web.config file must be set to InProc . If it isn t, the End event simply cannot fire.
-
You re not using the Session . The Session End event can t fire if there s no Session to End . Are you sure your application is storing information through the Session object?
-
Your code is flawed. There s an error somewhere in the code that responds to the End event. Try running your application in debug mode, with a short < sessionState > timeout attribute. Visit the page and then wait. Does the End event kick in? Does an error occur in your code?
There is quite seriously no other excuse for your code not running. There s no mysterious bug. There are no weird setup issues or reasons for not trusting the Session End event. It works, no excuses.
| TOP TIP | Another common developer complaint is Global.asax events being fired off multiple times (i.e., the code behind a Timer event runs multiple times, even though the event should've only fired once). When multiple versions of an event fire off asynchronously, the code running may "overlap" with itself and cause problems. One highly underused trick that stops this occuring is to temporarily "freeze" your Web application when you begin such code, which ensures nothing else happens while your event code is running, then " unfreeze " at the end. You can do this by running Application.Lock at the beginning of your code and Application.UnLock at the close. Simple, but a true lifesaver. |
Spying on Your Web Host: Checking Uptime in .NET
Download supporting files at www.apress.com .
The files for this tip are in the Ch3 ” Spy on Web Host folder.
Okay, so your host promises 99.999% uptime, but are they really delivering? Unless you re either checking every couple of seconds or dishing out for some monitoring service, you really don t have much of an idea.
That is, until now.
ASP.NET Web pages served up through IIS are delivered through an ASP.NET worker process (aspnet_wp.exe). This file executes your code and puts all the ASP.NET pieces together. If we could access this worker process, we may be able to look at how long it had been running, its current state, and perhaps even a history, showing previous instantiations of the worker process.
Well, you can. And the following snippet of code shows you exactly how:
Dim strReport As String Dim objInfo As ProcessInfo = ProcessModelInfo.GetCurrentProcessInfo ' Get time information strReport = "ASP.NET was started at " & _ objInfo.StartTime.ToString & ". " & _ "It has been running for " & _ objInfo.Age.Days & " days, " & _ objInfo.Age.Hours & " hours and " & _ objInfo.Age.Minutes & " minutes. " Response.Write(strReport) ' Get other info strReport = "The process ID is " & _ objInfo.ProcessID & ". " & _ "Current status is " & _ objInfo.Status.ToString & ". " & _ "Peak memory used was " & _ objInfo.PeakMemoryUsed & ". " & _ "Request count is currently " & _ objInfo.RequestCount & "." Response.Write(strReport)
It may look a little weird, but all we re doing here is retrieving a ProcessInfo object that contains information about the current worker process. This is then formulated into a string using key properties and spurted out to the user, through Response.Write . Try it out: you ll be given an instant server status report.
The ProcessModelInfo class also has a GetHistory method, which allows you to retrieve information about previous instances of the aspnet_wp.exe process. It returns an array of ProcessInfo objects. Either use a For Next loop to retrieve this information or bind direct to a DataGrid.
There s also a technique for retrieving the amount of time that your actual server has been running (not just the ASP.NET worker process). Simply nab the TickCount from the Environment class, which lists the number of milliseconds the machine has been running. After that, either perform a few simple calculations ” or, slightly easier, convert it into a period of time (a TimeSpan object), and then retrieve the appropriate properties. (See Figure 3-14.) Here s my snippet of code that does exactly that:
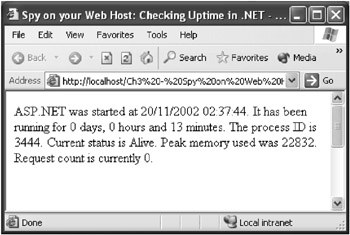
Figure 3-14: ASP.NET only been running for 13 minutes? Sounds dodgy. Change your host.
Dim tsAge As TimeSpan = _ TimeSpan.FromMilliseconds(Environment.TickCount) Dim intDaysUp As Integer = tsAge.Days Dim intHoursUp As Integer = tsAge.Hours Dim intMinsUp As Integer = tsAge.Minutes Response.Write("The server has been up " & _ intDaysUp & " days, " & intHoursUp & _ " hours and " & intMinsUp & " minutes.") Can It Cope? Stress Testing Your Web Apps
It s the new face of that old, often troublesome Web Application Stress package. It s a tool designed to see whether your site can stand up against heavy traffic. It s distributed with the Enterprise and Architect editions of Visual Studio .NET. It s the curiously christened Application Center Test (ACT).
Here s how it works. You launch ACT and record a browser session, simulating a regular user. You may explore the site, do a little searching, upload a couple of files, or do whatever users typically do at your site. Then you tell ACT to rerun that test over and over again, perhaps simultaneously and with great speed. When finished, you check out the results to see how both your server and ASP/ASP.NET applications stood up to being thrashed.
Start by launching ACT: click on Programs ![]() Microsoft Visual Studio .NET
Microsoft Visual Studio .NET ![]() Microsoft Visual Studio .NET Enterprise Features
Microsoft Visual Studio .NET Enterprise Features ![]() Microsoft Application Center Test. You ll see a bundle of existing samples. To record your own, right-click on the Tests node and choose New Test. Skipping through the wizard, select Record a New Test, then click on the button to start recording. An empty Internet Explorer browser window will appear.
Microsoft Application Center Test. You ll see a bundle of existing samples. To record your own, right-click on the Tests node and choose New Test. Skipping through the wizard, select Record a New Test, then click on the button to start recording. An empty Internet Explorer browser window will appear.
| TOP TIP | Using a dial-up networking connection? It s poorly documented, but ACT won t record test sessions through a regular dial-up. In fact, even if you re recording on the http://localhost/ server while a dial-up connection is active in the background, it ll refuse to record. Yes, it s annoyingly picky: try disconnecting and attempting once more. |
Ensure that you are not working offline (if so, uncheck this mode using the File menu), then start acting like a user: browse, login, search. Play around for a minute or three. When you re done, stop using the browser window and return to ACT, clicking on Stop Recording. Provide your test with a name , then finish the wizard.
Your test should now appear under the list of tests. Select it and view the VBScript code that s generated for you. If you need to remove any unnecessary requests, simply comment out the call SendRequest# line in the Sub Main method at the bottom of your test script.
So, you have your test recorded. Now, let s look at its settings: right-click on your test and select Properties. This is where you choose how far to push your application, selecting parameters such as how many simultaneous browser connections you want to simulate or how long you wish to run the test. You can also use the Counters tab to monitor certain parts of your system as the site is being accessed, potentially enabling you to track down bottlenecks. The Users tab also lets you specify a list of test users to log in to your site (although this requires a little custom programming and a surf through the help files). Click OK when finished.
When you re ready to begin, add any notes for this test in the top panel, then right-click on your test and select Start Test. You ll be shown a summary as the whole thing churns away. If you re curious , you can also click Show Details for an instant graphical view of how it s all going.
After the test has finished, you ll probably want to see, detailed report as to how it went. Click on Close, then select the Results node and highlight your test run. You should be presented with a graphical report showing how well your site handled the situation ”or not, as the case may be. Here, you ll be able to see how many application requests per second the Web server was able to handle, how long it took the server to respond and how much bandwidth you used per second. (See Figure 3-15.)
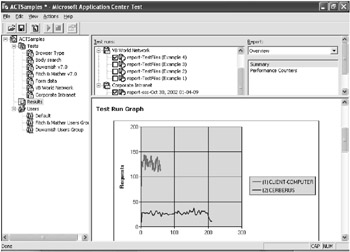
Figure 3-15: A little test I ran earlier with a bottle -necking application
If you chose to record performance counters, you should also be able to view data about how your machine handled itself, too. If you wish, you can check multiple tests and compare results. More information about analyzing the content in these reports can be found in the ACT help file under Analyzing the Test Results.
If your site didn t hold up as well as you thought it should ” reacting slowly and producing connection errors ”you might want to start looking at how you can optimize your application a little more. For example, you may implement caching, rewrite inefficient code, distribute your application over multiple machines (a Web farm ), or simply upgrade your server.
No matter what the outcome, it s always good practice to stress test your application in preparation for the real world. Because you never know when that next flood of visitors will be checking in.
| TOP TIP | If you have the urge, you can even use ACT directly from within Visual Studio .NET. When creating a new project, select Other Projects |
The Two Methods of Moving Web Servers
So, your Web application has become a real company success, but, despite all your fine-tuning, it s starting to slow down. Why? The server just isn t powerful enough. It s time to move, but how?
You can choose between two methods. The first is the absolute easiest : simply open your project and click on Project ![]() Copy Project. Alter the destination project folder to refer to your new server, select exactly what you want to copy, and click OK. (See Figure 3-16.) No problem.
Copy Project. Alter the destination project folder to refer to your new server, select exactly what you want to copy, and click OK. (See Figure 3-16.) No problem.
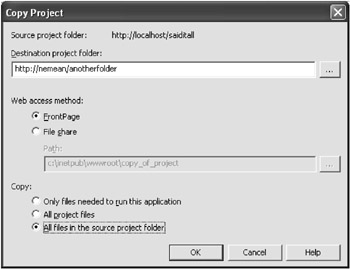
Figure 3-16: Pick yer choices and copy yer files!
However, everyone knows ”more often than not ”there are special configuration issues and setup requirements administrators require that hinder such an easy deployment.
In these situations, you ll require a manual move. To do this, first enter your actual application folder (something like c:\inetpub\ wwwroot \YourAppName\). Next, copy all the required files and folders across to a desired directory on the remote server. If you re moving your source code as well, edit the YourAppName.vbproj.webinfo XML-based file so it points to your application on the new server.
Next, you ll have to set up this directory as a virtual folder in IIS. To do this, on the remote machine, click on Start ![]() Programs
Programs ![]() Administrative Tools, then select Internet Services Manager (Windows 2000/2003) or Internet Information Services (Windows XP). Expand on your machine name, right-click Default Web Site, and select New
Administrative Tools, then select Internet Services Manager (Windows 2000/2003) or Internet Information Services (Windows XP). Expand on your machine name, right-click Default Web Site, and select New ![]() Virtual Directory. Follow the wizard, providing an alias, specifying the directory containing the new files, and setting up permissions.
Virtual Directory. Follow the wizard, providing an alias, specifying the directory containing the new files, and setting up permissions.
And that s it for the manual move. You ll now be able to access your application at http://newserver/alias/. Simple!
Where to Put Your Files with an ASP.NET Host
If you re developing your ASP.NET Web application on the server you intend to run it on, you ll find deployment a real doddle: just hand out the address. Don t worry about the security of your source code: IIS will automatically prevent anyone from downloading it. And when it comes to administration? Simply open the project straight from the Web server and start changing. Supercool!
However, if you re exposing your ASP.NET Web application through a host account, it s most likely that you ll be given just one virtual folder, a single application within IIS. That s great if you re just uploading one core application ”you merely have to access your folder via FTP, transfer all your application files, access through your URL, and, hey presto!
More likely, however, is that a developer will have multiple ASP.NET Web applications to upload ”a root application, for example, and a separate project he wants to place in an admin subdirectory. If you do a direct upload from here, the separate admin project will simply not work: its assembly (the DLL file in the Bin folder) is in the wrong location. Try it and you ll see. There are other considerations, too, such as the location of Global.asax.
So, if you re uploading multiple ASP.NET Web applications, follow this threepoint checklist for trouble-free deployment:
-
Create a Bin directory via FTP in your root application folder. Go through every Web application you plan to upload and move its contents (typically your assembly DLL, any referenced components , and a possible debug file) into this one directory.
-
You re allowed only one Web.config and Global.asax file per IIS application. Choose the files you want to use and upload them directly into your root folder. Make sure you do not upload a Web.config file into any other directory: it ll cause an error in that directory, whereas excess Global.asax files simply get ignored.
-
Finally, upload the rest of your files (typically just ASPX pages) into the relevant locations and subdirectories, and then attempt to access via your URL. They ll all automatically find their supporting assemblies in the root Bin folder, plus use the Web.config and Global.asax files you uploaded.
It s always confusing at first, but follow these three steps to take real advantage of your hosting account and save yourself a good few bucks. Good luck!
Uh-oh: Installing IIS After Visual Studio .NET
If you install IIS after Visual Studio .NET, you ll need to do a little reconfiguring before you can successfully create your own ASP.NET applications. Thankfully, it s relatively simple: just look up installing Internet Information Server in the help index. Halfway through the page, you ll find full instructions on how to install IIS, optionally reconfigure FrontPage extensions, and, finally, repair the .NET Framework. Enjoy!
EAN: 2147483647
Pages: 76