Unlinked Subreports
Unlinked Subreports
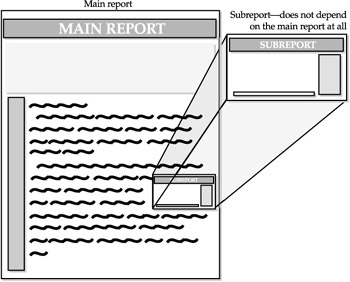
The most straightforward subreport is an unlinked subreport. An unlinked subreport can be thought of as a completely separate report that just shows up on the main report ”there s no connection at all. The subreport has its own layout, its own database connection, and its own selection criteria. It is not affected at all by what appears on the main report.
| Note | Crystal Reports will not create another .RPT file when you create a subreport. Even though you will see another Design tab with separate tables and record selection, the subreport definitions are all contained in the main .RPT file. |
To create an unlinked subreport, you must first create or open at least the skeleton for the main report, and then use the Insert Subreport function to create or import a subreport. Although you can insert a subreport on the report in the Preview tab, you may not be able to accurately tell where it s being placed, so it s best to display the Design tab before you add a subreport.
Start to create the subreport by clicking the Insert Subreport button on the Insert Tools toolbar, or by choosing Insert Subreport from the pull-down menus . The Insert Subreport dialog box will appear (shown on the following page).
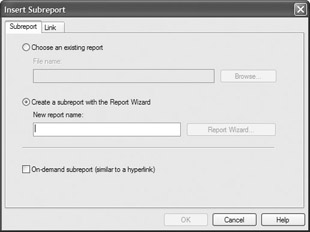
The Insert Subreport dialog box contains two tabs: Subreport and Link. The Link tab, discussed later in the chapter in Linked Subreports, is used to create a linked subreport. The Subreport tab contains two radio buttons , Choose a Report and Create a Subreport, and one check box, On-Demand Subreport (on-demand subreports are discussed later in this chapter). If you ve already created another report that you would like to import as a subreport now, you can click the Choose a Report radio button and type in the path and filename of the existing report, or use the Browse button to navigate to the existing report. When you click OK, a subreport object outline will be attached to your mouse cursor. Place the subreport object in the desired location on the main report. As soon as you place the subreport, you ll notice that another Design tab will appear. If you click it, you ll find the report layout for the report you just imported.
If you wish to create a new subreport from scratch, click the Create a Subreport radio button and give the subreport a descriptive name in the Report Name text box. Remember that you are not creating a new .RPT file when you create a subreport, so the subreport name doesn t have to conform to file-naming conventions. It should be descriptive of the subreport, because the name will appear on the main report Design tab wherever the subreport object is placed. Notice that once you enter a name , the only button that becomes enabled is the Report Wizard button. The OK button at the bottom of the dialog box is still dimmed. This indicates that you must use the Report Wizard to create at least a minimal portion of your subreport. (Once you close the Report Wizard and return to the Insert Subreport dialog box, the OK button will be enabled.) When you click the Report Wizard button, the Standard Report Creation Wizard appears.
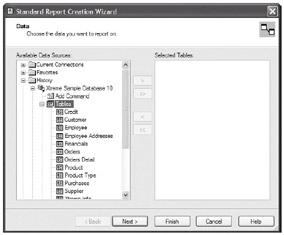
Don t forget that one of the powerful features of subreports is the ability to create reports based on entirely different databases and tables. You can select completely different databases, tables, and fields than are used on the main report. You don t have to complete any of the dialogs in the wizard in order to click Finish and place the subreport on the main report ” you can have a completely empty subreport as a placeholder while you work on other things ” but usually you would choose options in at least the Data and Fields dialogs. All of the same dialogs available in the Standard Report Creation Wizard when creating a main report are available when you re creating a subreport, including Grouping, Summarizing, Group Sorting (TopN), Chart, Record Selection, and Template. You can refine your subreport before you click Finish, or enter minimal information and work in the subreport Design tab directly.
When you ve selected your desired options in the Wizard and clicked Finish, you ll be returned to the Insert Subreport dialog box. Notice that the OK button is now enabled, because you have created enough of a report in the Wizard. When you click OK, you will be returned to the main report Design tab, and a box-like subreport object will be attached to your mouse cursor. Drop the object by clicking in the report section of the main report where you want the subreport to appear. Choose this section carefully ; it typically makes no sense for an unlinked subreport to appear more than once in the main report. For example, if you place the subreport in the details section, the same unlinked subreport will appear over and over again, once for each details record. You ll typically place an unlinked subreport in a report header or footer, unless you want it to repeat on more than one page.
| Tip | Don t forget the Underlay formatting option on the Section Expert (discussed in detail in Chapter 10). You can, for example, easily create a second page header section for your subreport object and format the second page header to Underlay Following Sections. That way, your subreport will print alongside ”not on top of ”any data on the main report. |
When you place your subreport in the main report Design tab, it simply shows up as a box with the subreport name centered inside it. Notice, however, that another Design tab labeled with the subreport name now appears alongside the main report Design tab. If you click the new tab, the subreport Design tab will appear.

You can now move, resize, reformat , and otherwise modify objects in the subreport just as you would in the main report. The subreport will present its own Database Expert and Field Explorer, allow a separate set of formulas to be created, and allow you all the flexibility you have on the main report. However, the subreport Design tab has one limitation: You cannot add another subreport to it ”subreports can be created only one level deep.
| Caution | Since subreports can be only one level deep, an existing report that already contains subreports will not include those subreports when it is imported from the Insert Subreport dialog box. The report will be imported into the subreport Design tab, but the lower-level subreports won t show up. You may need to modify the imported report to make up for the empty space that appears where the subreport used to be. |
You can even preview a subreport in its own Preview tab. With the subreport Design tab displayed, preview the report using the Preview toolbar button, the Refresh button, the F5 key, or the pull-down menu options. A separate Preview tab for the subreport will appear next to the subreport Design tab. This tab will simply add the subreport to the word Preview.
When you now preview the main report, you ll see the subreport where you placed it. By default, subreports are surrounded by a border, so you ll see a box around the subreport. If you do not want to see a box around the subreport, right-click the subreport object and select Format Subreport. On the border tab, you can remove all or some of the four border lines.
If the subreport is not entirely visible (it may be pushed off the right side of the page, or it may be overwriting main report data if you use the Underlay Following Sections section formatting option), return to the main report Design tab and reposition or resize the subreport object. The width of the subreport design tab is based on how wide you make the subreport object in the main report. If you don t have sufficient room in the subreport Design tab to properly place objects, return to the main report Design tab and resize the subreport object.
| Tip | You may save a subreport in its own .RPT file to use elsewhere or on its own. Select the subreport object in the main report Design or Preview tab and choose File Save Subreport As, or right-click the subreport object and choose Save Subreport As from the pop-up menu. |
Drilling Down on Subreports
You have the same flexibility for drill-down reporting in subreports as you do in the main report. If you design a subreport with grouping, hidden sections, or charts , you can drill down in the subreport, too.
When you first preview the main report, the subreport will appear inside it. If you point to the subreport, you ll notice the mouse cursor change to a drill-down cursor, indicating drill-down capability. When you double-click the subreport, it will be displayed in its own Preview tab (but no actual subreport drill-down will occur). If you ve designed the subreport to allow drill-down, you ll notice the mouse cursor displaying a drill-down cursor again in the subreport Preview tab. If you then double-click again, additional drill-down tabs will appear for groups you ve created in the subreport.
If Crystal Reports runs out of room to display all the tabs, two small left-right arrows will appear to the right of the group of tabs. You can use the arrows to cycle through the tabs from the left or right. If you wish to close some of your drill-down tabs, click the red X next to the page navigation controls. This will close the tab you are currently viewing and display the tab to the left. Figure 13-1 shows an unlinked subreport with more tabs than can be displayed at once.
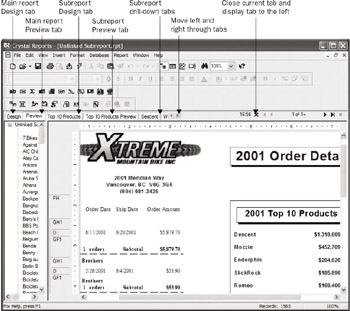
Figure 13-1: Unlinked subreport with Design tab, Preview tab, and drill-down tabs
| Tip | When you add a subreport to the main report, a Design tab for the subreport is created automatically. You can close the subreport Design tab by clicking the red X button. To redisplay a subreport Design tab, display the Design tab for the main report and then double-click the subreport object. You may also select the subreport and choose Edit Edit Subreport from the pull-down menus, or right-click the subreport object and choose Edit Subreport from the pop-up menu. |
EAN: N/A
Pages: 223
- Chapter VIII Personalization Systems and Their Deployment as Web Site Interface Design Decisions
- Chapter IX Extrinsic Plus Intrinsic Human Factors Influencing the Web Usage
- Chapter X Converting Browsers to Buyers: Key Considerations in Designing Business-to-Consumer Web Sites
- Chapter XII Web Design and E-Commerce
- Chapter XV Customer Trust in Online Commerce