Conditional Formatting and Formatting Sections
You ll often want to present your RDC reports in the Report Viewer to allow report interaction in an online environment, instead of having them printed on paper. The Report Viewer provides complete interactive reporting features, such as drill-down, that are invaluable to the application designer. Having control over these capabilities at run time provides for great flexibility.
The Xtreme Orders sample application gives the user the opportunity to specify whether or not to see the report as a summary report only. When this check box is selected, the VB application needs to hide the report details section so that only group subtotals appear on the report. In addition, you need to control the appearance of the report s two page header sections (Page Header a and Page Header b), as well as the two Group Header #1 sections (Group Header #1a and Group Header #1b). This is done to accommodate two different sections of field titles that you wish to appear differently if the report is presented as a summary report instead of a detail report. If the report is being displayed as a detail report, the field titles should appear at the top of every page of the report, along with the subheading and smaller report title. If the report is displayed as a summary report, you want the field titles to appear in the group header section of a drill-down tab only when the user double- clicks a group. Since no detail information will be visible in the main report window, field titles there won t be meaningful.
And finally, you ll want to show Group Header #1a, which contains the group name field, if the report is showing detail data. This will indicate which group the following set of orders applies to. However, if the report is showing only summary data, showing both the group header and group footer would be repetitive ”the group footer already contains the group name, so showing the group header as well will look odd. However, you will want the group header with the group name to appear in a drill-down tab. Therefore, you need to control the appearance of four sections when a user chooses the Summary Report option. Look at Table 27-1 to get a better idea of how you ll want to conditionally set these sections at run time.
| Section | Detail Report | Summary Report |
|---|---|---|
| Page Header b (field titles) | Shown | Suppressed (no drill-down) |
| Group Header #1a (group name field) | Shown | Hidden (drill-down okay) |
| Group Header #1b (field titles) | Suppressed (no drill-down) | Hidden (drill-down okay) |
| Details (detail order data) | Shown | Hidden (drill-down okay) |
You ll notice that, in some cases, sections need to be completely suppressed (so they don t show up, even in a drill-down tab) as opposed to hidden (they show up in a drill-down tab, but not in the main Preview tab). There is a somewhat obscure relationship among areas and sections that make this determination. Specifically, only complete areas (such as the entire Group Header #1) can be hidden, not individual sections (for example, Group Header #1a). However, both areas and sections can be suppressed. To further explain this concept, if you look in the Properties dialog box after you ve selected a section in the design window, you ll see a Suppress property but no Hide property.
This presents a bit of a coding challenge for the Xtreme Orders sample application. First, you need to determine the correct combination of area hiding and section suppressing that sets what appears in the Preview window and in a drill-down tab. If an area is set to Hide, none of the sections in it will appear in the main Preview window. And when the user drills down into that section, you will also want to control which sections inside the drilled-down area appear in the drill-down tab. Then, you must find where to set the Hide property for a particular area. You must also find where to set the Suppress property for sections inside the hidden area, or other sections that aren t hidden.
Since the Hide property is available only for an entire area, you need to set the HideForDrillDown property for the appropriate Area object within the Areas collection. Since the Suppress property needs to be set for individual sections, you can just refer to the individual sections in the RDC design window by name, setting the Suppress property for them as needed. Consider that the Page Header b section has been given the name PHb in the Properties dialog box (it was named Section 3 when the report was imported). Other sections have been given more descriptive names in the RDC design window, as well. Group Header #1a is named GH1A, and Group Header #1b is named GH1B.
Keeping in mind the preceding discussion and the hide and suppress requirements outlined in Table 27-1, look at this code from the sample application:
 'Hide/show sections
 With Report
 If chkSummary Then
 .Areas("D").HideForDrillDown = True
 .PHb.Suppress = True
 .Areas("GH1").HideForDrillDown = True
 .GH1A.Suppress = False
 .GH1B.Suppress = False
 Else
 .Areas("D").HideForDrillDown = False
 .PHb.Suppress = False
 .Areas("GH1").HideForDrillDown = False
 .GH1A.Suppress = False
 .GH1B.Suppress = True
 End If  'chkSummary
 End With  'Report
Notice that both Area objects for the details and Group Header #1 areas are being formatted, as well as individual sections. The areas must be formatted from their collection, whereas sections can be manipulated directly below the Report object by name.
| Note | You can navigate deeper into the object hierarchy and actually set the Suppress property for members of the Sections collection inside the Area object. Although this is a little more code intensive , it is required if you are using an external .RPT file, which doesn t expose individual section names as does the RDC ActiveX designer. |
The Format Event
Another benefit that only the RDC provides to developers is the Format event. This event is fired every time the processing of an individual report section begins. Consider the way the first page of a report might be processed . First, the overall report is prepared ; then the page header prints, followed, in order, by the report header (since this is the first page of the report), the first group header, all the details sections in that group, the first group footer, and so on. Each time any of these sections begins to print (including when the report is prepared ), its respective Format event fires.
You can intercept these formatting events and change the behavior of the section, or of objects within the section. This gives you complete Visual Basic functionality when it comes to conditional formatting or section formatting. In older integration methods that use .RPT files, you must use Crystal Reports conditional formulas or the Highlighting Expert to set background colors for sections, highlight fields over a certain value, and perform other formatting based on certain conditions. While the RDC continues to support that flexibility, you can also base individual section and object formatting on VB code.
| Tip | While these format events are automatically exposed when you use the internal RDC ActiveX Designer, you can use them when integrating external .RPT files with the RDC. This can be accomplished by declaring a variable of type Section using the VB keycode WithEvents. For example, the following code will allow you to use the Format event with an external report: Dim WithEvents detailSection As CRAXDRT.Section |
To add code for any Format event, simply double-click a section in the RDC design window. This displays the Format event in the code window for the particular section you double-clicked. You can also right-click the designer in the Visual Basic Project Explorer and choose View Code from the pop-up menu. In either case, each report section appears in the object drop-down list in the upper-left corner of the code window. The only available procedure for each report section is Format, which will appear in the procedure drop-down list in the upper-right corner.
You have all the power of VB at your disposal to control the appearance and formatting of sections and objects, or the content of text objects, while the report is being formatted. This allows you to write VB code to determine how to format a field in the current section being formatted (perhaps to set the background or font color of an object according to some VB code). You can also change the formatting of the entire section, as demonstrated in the following code from the Xtreme Orders sample application:
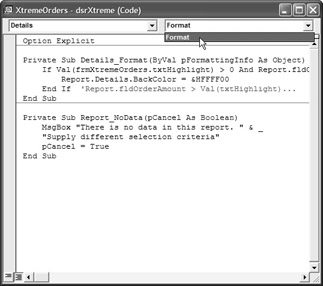
 Private Sub Details_Format (ByVal pFormattingInfo As Object)
 If Val(frmXtremeOrders.txtHighlight) > 0 And _
 Report.fldOrderAmount.Value > Val(frmXtremeOrders.txtHighlight) Then
 Report.Details.BackColor = &HFFFF00
 End If  'Report.fldOrderAmount > Val(txtHighlight)...
 End Sub
| Tip | The pFormattingInfo argument that is passed into the module is an object that exposes three read-only properties that return true or false: IsEndOfGroup, IsStartOfGroup, and IsRepeatedGroupHeader. You can read the contents of these properties to help determine how to handle logic in the Format event. |
This code is contained in the Format event for the details section (notice that the report section has been renamed Details from its default name of Section 6). Every time the details section begins to format, this event fires. At that time, the contents of the Highlight text box on the Print Xtreme Orders form are checked for a value. If the user has supplied a value, and the fldOrderAmount database field from the report is greater than the value the user supplied, the background color of the details section is set. This logic replaces the parameter field and conditional formatting used in many other similar reporting situations.
Obviously, many other flexible and complex types of formatting and manipulation can occur during the Format event. A common use of this manipulation is to replace formula fields on the report with text objects, and use the SetText method to change the contents of the text objects from within the Format event. Essentially, this extends the complete power of the Visual Basic language to objects you place on your report.
The RDC exposes some additional events to the report-processing cycle. Not only can you trap the Format event for every report section, but the Report object itself fires several events as it processes. An event of particular interest is NoData. Look at this code fragment:
 Private Sub Report_NoData(pCancel As Boolean)
 MsgBox "There is no data in this report. " & _
 "Supply different selection criteria"
 pCancel = True
 End Sub
If the report contains no data when it processes, the NoData event will fire. You may trap this event and perform special handling. In particular, by setting the pCancel value to true, you can cancel the remainder of report processing. Be aware, though, that canceling report processing won t stop the Report Viewer from appearing ”you need to add a global variable or some other flag to indicate that the Report Viewer should not be displayed in this event.
As you search through RDC documentation, you may see references to Formatting Idle or other processing time references. Certain object properties can be set only during certain times when the report is processing. This is mostly significant when writing code in the Format event. If you attempt to set a property that can t be set during that particular report-processing time, you ll receive either error messages or unexpected results. Look for a discussion of formatting modes by searching the online Help for Format event.
| Caution | Formatting events may fire more often than you might expect because of the multiple passes Crystal Reports must make as it processes the report. This may happen, for example, when the RDC encounters a Keep Together section option at the end of a page. If you place code to accumulate values in the Format event without accounting for these multiple passes, your accumulations will be inaccurate. The RDC includes a feature called Report Variables that can keep track of these reporting passes . If you use Report Variables instead of your own variables, values will accumulate only when an actual logical change occurs to a report section. Search the online Help file for Report Variables to get complete details. |
EAN: N/A
Pages: 223