Using Events
A powerful feature of Crystal Enterprise is the ability to base report and program object scheduling on events. An event consists of one of three different general occurrences: the existence of a file somewhere on a drive, the completion of another scheduled job (either just the completion, or specifically the success or failure of the job), or a simple trigger that an administrator can initiate from within the CMC. Events allow very powerful control of scheduling from within CE. For example, you could potentially schedule a program object to execute a custom data warehouse update program, which writes data extracts to a specific file location. Reports based on the new data warehouse files will run after a specific file is detected in that location. And, given the successful completion of the reports, another program object could run a batch file that deletes the data warehouse files.
Before they can be used for scheduling, events must be defined in the Crystal Management Console. Begin by clicking Events in the Define area of the main CMC screen. The Events screen will appear showing any existing events that have already been defined (just column headings will appear if no events are yet defined). Click the New Event button in the upper right-hand corner. The New Event screen will appear. Select the type of event you wish to create from the drop-down list at the top of the screen.
-
File Specify a descriptive name and optional description for the file-based event. If your CE system includes more than one Event Server, choose the server you wish to look for the existence of the file from the Server drop-down list. Then, type the full pathname and filename of the file that the Event Server will look for to trigger the event. Remember that the filename will be used by the Event Server, not necessarily the computer you are accessing the CMC from. So, if you specify a C: drive, the file will need to reside on the chosen Event Server s C drive in order for the event to be triggered. Click OK to save the event when you re finished.
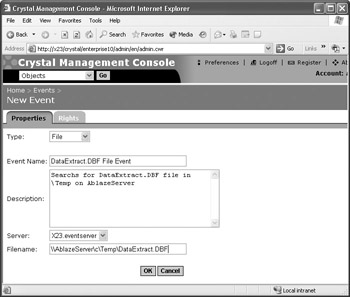
Caution Remember that the Event Server s sole task is to trigger file events. In order for it to do this successfully, the Event Server NT Service must have sufficient rights to read any network file shares that may be specified in a file event. You may need to change the NT account the Event Server uses to something other than the System account for it to properly access network shares. This can be done in the Windows Control Panel s Administrative Tools Services area, or using the Crystal Configuration Manager (discussed later in this chapter).
-
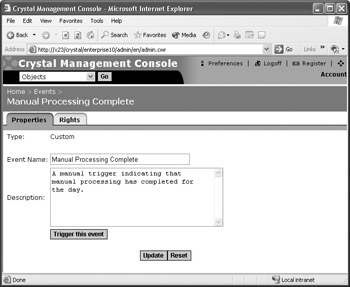
Custom Specify a descriptive name and optional description for the custom event. No other specifications are necessary. Once you click OK, the event will be saved and the screen will reappear with a Trigger This Event button displayed below the event description. Any time you wish to trigger the custom event, you need merely select the event from the CMC Events link and click the Trigger This Event button.
-
Schedule Specify a descriptive name and optional description for the schedule event. Then, choose whether the event will be triggered only if the source job runs to success, fails, or simply completes in success or failure. Click OK to save the event.
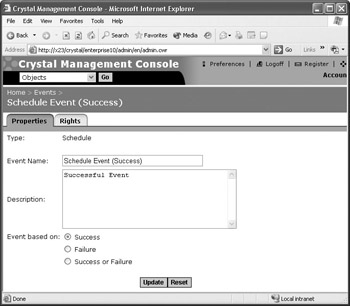
Once you ve created and saved the event, you may also click the Rights tab in the Event screen to set rights for the event. As with most other objects in Crystal Enterprise, you may choose to make the event only available for scheduling to certain groups or users.
Scheduling with Events in the CMC
Once you ve created one or more events, you can use them when scheduling reports or program objects in the Crystal Management Console. This is accomplished by selecting the report or program object you wish to schedule with events, and making choices from the Schedule tab after choosing Organize Objects.
| Note | Events can only be used for scheduling from the Crystal Management Console or a custom web application developed with the Crystal Enterprise SDK. You cannot schedule with events in the CE Web Desktop (ePortfolio). |
To schedule an object with events, begin by locating the report or program object you wish to schedule based on an event. Either click Folders or Objects from the Organize area of the main CMC screen. If you click Objects, you ll see all objects added to the CMS. If you click Folders, choose the desired folder, which will show only objects contained within that folder. Once you ve found the object you wish to schedule, click its name. The object s properties window will appear. Click the Schedule tab. The schedule screen will appear, as shown in Figure 26-1.
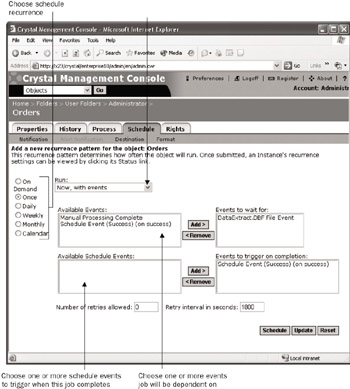
Figure 26-1: Scheduling with events in the CMC
Begin by choosing some sort of recurring schedule with one of the displayed radio buttons (even choosing Once will suffice ”you must choose something other than On Demand). From the Run drop-down list, choose one of the available options that contains the words With Events (you won t be able to use any event dependencies without choosing a With Events choice). Once you make this choice, the screen will redraw with Available Events and Available Schedule Events boxes appearing below the Run drop-down list. All defined events that you have rights to will appear in the Available Events list. All schedule events you have rights to will appear in the Available Schedule Events list.
In the Available Events list, select one or more events you want this job to be dependent upon and add them to the Events to Wait For list by clicking the right arrow ( all events you add to this list must be triggered in order for this job to run). If you want this job to trigger a schedule event (on simple completion, or on specific success or failure, depending on how the event was defined), choose one or more schedule events from the Available Schedule Events list. Then, add them to the Events to Trigger on Completion list by clicking the right arrow.
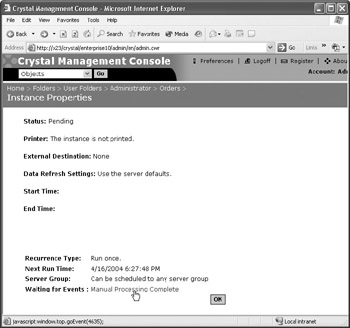
Once you ve made all desired selections, click the Schedule button. The object s History screen will display with the instance you just scheduled appearing at the top (most probably with a Pending or Recurring status). If you want to ensure that the instance is waiting for an event to be triggered, click the status (the words Pending, Recurring, and so forth). The Instance Properties screen will appear, with any pending events noted at the bottom next to the Waiting for Events label.
EAN: N/A
Pages: 223